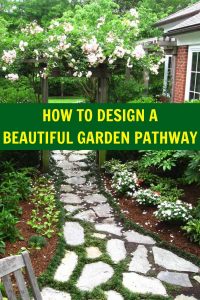
How to Design a Beautiful and Functional Garden Pathway
The first garden I ever called my own was a patch of grass bordered by overgrown hedges and hopeful dreams. I didn’t have a plan—just a rusty trowel, a few seed packets, and this overwhelming urge to make something beautiful grow. But with every step I took across the yard, I found myself carving accidental trails in the soil. Rain turned them to mud. Spring blooms got trampled. And slowly, it dawned on me: my garden needed more than plants—it needed paths. It needed direction.
One summer morning, barefoot and determined, I started placing stones, not even spaced properly, just where it felt right. That moment changed everything. What began as a clumsy attempt turned into a ritual—marking out where my feet, and my heart, naturally wanted to go. That’s when I truly understood what a garden pathway can be. Not just a means of getting from one place to another, but a way to bring order to chaos, softness to structure, and personality to the wild green tangle of life.
A well-designed path brings rhythm and flow. It says, “Come this way.” It guides the eye, the body, and the mood. Whether you choose winding gravel trails that invite a pause, or bold, clean pavers that point you home, a garden path is a subtle storyteller.
If you’ve ever looked out at your garden and thought, “Something’s missing,” chances are, it’s not another plant—it’s a path. Let me walk you through what I’ve learned, step by step, in creating a garden that not only grows—but invites you in.
Choosing the Right Material
I always tell people—start by thinking about how you want your garden to feel. Natural? Formal? Romantic? Playful? Your path’s material should reflect that mood.
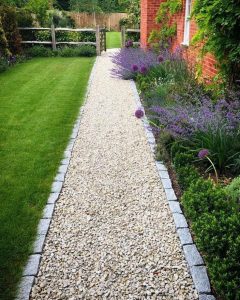
Gravel: My go-to when I want something earthy and low-maintenance. It drains beautifully and looks great winding through herb gardens. But be warned: it’ll wander without borders. I now always edge my gravel with bricks or timber to keep it tidy.
Bricks and Pavers: If you’re going for timeless and structured, these are your best friends. I use them in high-traffic areas like between the back door and veggie beds. But here’s a tip—don’t skip the sand and gravel base. I did once, and the result was an uneven mess within a year.
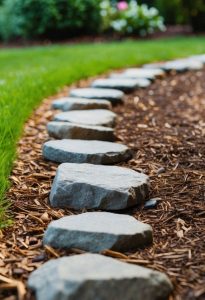
Stepping Stones: These feel like a fairy tale. I space mine to match a natural stride and plant creeping thyme in between. Soft on the eyes, soft underfoot, and it smells incredible after rain.
Mulch or Wood Chips: Ideal for wild, woodland spaces or quick, informal paths. I use the wood from pruned trees to save money. But they decompose quickly, so be ready to refresh them once or twice a year.
Designing for Function and Flow
A good path feels intuitive. Before I laid my current paths, I walked the garden over and over, noticing where I actually stepped. Turns out my feet knew more than my sketches.
Curved Paths: Great for smaller gardens. I use them in flower beds to encourage slow, thoughtful strolls. Curves make space feel bigger, like you’re always discovering something new.
Straight Paths: When you need efficiency—like from the kitchen door to the compost bin—a straight path with bricks or stone makes sense.
Mixing It Up: My own garden uses both. A winding gravel path through the roses leads to a straight paver walkway to the greenhouse. Form meets function.
Tip: Make your path at least 2 feet wide (3 feet if it’s a main walkway). Anything narrower feels awkward, especially once plants start spilling over.
Blending the Path with the Landscape
Your garden path shouldn’t feel like it was dropped in by a contractor. It should feel grown, not placed.
Material Matters: In my wildflower patch, irregular flagstones work better than perfect pavers. In my formal front yard, neatly edged bricks give structure.

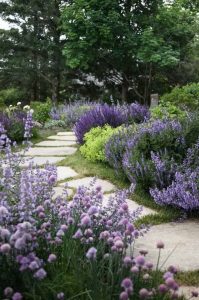
Borders & Edging: I line paths with lavender and catmint—plants that lean in gently but never overrun. They soften the edges and bring color, scent, and movement.
Lighting: Solar path lights were one of my best investments. They add a quiet magic at night and make navigating safer. I’ve also hung tiny string lights from a nearby trellis for twilight charm.
Maintaining a Long-Lasting Path
One thing I didn’t consider when I first built my pathways was long-term maintenance. No matter what material you use, paths need a little care to stay functional and attractive. Gravel paths benefit from occasional raking and replenishing, while brick or paver paths may need weeds pulled from the cracks or stones re-leveled over time.
For stone or brick paths, I always make sure there’s a solid foundation of compacted gravel or sand underneath. Without it, stones can shift, sink, or become uneven, which leads to frustrating repairs later.
If I use mulch or wood chips for a more natural path, I refresh it every year to keep it looking tidy. I also keep an eye on nearby plants, making sure they don’t grow too aggressively and cover the walkway completely. Some spillover is charming, but if the path disappears entirely, it defeats the purpose!
Tip: Always start with a solid base. Whether it’s sand, gravel, or compacted soil, it keeps everything from sinking, shifting, or turning into a tripping hazard.
Step-by-Step Guide to Building a Simple Gravel Path
Step 1: Plan It Out
- Walk your space and mark the path with string or hosepipe.
- Consider curves and width.
Step 2: Dig & Prepare the Base
- Dig out about 4 inches deep.
- Add 2–3 inches of crushed rock or sand, tamp it down.
Step 3: Lay the Border
- Add edging material (bricks, metal, or timber) to keep gravel in place.
Step 4: Add Gravel
- Pour in gravel (pea gravel or decomposed granite), rake it level.
- Spray lightly with water to help it settle.
Step 5: Maintain
- Check monthly for weed sprouts.
- Refill thin spots and re-rake as needed.
FAQs
1. What’s the easiest garden path to install?
Gravel is the easiest and most forgiving. With basic tools and a weekend, you can build a path that looks beautiful and functions well.
2. Can I build a path without digging?
Yes—stepping stones or mulch can be placed over landscape fabric, but without a dug-out base, they may shift or sink over time.
3. What’s the best width for a garden path?
Aim for at least 2 feet for personal walkways. For high-traffic paths or ones used for wheelbarrows, 3 feet or more is ideal.
4. How do I keep weeds out of my path?
Use a weed barrier fabric under gravel or mulch. For pavers, sweep polymeric sand between joints to block weed growth.
5. Can I mix materials in one path?
Absolutely! I’ve mixed gravel with pavers for texture and practicality. Just make sure each section has a solid foundation and flows visually.
Final Thoughts
A garden path isn’t just a feature—it’s a feeling. It’s where muddy feet meet peaceful mornings. Where you pause to smell basil or follow the bees. Whether yours winds through sunflowers or leads to a potting bench, it tells a story. And it’s one worth stepping into, one stone at a time.
Now it’s your turn. Walk through your garden barefoot or in boots—notice where your feet want to go. Picture a winding gravel path, or crisp brick walk leading you somewhere peaceful. Start with one section. It doesn’t need to be big. Just meaningful.
Snap a before-and-after picture and share it with others—you’ll inspire more people than you think. Your pathway might just be the missing rhythm your garden’s been waiting for.