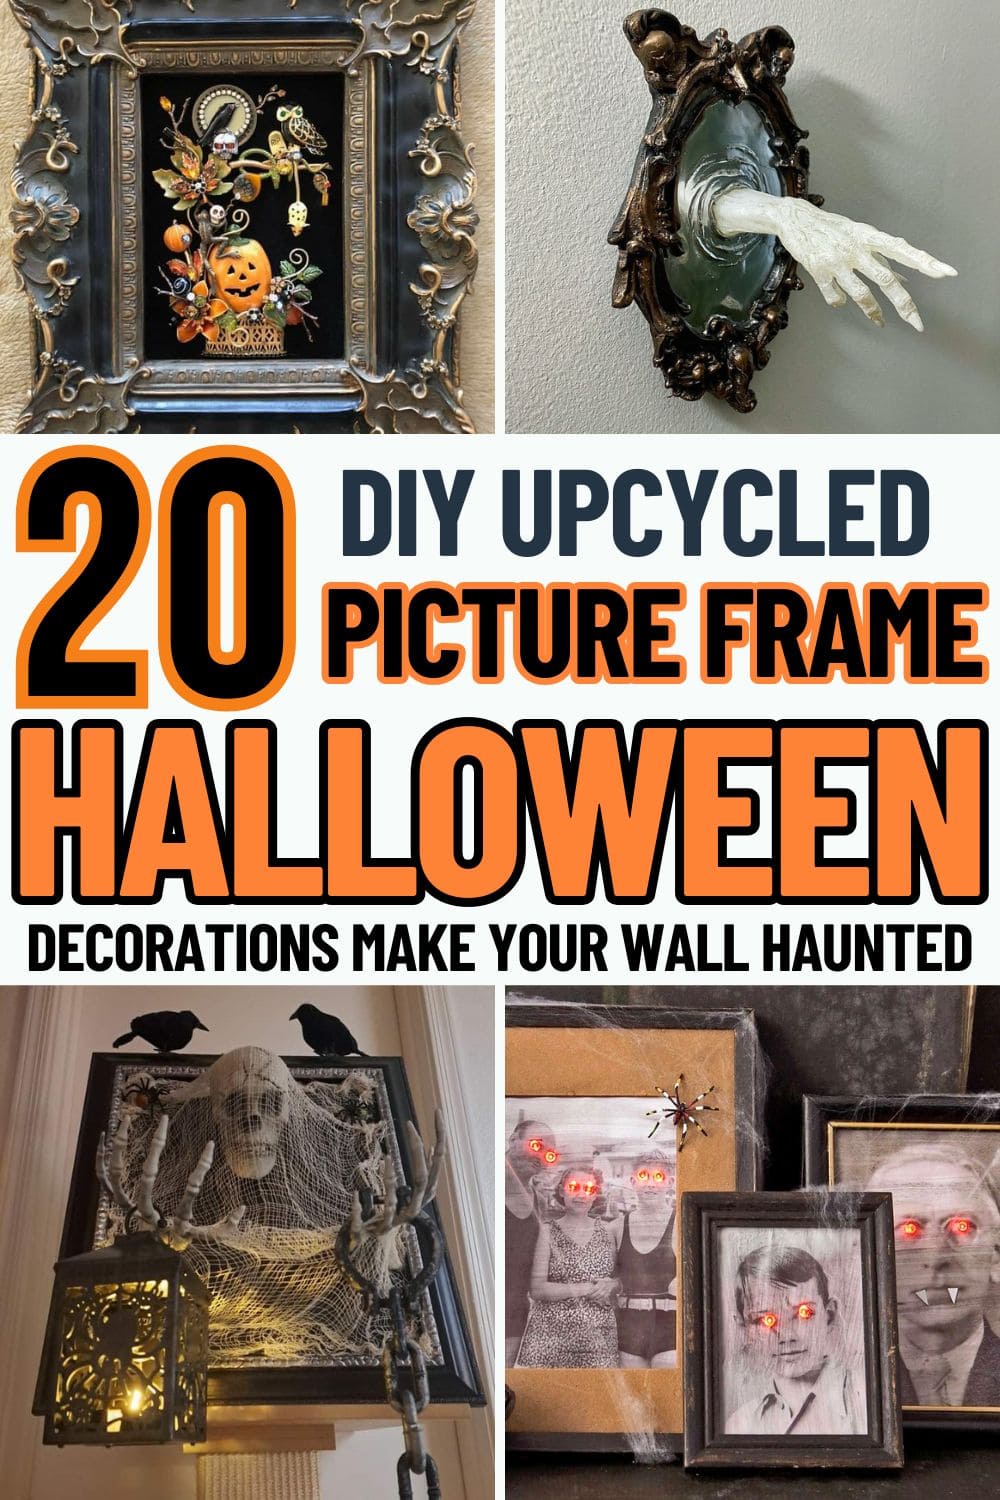
20 Spooky DIY Upcycled Picture Frame Ideas for Haunted Halloween Decor
Halloween is the perfect excuse to get a little weird with your decor, and upcycled picture frames are one of the easiest ways to make a big impact without spending much. You don’t need to be a professional crafter, just a bit of glue, some creepy odds and ends, and an old frame is all it takes to turn something forgotten into something frightfully fun.
These spooky DIY ideas add just the right amount of haunted charm to your space, and each one has its own personality.
Some are bold and theatrical, others are eerie and elegant. All of them are sure to draw curious looks and maybe even a few chills. Ready to create something spine-tingling?
See more: 22 Budget-Friendly Halloween Door Decor Ideas That’ll Still Impress Your Neighbors
#1. Haunted Mirror Frame with Glowing Eyes
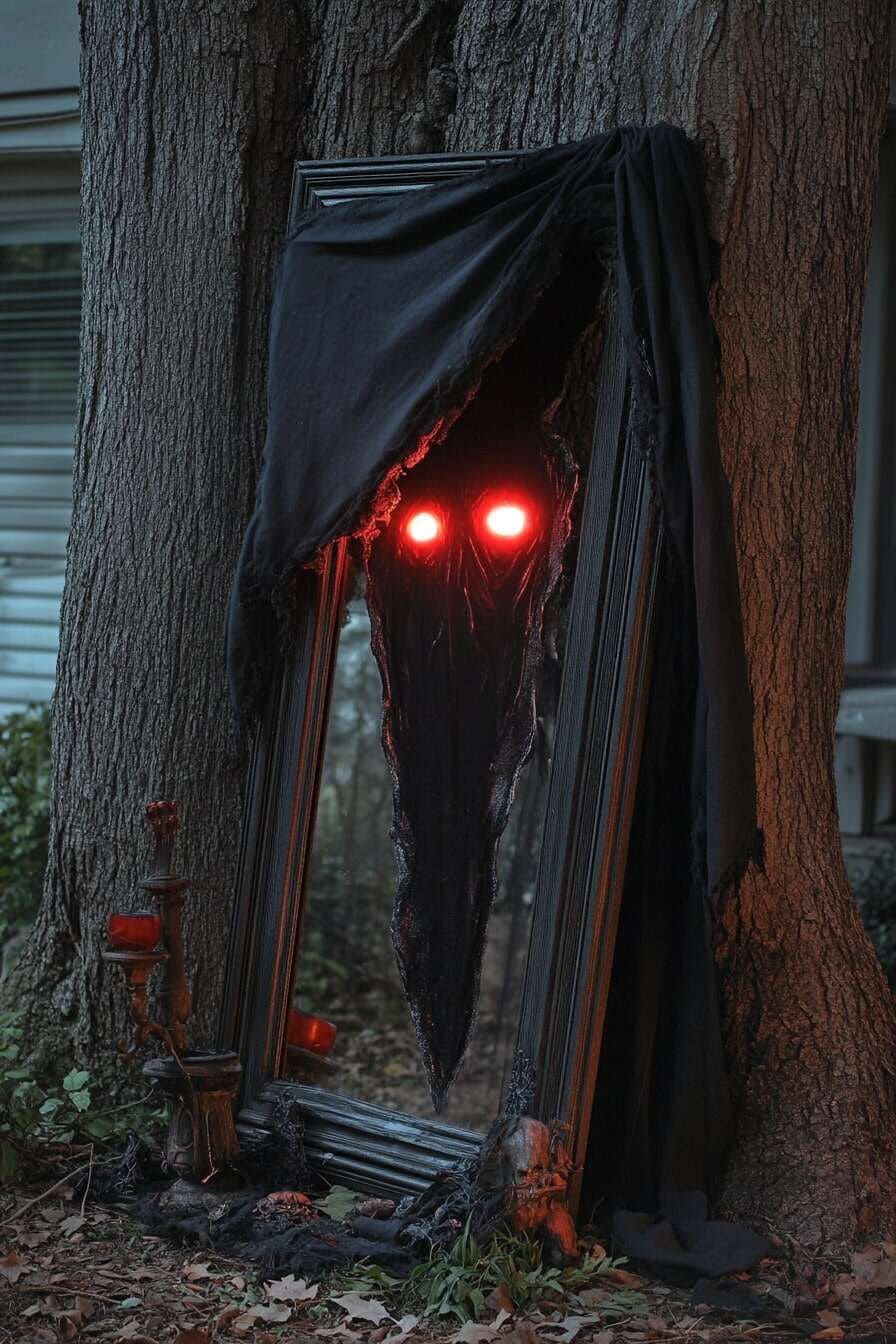
This eerie upcycled picture frame takes Halloween ambiance to a haunting new level. Set against the trunk of a tree, it feels like a cursed portal to the underworld.
You can see a tattered black cloth drapes ominously over the top, giving way to a hollowed shadowy figure with glowing red eyes that pierce through the night. It’s more than just a prop, it’s a chilling presence in your yard that makes guests hesitate before stepping closer.
Also, use this frame to transform a quiet corner of your garden into a scene straight from a horror movie. Bonus, it requires minimal tools, just your imagination and a flair for the dramatic.
Materials Needed
- 1 large picture frame (24″×36″)
- Black cheesecloth or tattered fabric (2 yards)
- 2 red LED push lights
- Black spray paint (matte)
- Strong adhesive
- Optional: Skull, candelabra, moss, or Halloween props
Step-by-step Guide
Step 1: Spray paint your picture frame black if it isn’t already. Let it dry completely before assembling.
Step 2: Tear or burn the edges of your fabric slightly to give it a ragged, ghostly look. Then drape it from the top corners of the frame.
Step 3: Place or glue your red LED lights at eye level inside the frame. You now cover the light source lightly with sheer black fabric to diffuse the glow.
Step 4: Anchor the frame against a tree or wall for stability. Then secure with hidden wires or stakes if used outdoors.
Step 5: Add moss, faux bones, or spooky accessories to the base to give your setup a full horror vignette.
#2. Sweet Ghost in a Golden Frame
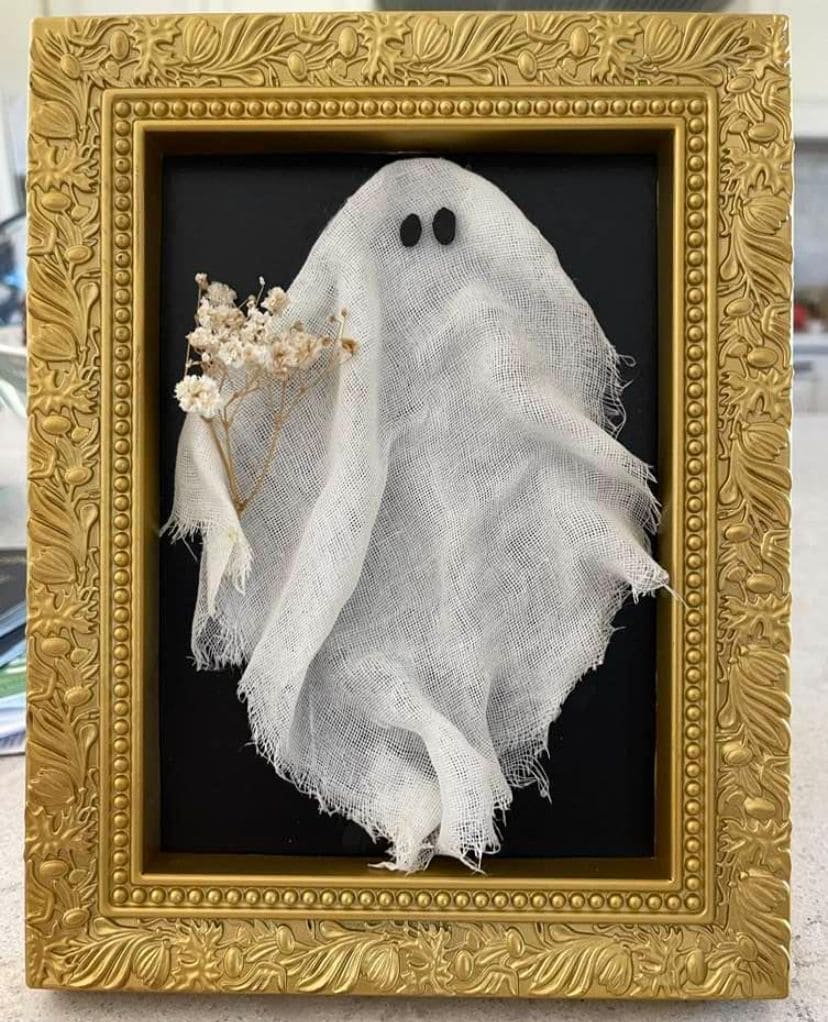
Crafted from cheesecloth and gently shaped to resemble a ghostly figure, this little phantom sits against a deep black backdrop, accented with dried baby’s breath for a touch of unexpected delicacy.
Plus, the ornate gold frame gives it a regal, almost portrait-like quality, perfect for a mantelpiece or shelf vignette.
You can create your own ghostly masterpiece in just minutes, making it a lovely afternoon craft with kids or a subtle Halloween touch for your home’s cozier corners.
Materials Needed
- 1 ornate gold picture frame (8″×10″)
- Piece of black cardstock or fabric
- Cheesecloth (12″×12″)
- 2 small black felt ovals
- Glue stick or double-sided tape
- Dried flowers (baby’s breath or similar)
Step-by-step Guide
Step 1: Remove the glass from your frame and secure black cardstock or fabric to the backing as your background.
Step 2: Cut your cheesecloth into a ghost shape like loose, flowy, and a little uneven works best for that ethereal vibe.
Step 3: Glue or tape the cheesecloth ghost to the background, letting the edges curl slightly for depth.
Step 4: Add two black felt eyes or draw them on with marker.
Step 5: Finally, tuck in a tiny dried flower bundle under one arm to give your ghost a sweet personality.
#3. Halloween Jewelry Collage in Ornate Frame
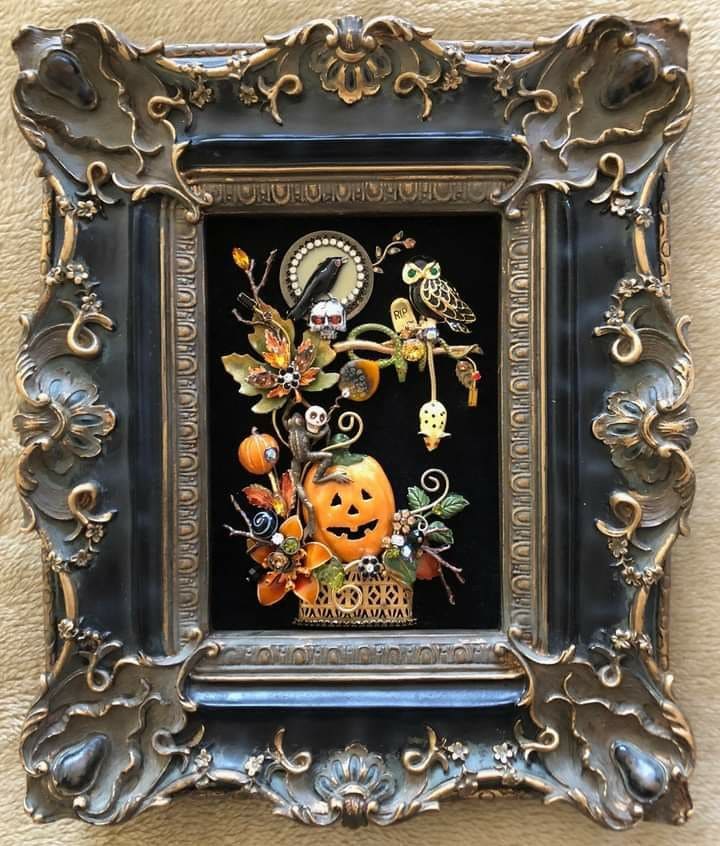
Wow, this one-of-a-kind piece feels like Halloween spilled out of a treasure chest. Built inside an extravagant baroque-style frame, this spooky collage brings together brooches, beads, buttons, and charms to create a magical fall scene.
In addition, a grinning jack-o’-lantern anchors the bottom, while owls, ravens, skeletons, and glittering leaves climb upward like an enchanted tree. The black velvet background adds drama and depth, making every element stand out like a relic from a haunted jewelry box.
If you love crafting with forgotten bits and costume jewelry, this is the perfect way to turn them into a captivating keepsake.
Materials Needed
- 1 ornate vintage-style frame (12″×14″ or larger)
- Black velvet or felt backing board
- Assorted Halloween jewelry pieces (pins, brooches, buttons, charms)
- Small faux pumpkins, florals, or paper leaves
- Hot glue gun
- Optional: rhinestones or mini skull beads
Step-by-step Guide
Step 1: Line your frame backing with black velvet and secure tightly inside the frame.
Step 2: Arrange larger centerpiece items first, like the pumpkin, owl, or floral clusters.
Step 3: Fill in gaps with brooches, mini charms, and accents. Layering gives a 3D jewel-box look.
Step 4: Use hot glue to attach each piece firmly, especially heavier ones near the center or base. Then you can hang it in a well-lit spot so the sparkle and intricate details shine through.
#4. Haunted Multi-Eye Portrait Frame
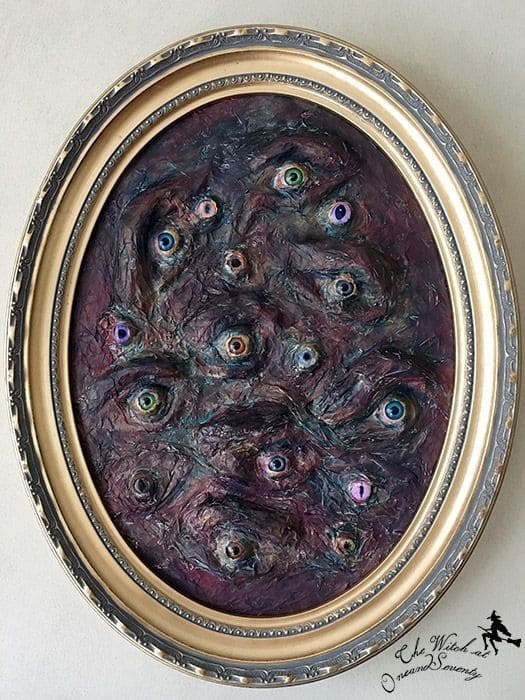
Look at this eerie, textured art piece, it turns an ordinary frame into something otherworldly. Set inside a vintage oval frame, layers of wrinkled, painted paper pulp or fabric form a fleshy, twisted surface from which dozens of unblinking eyes peer outward.
Moreover, each eye is sculpted and colored to look disturbingly real, making you feel like the piece is following you across the room. It’s super disturbingly elegant.
This is the kind of wall art that leaves an impression. Hang it in a dim hallway or haunted gallery wall for ultimate effect.
Materials Needed
- 1 vintage oval picture frame (14″×18″)
- Air-dry clay or paper mache pulp
- 12-15 plastic doll eyes
- Acrylic paints (black, plum, green, purple, metallics)
- Mod Podge
- Hot glue and sculpting tools
Step-by-step Guide
Step 1: Sculpt a base using air-dry clay or layered paper pulp, creating swirls, wrinkles, and raised textures across the backing board.
Step 2: While the material is soft, press in the doll eyes at random positions and angles, then let dry completely.
Step 3: Paint the entire surface using deep purples, blacks, and greens, blending them for a bruised, aged look. Highlight edges for dimension.
Step 4: Add gloss to the eyes and seal the entire piece with Mod Podge or matte spray once dry.
Step 5: Fit the panel into your ornate frame and hang with care because it will stare back at you, haha.
#5. Gothic Raven Silhouette Hanging Frames
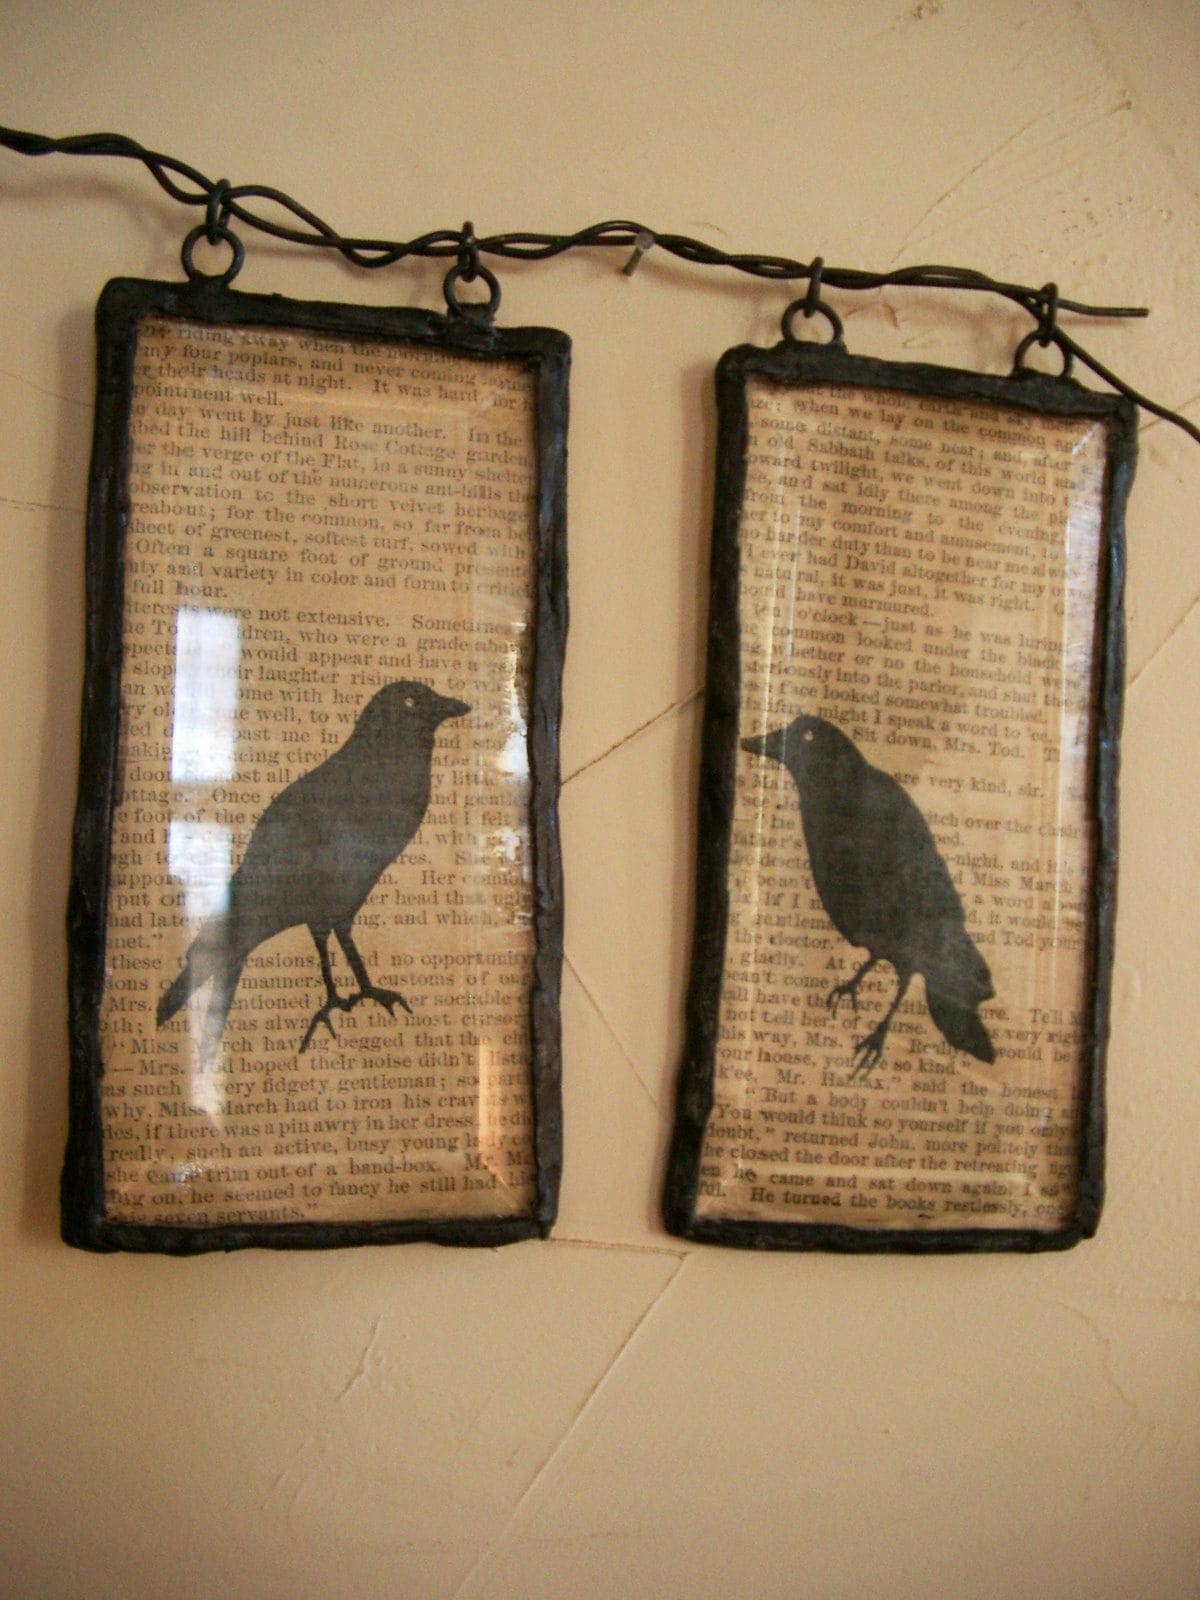
Elegant in their simplicity, these suspended raven silhouettes channel a quiet, haunting mood. Each image printed against torn book pages hangs inside a narrow glass pane, framed with rustic soldered edges and looped from a twisted wire branch.
They feel like something unearthed from an old attic. If you appreciate subtle, literary-inspired Halloween decor, this one speaks volumes. The project uses recycled materials and brings a museum-like aesthetic to your seasonal setup.
Of course, you can easily hang them in a narrow hallway, above a desk, or near a flickering candle to let the shadows tell their story.
Materials Needed
- 2 small glass photo frames (5″×7″) with metal edges or soldered look
- Old book pages (torn or aged)
- Black raven silhouette cutouts (printable or hand-cut)
- Twisted branch
- Small jump rings
- Glue stick or Mod Podge
Step-by-step Guide
Step 1: Cut book pages to fit inside the frames, then glue the raven silhouette cutouts on top.
Step 2: Place the designs inside the glass panes, securing them shut if not already sealed.
Step 3: Next, you just attach small hooks or rings to the top of each frame.
Step 4: String the frames along a wire or branch and twist it slightly for a hand-forged appearance. Finally, mount the entire piece onto your wall using nails.
#6. Haunted Family Portraits with Glowing Eyes
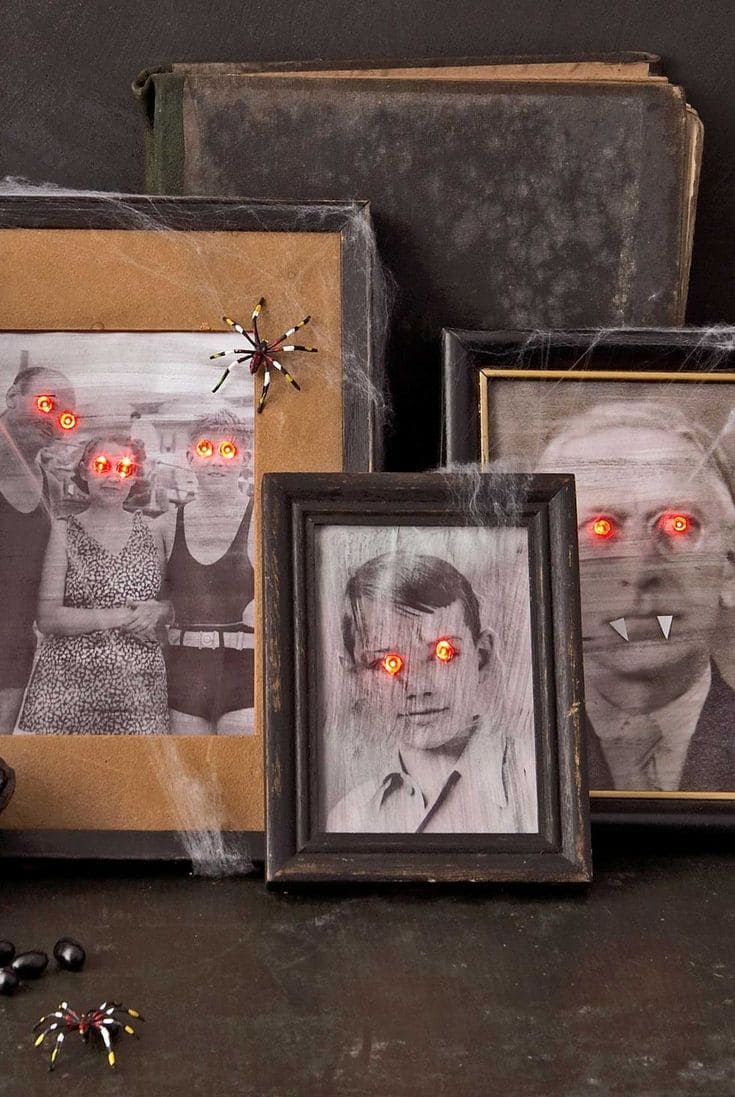
These aren’t your ordinary vintage family photos. One glance, and you’ll feel those glowing red eyes pierce right through you.
This upcycled Halloween decor turns old black-and-white portraits into creepy curiosities by adding LED lights behind the eyes and maybe a fang or two for effect.
Dressed in old-timey clothes and staring with unholy intensity, these photos are perfect for mantels, shelves, or creepy corner vignettes. With a little craftiness, you’ll give these forgotten relatives a whole new afterlife.
Materials Needed
- 3-4 vintage-style picture frames (varied sizes)
- Black-and-white portraits (copies of real or found photos)
- Red LED lights (flashing or solid)
- Craft knife and hot glue gun
- Cardboard backing and batteries
- Fake spider webs, plastic spiders, and optional vampire fangs
Step-by-step Guide
Step 1: Print your photos on matte paper. Then you cut out small holes where the eyes are.
Step 2: Insert red LEDs behind each eye, securing with tape or glue on the back.
Step 3: Mount the photo on cardboard backing and make room for the battery pack behind it.
Step 4: Finally, decorate the frame with cobwebs and spiders, and add fangs or drawn-on scars for a dramatic touch. Then switch on the lights and let the portraits do the scaring.
Tip: Hide a motion sensor nearby to activate lights or sound when someone walks past.
#7. Lantern-Wielding Skeleton Wall Frame
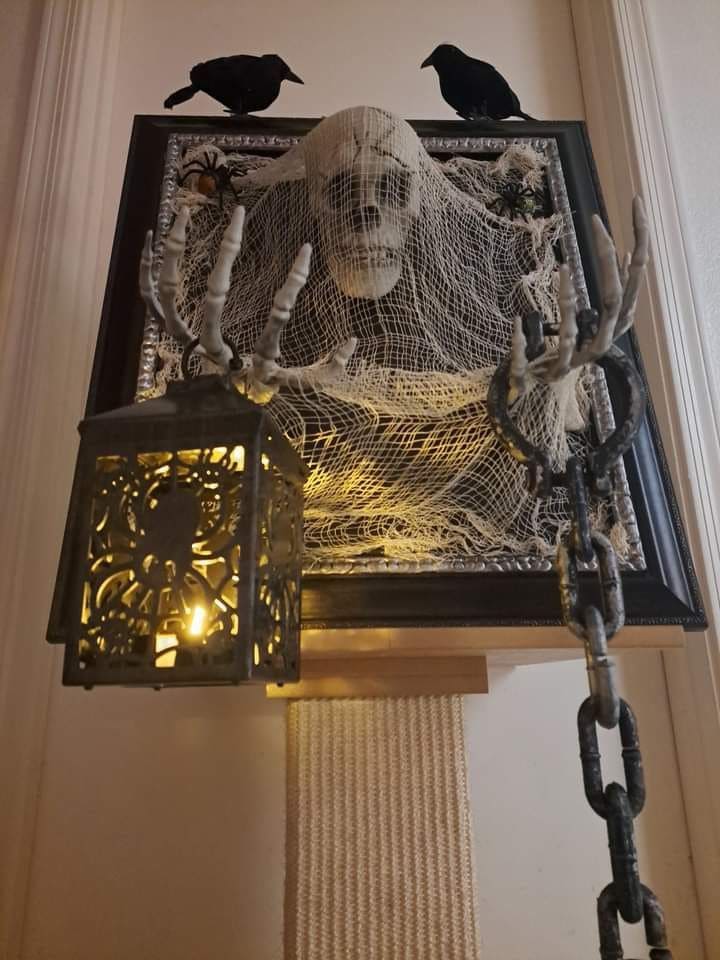
How about elevating your hallway into haunted territory with this striking wall-mounted skeleton lantern holder?
Suspended beneath a black frame wrapped in tattered gauze, a ghostly skull peers forward like it’s guarding a crypt. Two skeletal arms extend outward on chains, gripping a vintage-style lantern that casts a flickering, moody glow.
Also, you add a pair of perched crows on top, and this piece feels like it’s come straight from a haunted tower. It’s sculptural, eerie, and unforgettable, a show-stopper for your entryway or stairwell.
Best of all, it uses mostly thrifted or dollar-store parts, making it a high-impact piece without a frightful cost.
Materials Needed
- 1 black picture frame (16″×20″) with silver trim (optional)
- Plastic skull and skeletal arms with hands
- Cheesecloth or gauze (2 ft)
- Hanging lantern with LED candle (battery-operated)
- Plastic chain (3 ft)
- 2 plastic crows or ravens
- Hot glue, screws, and strong mounting hooks
Step-by-step Guide
Step 1: Attach the skull inside the frame and drape gauze loosely over it, securing ends at the corners with glue.
Step 2: Affix the skeleton hands to extend below the frame using screws or strong adhesive, positioned to hold the lantern.
Step 3: Hang the lantern using the chain, letting it dangle just below the hands. You should adjust until balanced.
Step 4: Place the plastic crows on the top corners of the frame to add extra haunted-house vibes.
Step 5: Finally, mount the entire piece to the wall using heavy-duty hooks or anchors for safety.
#8. All-Black Haunted Figurine Frame
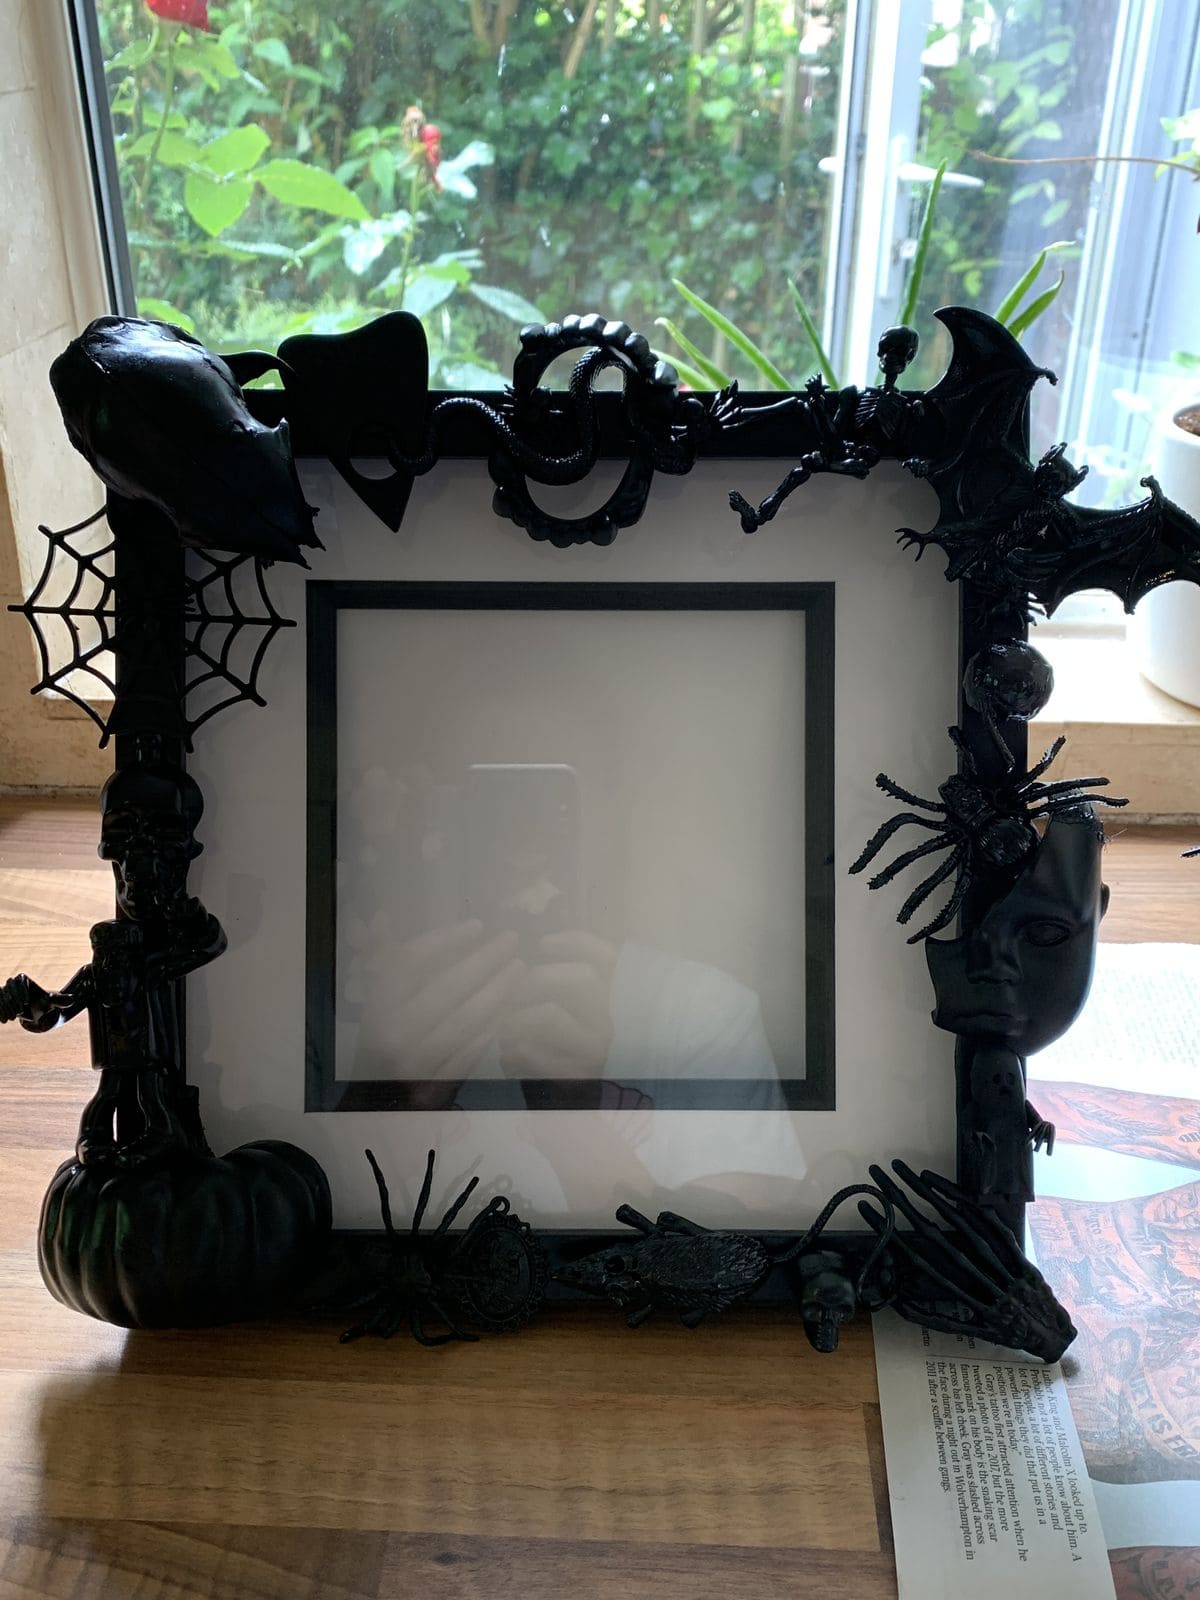
This frame is a visual spell of shadows, showcasing a collection of creepy odds and ends painted pitch black. From plastic spiders and rubber rats to bats, skeletons, and even a broken doll head, each piece clings to the edges like cursed relics.
It’s part sculpture, part horror collage with striking, weird, and impossible to look away from. Everything’s unified by the matte black paint, which pulls all the chaos into one strangely elegant silhouette.
Specially, it’s the ultimate DIY for Halloween maximalists and lovers of the bizarre. You can use it to frame a spooky print or leave it empty for a museum-of-the-macabre effect.
Materials Needed
- 1 chunky frame (10″×10″ or larger, flat-edged)
- Assorted small Halloween toys and props (doll head, skeletons, spiders, etc.)
- Hot glue gun
- Black spray paint (matte or gloss finish)
- Protective gloves and drop cloth
Step-by-step Guide
Step 1: Gather creepy plastic trinkets of all shapes and sizes. Then play with layout by arranging them loosely around the frame.
Step 2: Once satisfied with the placement, glue each object firmly to the frame. Let dry completely.
Step 3: In a well-ventilated area, spray the entire frame and objects evenly with black paint. You also allow full drying time.
Step 4: Add an optional clear topcoat for durability, or leave it matte for a raw gothic vibe. Now, you can display on a wall, shelf, or mantel and prepare for questions.
#9. Skeleton Frame Candle Keeper
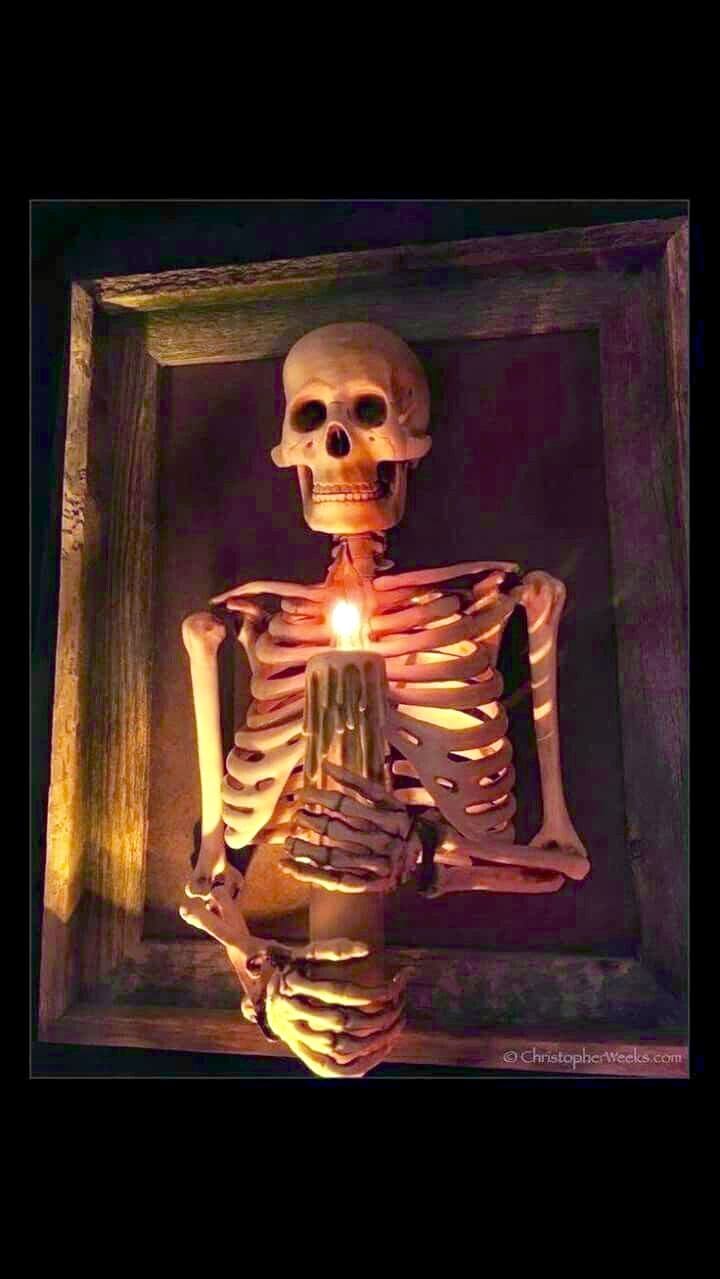
This bony guardian brings just the right balance of macabre and elegance to your Halloween wall. Nestled inside an old wooden frame, a skeleton torso clutches a single candle, casting a golden glow that dances over its hollow chest.
There’s something poetic about it, like a forgotten soul guarding a flicker of hope. This DIY frame idea is incredibly effective if you want something haunting yet minimal.
Besides, hang it in your hallway or near your entryway, and it’ll leave guests wondering what ancient tale this skeleton is silently telling. A touch of dim lighting is all it takes to bring this eerie figure to life.
Materials Needed
- 1 shadow box frame or deep photo frame (16″×20″)
- Plastic skeleton torso (approx. 18″ tall)
- Battery-operated LED candle (6″)
- Hot glue or epoxy adhesive
- Dark paint (optional)
Step-by-step Guide
Step 1: Stain or paint the picture frame if you want to give it a weathered, antique finish. Let it dry fully.
Step 2: Cut the skeleton torso to size if needed, making sure it sits snugly inside the frame.
Step 3: Use hot glue or epoxy to attach the skeleton to the backing. Then let the arms gently hold the LED candle.
Step 4: Secure the candle in place so it looks naturally cradled in the hands. You ensure the switch is still accessible.
Step 5: Hang your frame at eye level and switch on the candle to let the glowing bones do the rest.
#10. Miniature Ghost Portrait Gallery
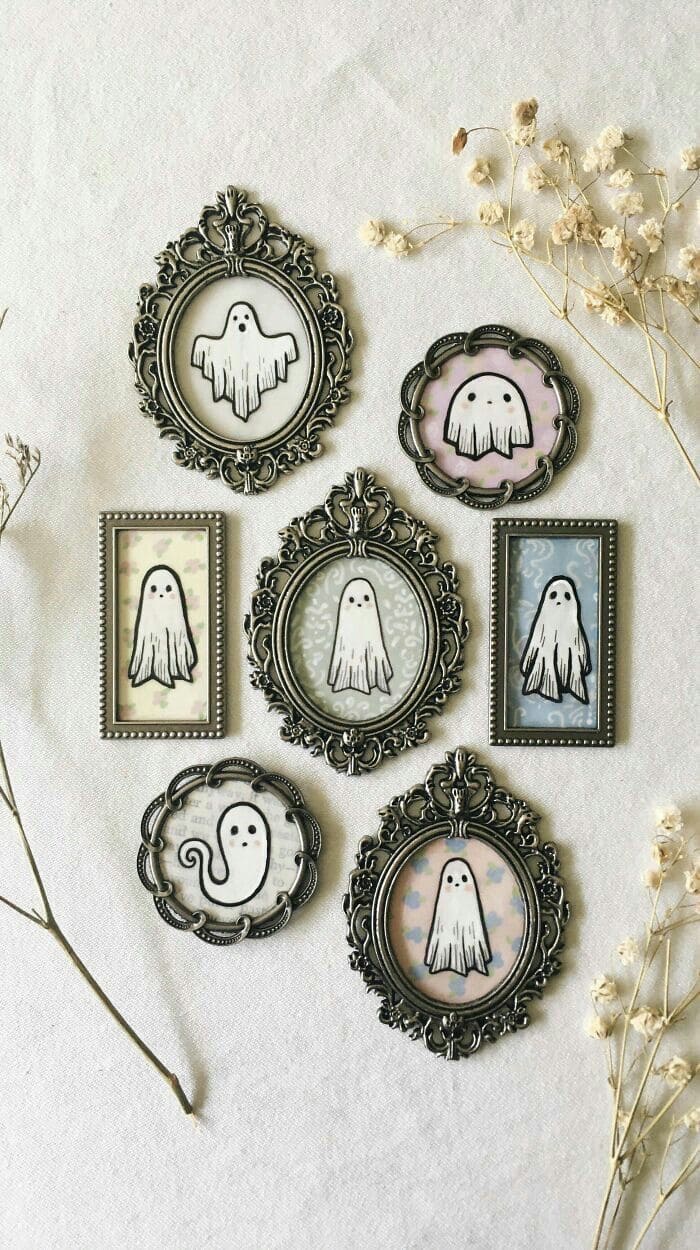
Interestingly, these little ghosties are more adorable than alarming, turning Halloween into a charming art exhibit. Set in ornate vintage-style metal frames, each one features a different hand-drawn ghost floating on soft pastel or patterned paper.
Bonus, the mix of oval, round, and rectangular frames creates a delightful balance, making this piece feel like a haunted heirloom collection or the ghostly family wall of a long-lost manor.
You can hang them as a group or scatter them around your home. These are perfect for anyone who loves Halloween’s gentler side, and they make thoughtful handmade gifts, too.
Materials Needed
- 7 small ornate frames (assorted shapes, 2″-4″ each)
- Printed pastel or patterned scrapbook paper
- Fine-tip black pen or printed cartoon ghost illustrations
- Scissors and glue stick
- Double-sided foam tape or magnetic backing (optional)
Step-by-step Guide
Step 1: Cut background paper to fit each frame, mixing patterns for visual interest.
Step 2: Draw or print cute ghost designs and carefully cut them out. Then glue the ghost illustrations onto the patterned paper backgrounds.
Step 3: Insert the assembled designs into each frame and close them securely.
Step 4: Arrange the frames in a gallery wall layout, or add magnets to the back for fridge décor.
#11. Gothic Hand Jewelry Holder Frame
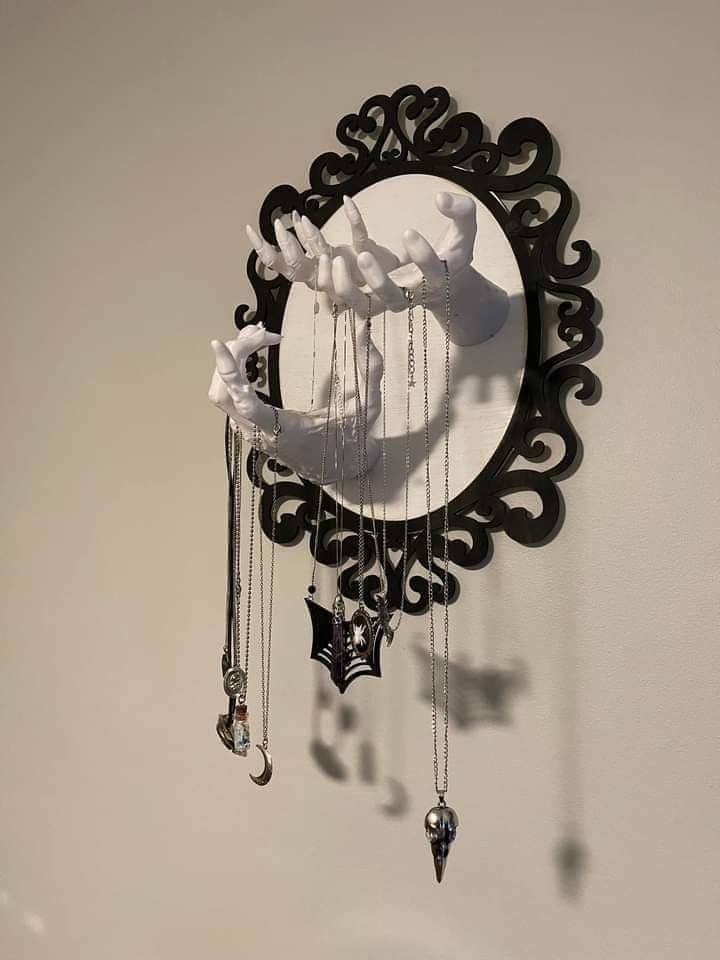
This isn’t just Halloween decor, it’s a wickedly cool piece of wall art that doubles as a gothic jewelry holder. A pair of outstretched white mannequin hands emerge from a dramatic black ornamental frame, perfectly shaped for displaying necklaces, charms, or even enchanted trinkets.
Furthermore, it feels like something pulled straight from a Victorian séance, elegant but slightly unsettling.
This project is ideal for anyone who leans into alternative style year-round and wants their jewelry display to have some personality.
Materials Needed
- Decorative wall frame or plaque (approx. 12″–16″)
- 2 plastic mannequin hands (white or painted)
- Strong adhesive (E6000 or epoxy)
- Drill (optional)
- Hanging hardware or command strips
Step-by-step Guide
Step 1: Find or paint a stylish frame with gothic flair and black, baroque, or scrollwork is perfect.
Step 2: Securely glue the hands to the center of the base. Let dry for several hours or overnight to ensure strength.
Step 3: Reinforce with screws or brackets from the back if you’re planning to hang heavier jewelry.
Step 4: Add hanging hardware and mount the piece at chest or eye level for easiest access.
Step 5: Finally, drape your favorite necklaces, chains, and charms from the fingers like offerings to the unknown.
#12. Skeleton Lady in a Gothic Garden Frame

This upcycled Halloween frame leans into spooky glamour with its enchanting mix of macabre and beauty. A dainty skeleton lounges elegantly in the corner, framed by moody faux florals, black branches, and a shimmering spiderweb.
The whole piece feels like a haunted portrait come to life, one you might find hanging in the parlor of a forgotten Victorian manor.
Topped with a sheer black ribbon and a bold striped rosette, this piece makes a striking door or wall accent. You can personalize it easily too by adding a mini hat, veil, or nameplate to give your skeleton some extra charm and backstory.
Materials Needed
- 1 ornate picture frame (16″×20″)
- Mini plastic skeleton (12″)
- 4-5 artificial black branches and berry stems
- Faux flowers (3-4 dark red or black blooms)
- Black mesh ribbon, striped ribbon, and large decorative bow
- Spiderweb string or netting
- Hot glue gun and wire cutters
Step-by-step Guide
Step 1: Start by spray painting the frame black if needed and letting it dry completely before adding decor.
Step 2: Secure black branches and faux flowers to one side using hot glue, creating a lush yet eerie arrangement.
Step 3: Attach your skeleton to the bottom corner of the frame, bending the limbs into a sitting position.
Step 4: Stretch a web across the open space of the frame and glue in place at multiple points for tension.
Step 5: Finish by tying or gluing a decorative bow at the top, letting the ribbons drape down for elegance.
#13. Hanging Baubles and Spiders Frame
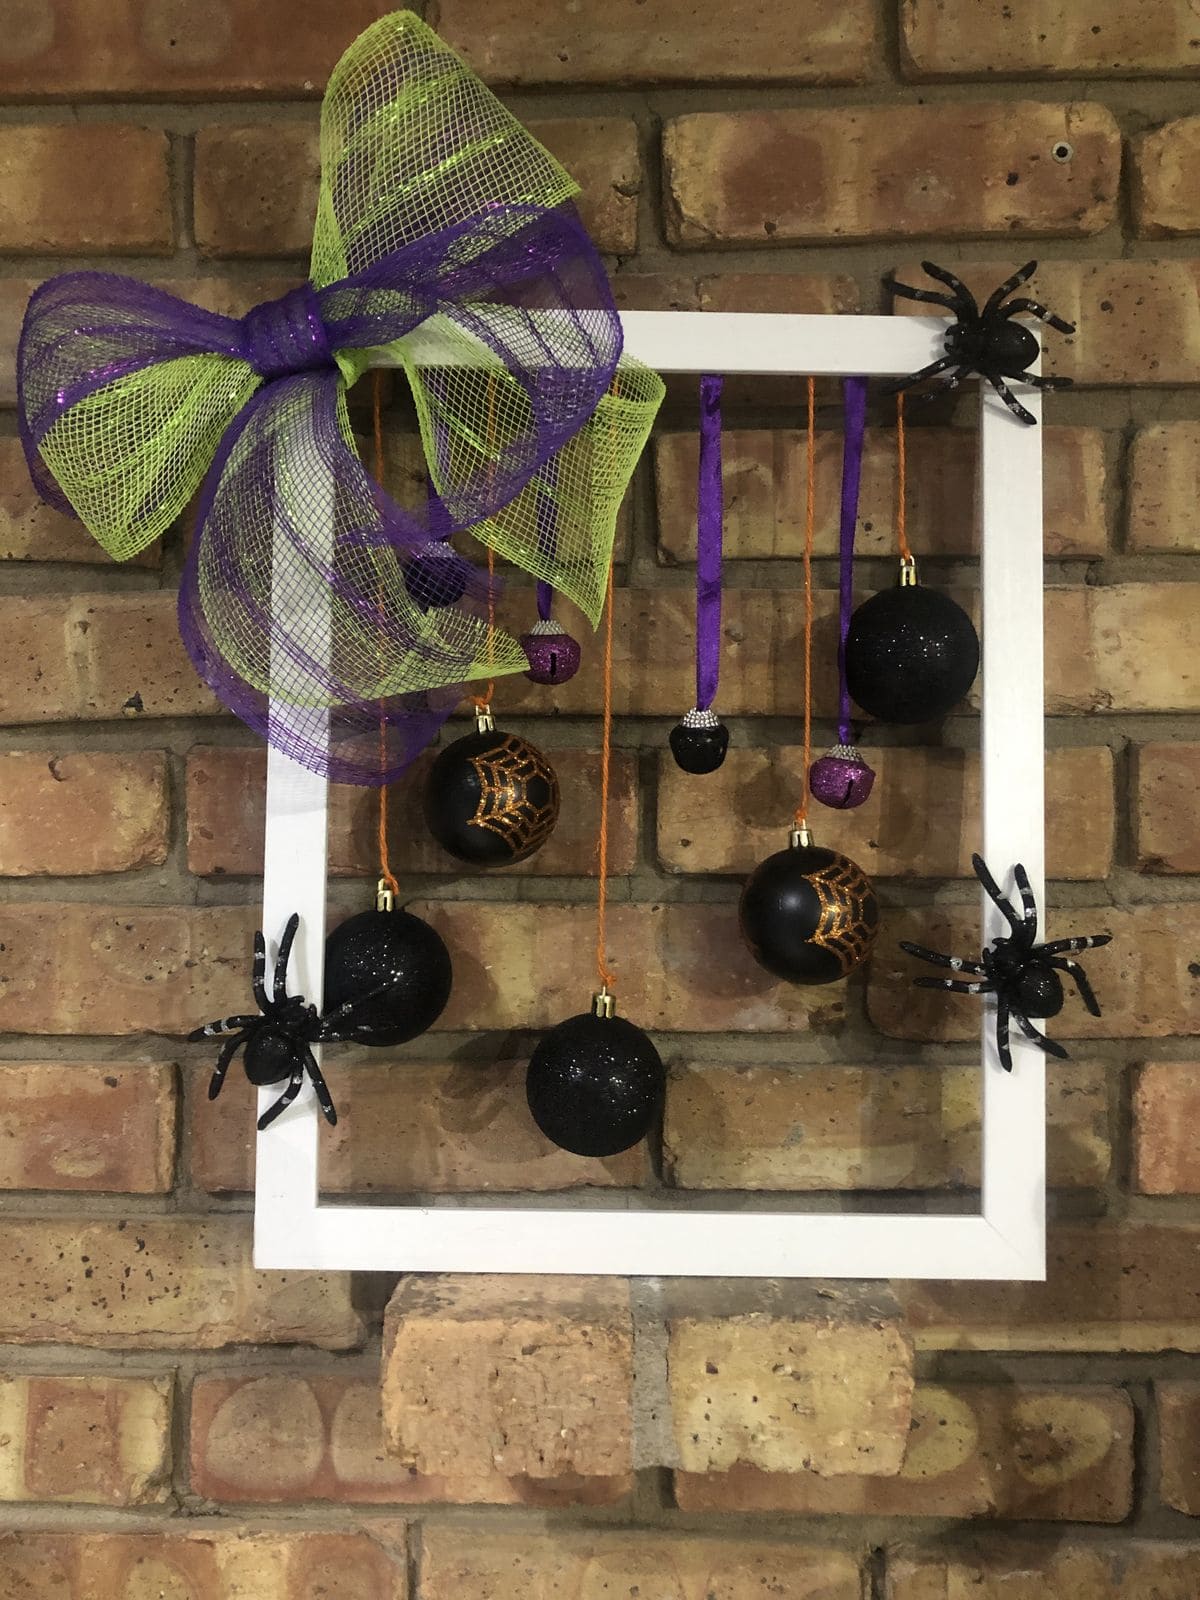
What about this design? This playful Halloween frame brings a pop of color and a dash of sparkle to your wall or front porch. Set against an open white frame, glittery black and purple ornaments dangle like spooky charms, suspended by vibrant ribbon and string.
Also, a bold mesh bow in lime and purple crowns the top corner, while oversized spiders creep along the sides adding just enough eerie to balance out the whimsy. It’s the kind of project that invites you to mix textures, colors, and personalities.
You can hang it on brick, a wooden door, or even inside your entryway to welcome trick-or-treaters with a smile.
Materials Needed
- 1 open white frame (16″×20″)
- 6-8 Halloween-themed ornaments (black, purple, glittery, spiderwebs, etc.)
- Orange and purple ribbon or twine (1/4″ width)
- Large mesh bow (lime green and purple)
- 3 plastic spiders (large size)
- Hot glue gun and scissors
Step-by-step Guide
Step 1: Tie ribbons to each ornament at varying lengths, then glue or staple the tops to the inside top edge of the frame.
Step 2: Secure your mesh bow in the top left corner using glue or floral wire.
Step 3: Attach the plastic spiders to the sides of the frame to give it a crawly effect. Now, hang the frame using a sturdy hook or over-the-door hanger, adjusting the ribbons to balance the baubles.
Step 4: Fluff the bow and tweak the spider placements until it feels just spooky enough for your space.
#14. Framed Skeleton X-Ray Wall Trio
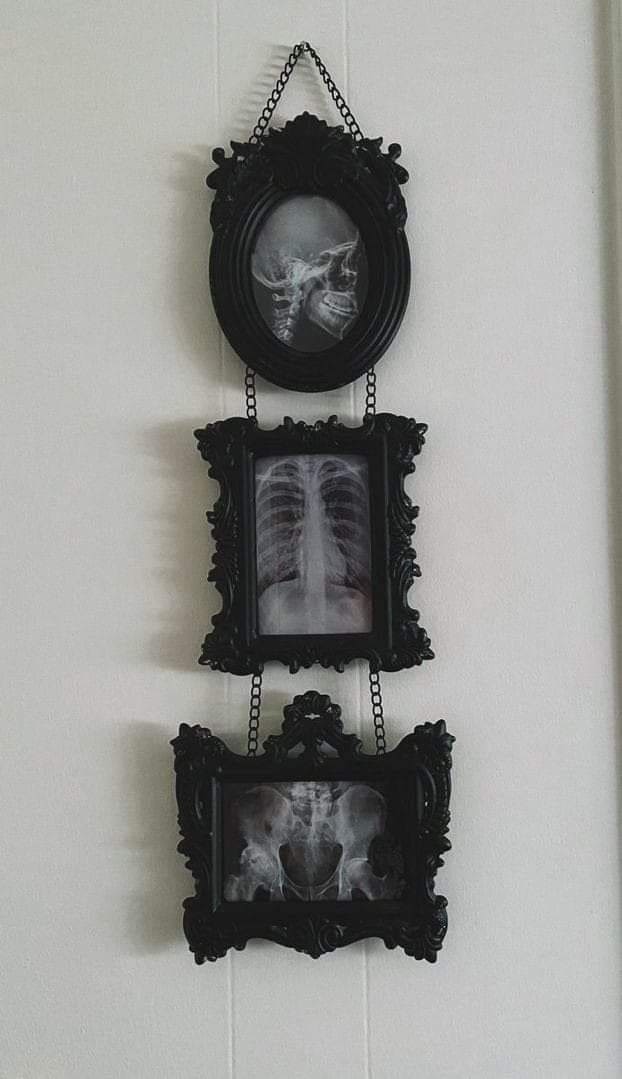
Featuring a spine-chilling X-ray triptych like skull, chest, and pelvis, this dramatic vertical wall hanging a subtle yet striking is a way to embrace spooky season without cartoonish elements.
Plus, the ornate black frames and hanging chain create an antique apothecary vibe, making it look like something salvaged from a haunted hospital or mad scientist’s lair.
It’s minimalist, morbid, and surprisingly stylish. Hang it in a hallway, above a mantel, or in a gothic gallery wall for maximum effect.
Materials Needed
- 3 vintage-style black picture frames (mix of oval and rectangle, 5″×7″ or 8″×10″)
- Printable X-ray images (skull, chest, pelvis)
- Matte photo paper or vellum
- Black chain or ribbon
- Hot glue gun
- Wall hook or nail
Step-by-step Guide
Step 1: Print your X-ray images and trim to fit each frame. For added eeriness, print on vellum and back with a light gray sheet.
Step 2: Insert each image into its frame and secure tightly.
Step 3: Attach black chain between each frame, spacing evenly and keeping it taut to avoid drooping. Then add hanging hardware or loop the top chain over a sturdy wall hook.
Step 4: Hang in a narrow vertical space for dramatic effect like a spine stretching down your wall.
#15. BOO Ghost Frame with Fall Plaid
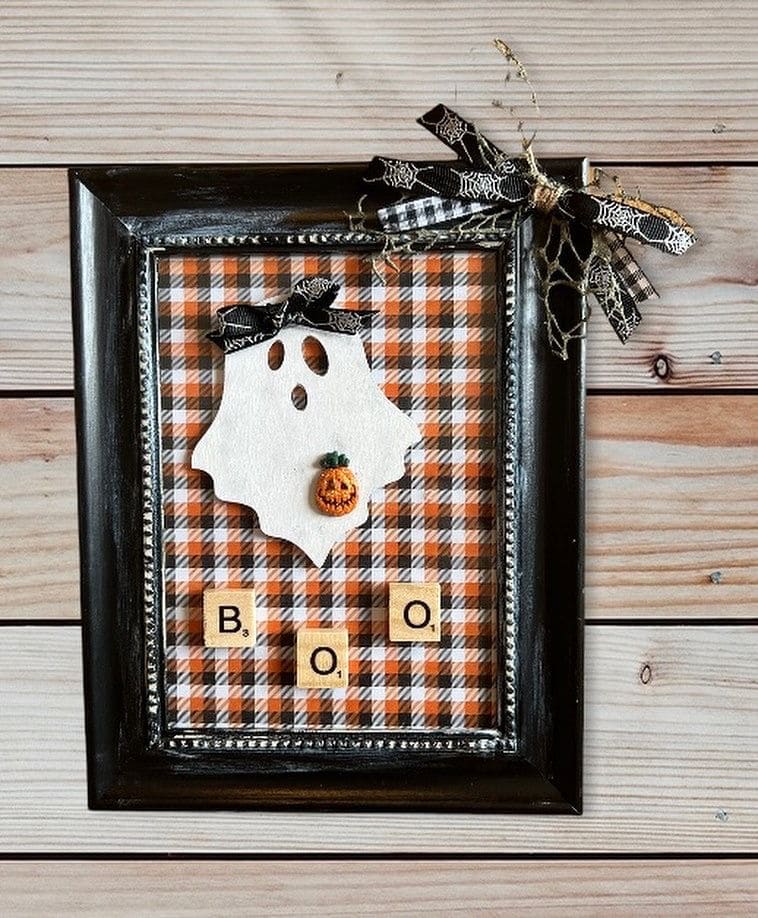
You can see this charming Halloween frame blends rustic vibes with playful spirit. Set on an orange plaid background, a ghost cutout floats cheerfully above wooden Scrabble tiles spelling “BOO.”
Moreover, a miniature pumpkin embellishment and a pair of bows, one atop the ghost and one tucked into the corner add texture and personality.
I believe it’s cozy, not creepy, making it ideal for a kid-friendly space, classroom door, or farmhouse-themed Halloween decor. Best of all, you can pull this off with scraps from your craft bin.
Materials Needed
- 1 small frame (8″×10″) painted black or dark brown
- Orange plaid scrapbook paper
- White ghost cutout (wood, felt, or paper)
- Mini pumpkin embellishment
- 3 wooden letter tiles (B, O, O)
- Halloween ribbon scraps and hot glue
Step-by-step Guide
Step 1: Remove the glass and insert your plaid background into the frame.
Step 2: Glue the ghost cutout slightly above center, and attach the mini pumpkin and bow to personalize it.
Step 3: Arrange the letter tiles underneath to spell “BOO” and secure with glue.
Step 4: Tie a layered bow from Halloween ribbon and glue it to the top corner of the frame for flair. Now you can set it on a shelf or hang it on the wall.
#16. Creepy Hand Reaching from the Mirror Frame
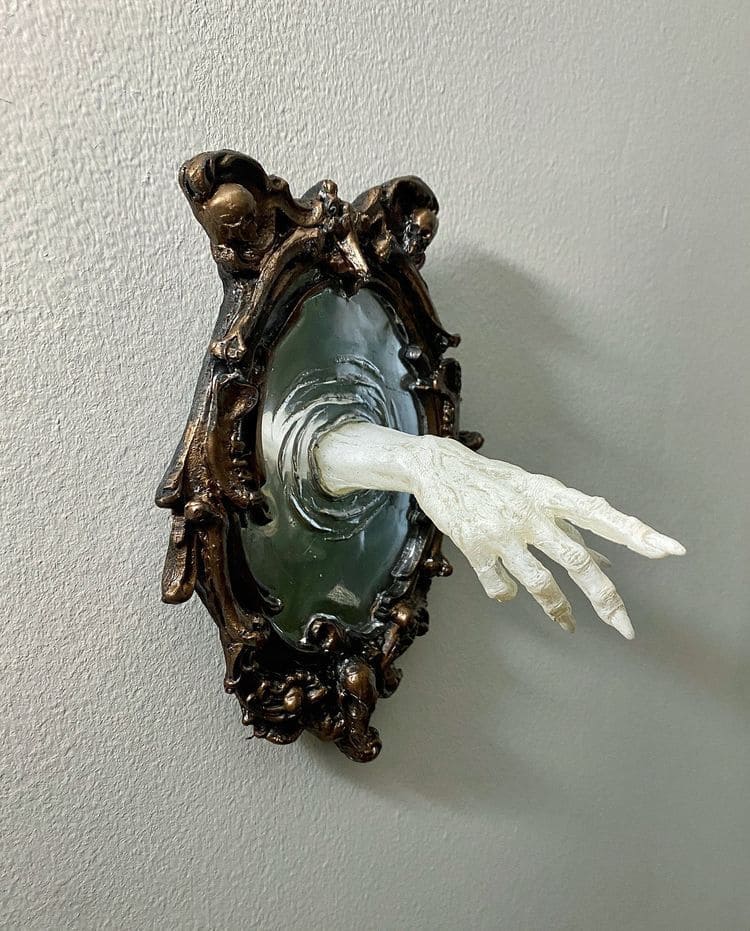
Simple, surreal, and deeply unsettling, this frame gives the illusion that something is trying to cross over, right into your home. A gnarled white skeletal hand extends from the center of a small baroque-style mirror frame, as though it’s breaking through another realm.
Not only that, the antique gold detailing adds an air of haunted sophistication, while the protruding hand offers a sudden jolt of the unexpected.
You can be pleasure as it’s a perfect hallway piece, small enough to hang anywhere, yet disturbing enough to make guests pause.
Materials Needed
- 1 small ornate frame with glass or mirror (approx. 6″×8″)
- Plastic or foam skeleton hand
- White or bone-colored acrylic paint
- Hot glue or epoxy
- Wall hook or mounting tape
Step-by-step Guide
Step 1: If your skeleton hand isn’t already white, paint it with acrylic and let it dry fully.
Step 2: Carefully cut a hole in the backing just large enough to insert the base of the hand. Then secure the hand in place from the back with hot glue, pressing until firm.
Step 3: Reinforce with cardboard or foam backing if needed, especially if the hand is heavy.
Step 4: Mount on the wall at eye level or just below for a startling reveal.
#17. Vintage Witchcraft Collage Frame
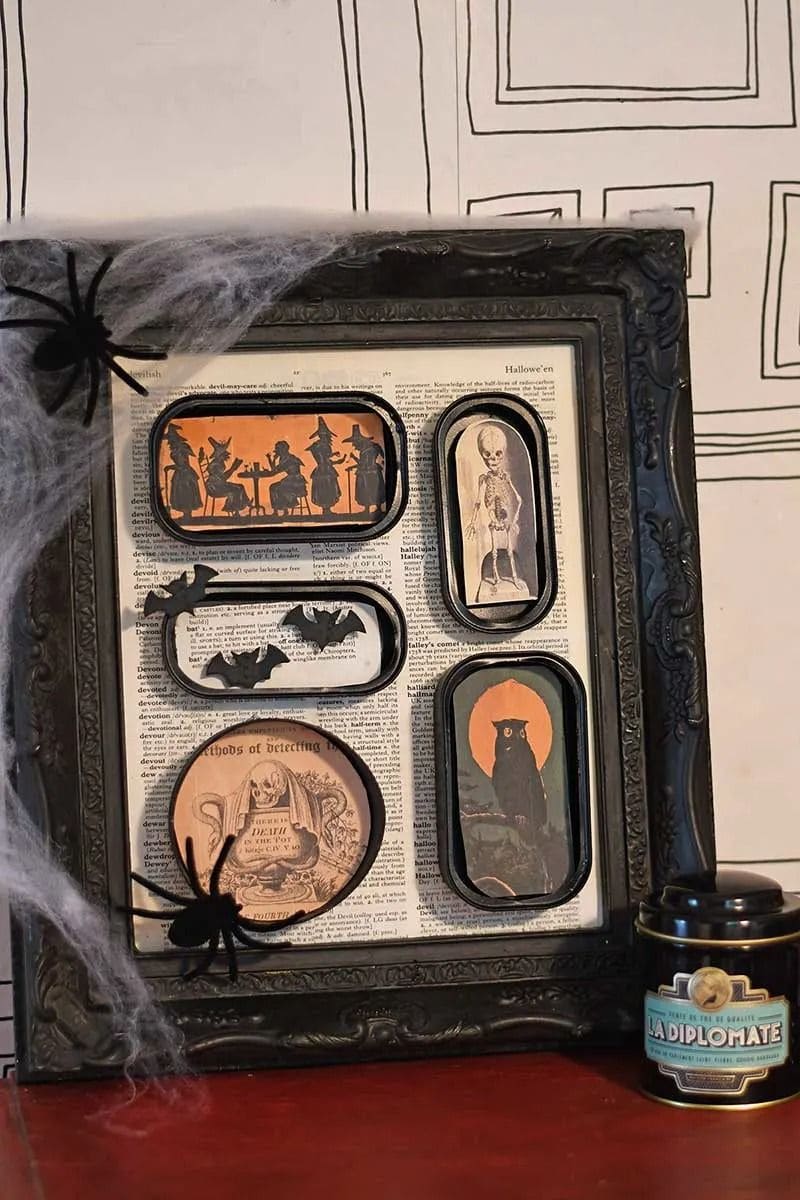
This spellbinding collage feels like a peek into an old witch’s scrapbook, layered with eerie silhouettes, aged illustrations, and tiny haunted scenes.
Nestled in sardine tin lids and arranged atop the page of an old dictionary, each miniature piece tells its own Halloween tale: witches gathering around a cauldron, a solemn skeleton, owls beneath an orange moon. The cobwebbed corners and oversized spiders give the display a shadowbox charm.
This project is ideal if you love thrifted treasures and don’t mind getting creative with scraps. It’s a celebration of spooky storytelling, perfect for anyone who finds magic in vintage finds and Halloween lore.
Materials Needed
- 1 ornate black picture frame (11″×14″)
- Page from a vintage dictionary or old book
- 5-6 sardine tin lids
- Vintage Halloween printables (witches, bats, skeletons, owls, etc.)
- Spider webbing and plastic spiders
- Mod Podge or glue stick
- Double-sided tape or foam dots
Step-by-step Guide
Step 1: Line your frame backing with the book page and secure it in place with Mod Podge or tape.
Step 2: Cut and glue Halloween images into the sardine tin lids. Let each one dry before handling.
Step 3: Arrange and attach the mini scenes onto the book page using foam dots for a 3D effect.
Step 4: You continue to drape spider webbing across the corners and place plastic spiders where they’ll pop.
Step 5: Prop or hang the frame near a reading nook or entry table for an old-world Halloween display.
#18. Foolish Mortals Skeleton Frame Wreath
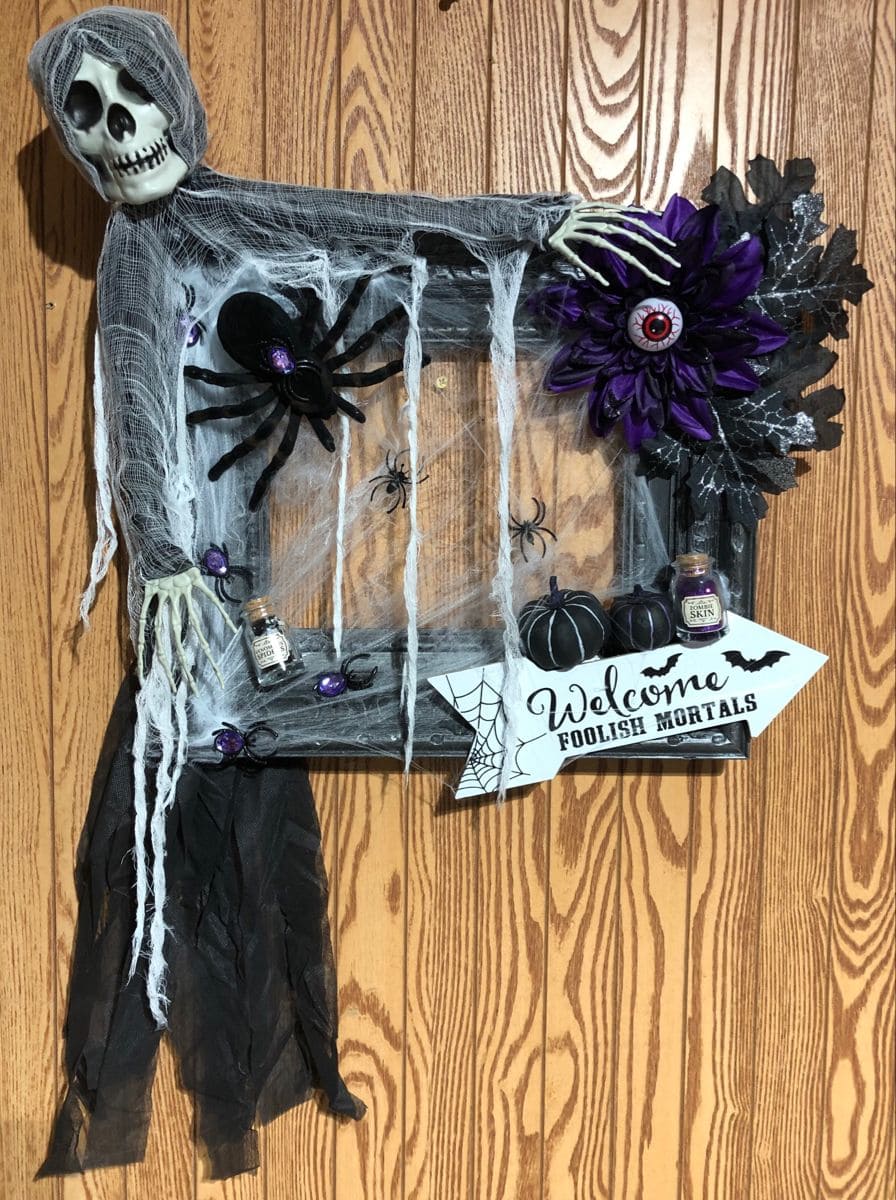
If you’re looking to greet your guests with flair and a little fear, this frame-wreath combo says it all. Wrapped in cobwebs and draped with a hooded skeleton, this piece doubles as a welcome sign and a haunted warning.
Bonus, askeletal hand clutches a purple-eyed flower, potion bottles sit ominously on the corner, and plastic spiders crawl across the draped fabric. Even the message “Welcome, Foolish Mortals” drips with Halloween humor.
This project is part wreath, part wall art, and 100% personality. Hang it on your front door or inside above a candy station to get the giggles and gasps rolling in.
Materials Needed
- 1 wooden or plastic open frame (16″×20″)
- Skeleton head and arms (lightweight plastic)
- Cheesecloth or gauze (1 yard)
- Plastic spiders and webbing
- Faux flowers (preferably black or purple) with eyeball accents
- Mini potion bottles and Halloween sign
- Hot glue gun, twine, and black tulle or ribbon
Step-by-step Guide
Step 1: Paint or prep the frame if needed. Then wrap cheesecloth and gauze around one side, tacking it with hot glue.
Step 2: Attach the skeleton head and arms, arranging the hands so they grip the corners or decorations.
Step 3: Glue down the spiders, flowers, and potion bottles. Let the webbing drape naturally across the center.
Step 4: Secure the “Welcome Foolish Mortals” sign on the bottom corner, propping it with mini pumpkins for support.
Step 5: Now, you just add a loop of ribbon to the top back and hang it with pride or menace.
#19. Skeleton Mirror Butler
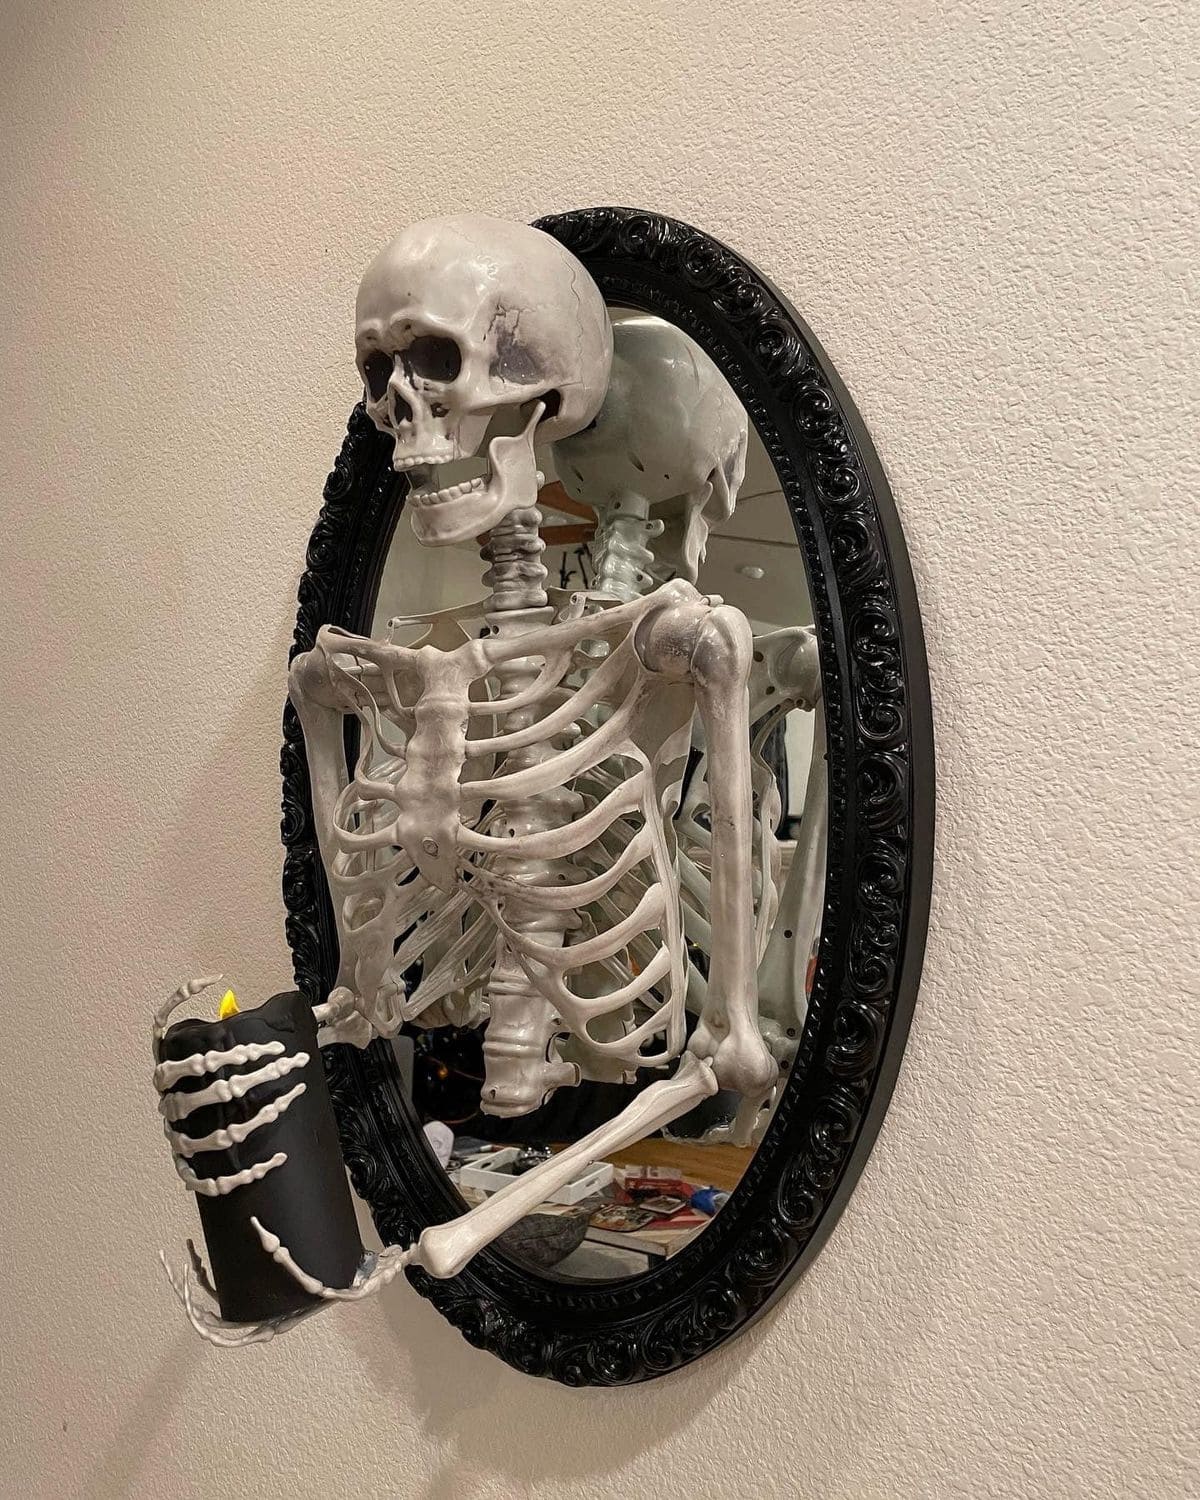
Who knew a skeleton could make such a courteous host? This spooky mirror project feels straight out of a haunted mansion, with a full bony torso stepping through an ornate oval frame to offer you a flickering candle.
The clever use of reflection makes it appear like the rest of the body is still lurking behind the glass. It’s a fun optical illusion that plays with perspective and your nerves.
You can also hang it near your hallway or by the entrance for a spine-chilling surprise that doubles as moody lighting. The contrast between the antique frame and the ghostly figure brings a theatrical elegance to your Halloween setup.
Materials Needed
- 1 oval mirror with decorative frame (18″×24″)
- Plastic skeleton torso and arms (18″-24″ height)
- Battery-operated black LED candle
- Hot glue
- Wall mounting hardware
Step-by-step Guide
Step 1: Position your mirror securely on a table or flat surface. Clean the surface for better adhesion.
Step 2: Detach the skeleton’s arms and position the torso as if emerging from the mirror. Then use glue to hold it firmly in place.
Step 3: Reattach the arms in a way that one holds the candle forward. You may need to trim or bend the joints for a better fit.
Step 4: Glue the candle into the skeletal hand so it rests securely and upright.
Step 5: Hang the frame on a sturdy hook or anchor. Now, flip the switch and watch your guests do a double take.
#20. Celestial Spider Web in a Golden Frame
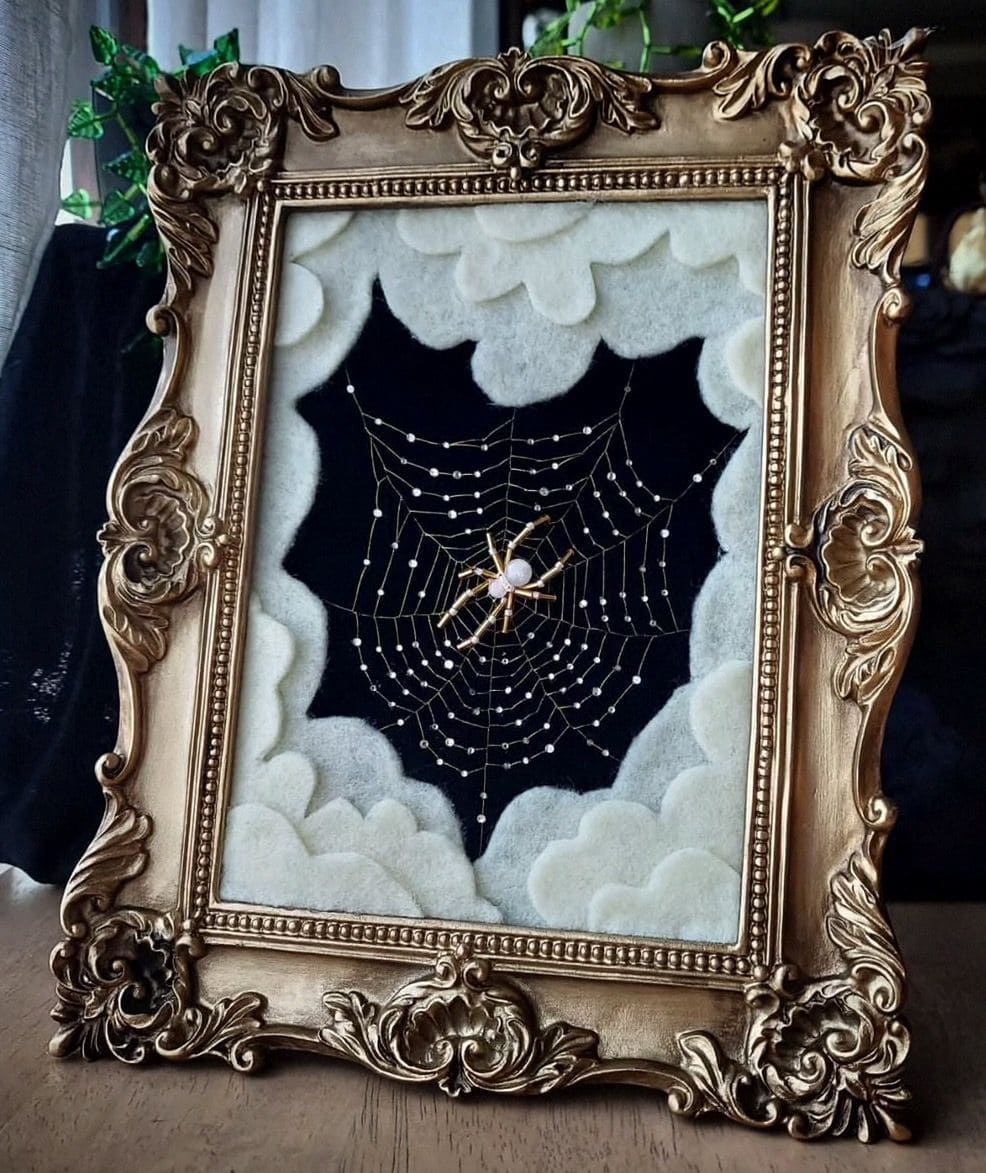
This ethereal piece is part art, part enchantment. Suspended in a vintage gold frame, a beaded spider web gleams against a black velvet night sky, delicately cradled by soft felt clouds.
At the center, a pearl-bodied spider weaves her celestial spell, equal parts elegant and eerie. The contrast of textures makes it mesmerizing to look at, and its subtle gothic charm makes it just right for those who prefer their Halloween décor with a dash of fantasy.
Materials Needed
- 1 ornate gold frame (8″×10″)
- Black velvet
- Off-white felt
- Gold or silver thread
- Small pearl or bead for spider body + wire or pins for legs
- Mini rhinestones
- Glue, scissors, needle, and thread
Step-by-step Guide
Step 1: Cut and glue your black velvet backing to fit the frame. You should layer felt clouds along the edges for depth.
Step 2: Stitch or glue metallic thread into a spider web shape across the center, start from the middle and spiral out.
Step 3: Use small rhinestones or pearl beads to highlight connection points on the web.
Step 4: Craft a spider using a pearl bead and wire or small pin legs, then glue it at the center of the web.
Step 5: Frame your piece without the glass, so the dimensional textures stand out.