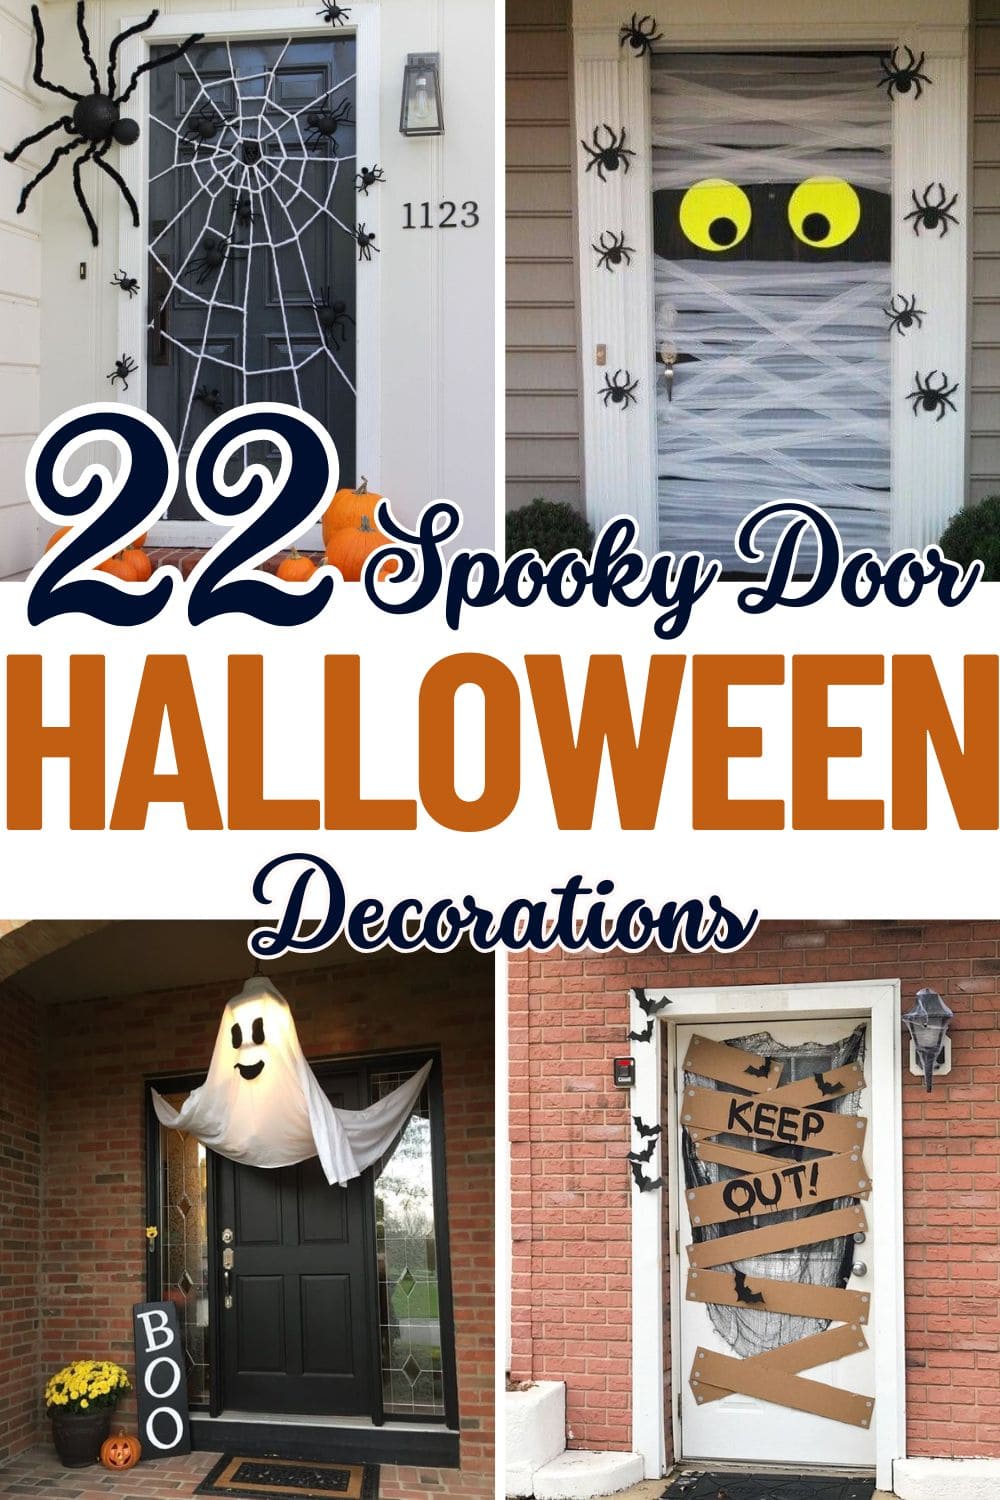
22 Budget-Friendly Halloween Door Decor Ideas That’ll Still Impress Your Neighbors
Have you ever felt that thrill when October rolls in and your front door becomes a blank canvas for spooky fun? Halloween has this magic—it invites creativity, laughter, and just the right amount of fright.
The best part is that you don’t need to spend a fortune to make your entrance unforgettable. With a little imagination and a few thrifty finds, you can turn your doorway into a neighborhood favorite.
These budget-friendly ideas aren’t just fun to make, they spark smiles from kids and adults alike. Let’s dive into door decor that brings the Halloween spirit to life.
#1. Googly Eye Doorway Monsters
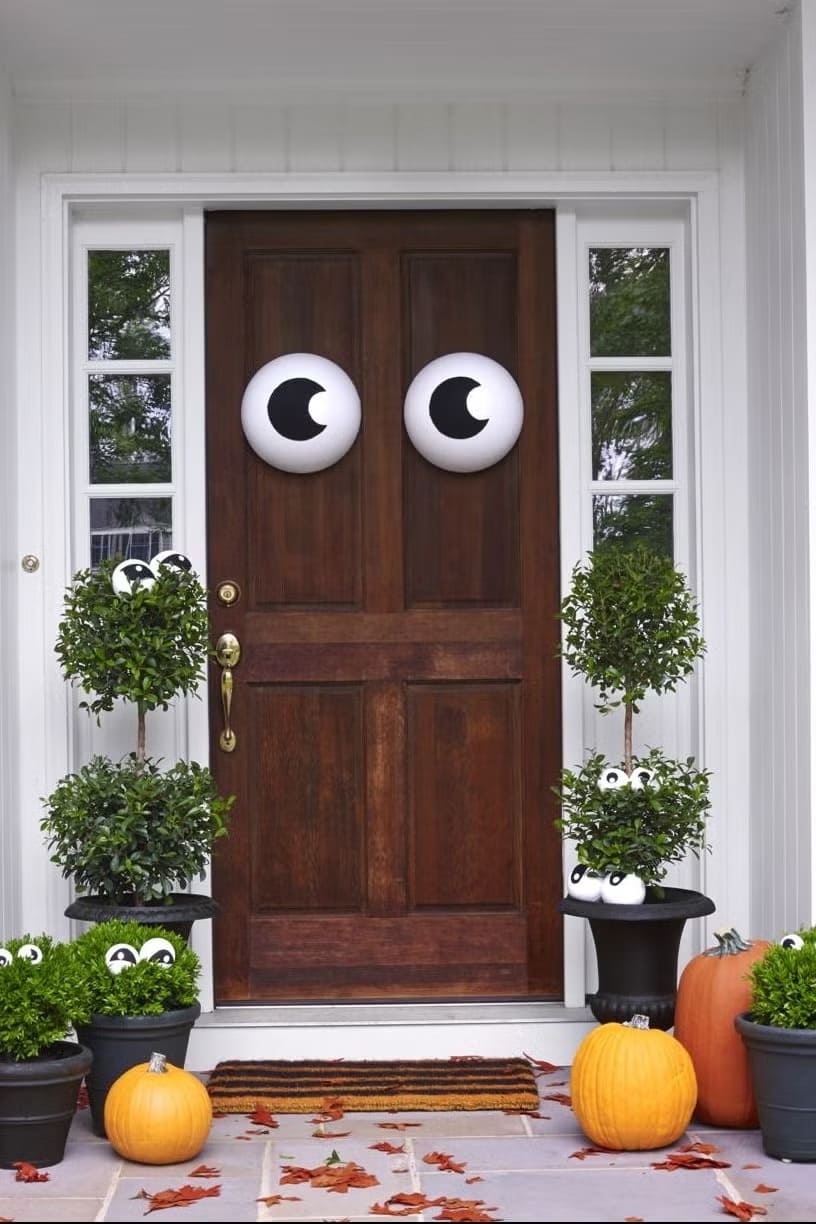
This clever setup transforms your front door into a wide-eyed character that’s more curious than creepy. Two oversized googly eyes centered on the door instantly create a whimsical face that grabs attention.
But the magic doesn’t stop there, each potted shrub and pumpkin features its own set of playful peepers, making it feel like the whole porch is watching you!
With minimal effort and tons of personality, this idea is perfect for families or anyone looking to keep Halloween lighthearted.
Materials Needed
- 2 large foam balls (10-12 inches)
- Black adhesive vinyl or paint
- Mini plastic
- Double-sided mounting tape
- 4-6 planters with shrubs
- 3-4 pumpkins
Step-by-step Guide
Step 1: Paint or stick black pupils onto the foam balls, then mount them on the door using adhesive strips.
Step 2: Add googly eyes to your planters and pumpkins with glue dots or tape.
Step 3: Arrange planters symmetrically for a tidy, balanced look, and scatter pumpkins around the base.
Step 4: Now, you sweep the area clean, so the googly eyes stay the center of attention.
#2. Giant Spider Attack on the Door

If you’re aiming for spine-tingling but simple, this oversized spider web door setup hits the mark. Thick white yarn is strung into a web that stretches perfectly across a black door, giving it a bold contrast.
Creepier still, large plastic spiders cling to the web like they’re ready to pounce.
But the star is the giant fuzzy spider crawling over the side of the doorframe, it looks like it just descended from the roof.
Materials Needed
- 1 large ball of thick white yarn
- 10-12 black plastic spiders (various sizes)
- 1 oversized fuzzy spider decoration (approx. 24-30 inches wide)
- Removable adhesive hooks
- 6-8 medium to small pumpkins
Step-by-step Guide
Step 1: Create the web by crisscrossing yarn in a radial pattern on the door, then spiral outward and secure with tape or hooks.
Step 2: Attach plastic spiders randomly across the web and around the doorframe.
Step 3: Position the giant spider crawling over the door trim for a dramatic touch.
Step 4: Finish by placing pumpkins at different heights along the steps for a festive balance.
#3. Spooky Chic Door with Bats and Bare Branches
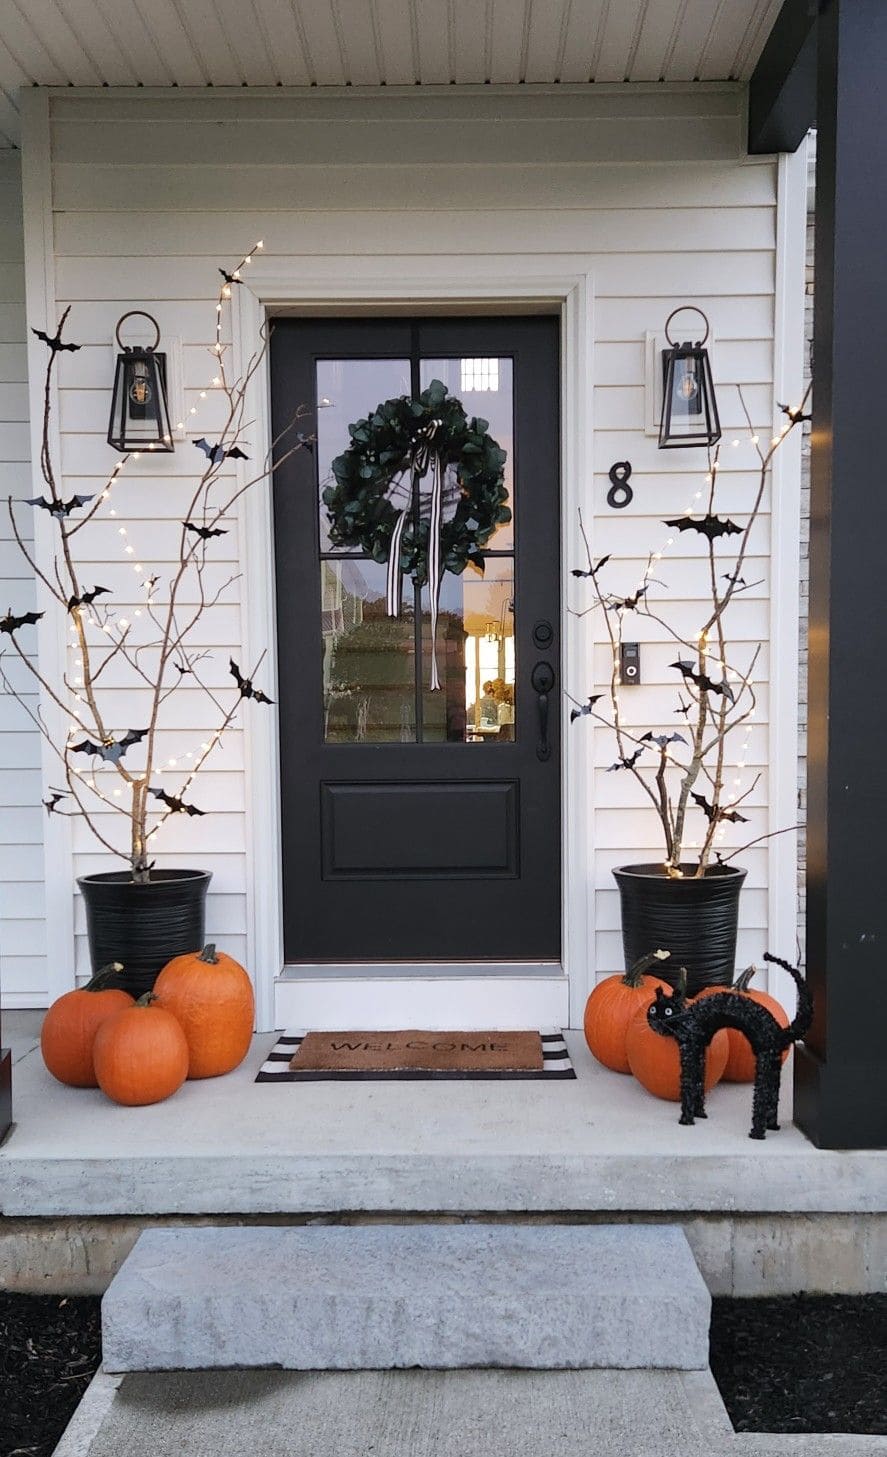
There’s a quiet magic in this minimalist Halloween setup. It doesn’t scream; it whispers, letting the small details do the haunting.
Also, the pumpkins add that necessary harvest charm, while the black cat figure brings a classic touch of mischief. The black door wreath tied with ribbon grounds the scene in elegance, perfectly matching the muted monochrome palette.
This is Halloween decor for the subtle soul with playful, stylish, and surprisingly easy to recreate.
Materials Needed
- 2 large planters (16-20 inches wide)
- Branches (3-4 feet tall, preferably gnarled)
- 15-20 black bat cutouts
- Warm white fairy lights (battery-powered)
- 4-6 medium orange pumpkins
- Black door wreath with accent ribbon
- Halloween figurines like a black cat (optional)
Step-by-step Guide
Step 1: Place sturdy branches in each planter. Then use rocks or soil to anchor them securely upright.
Step 2: Wrap fairy lights around the branches, hiding battery packs deep in the planters or behind the decor.
Step 3: Attach bat cutouts to branches using hot glue dots, floral wire, or double-sided tape.
Step 4: Arrange pumpkins around the base of each planter to soften the look and add contrast.
Step 5: Finally, hang the black wreath on your door and finish the scene with a fun prop like a black cat, skull, or broom.
#4. Haunted Branch Archway and Pumpkin Guard
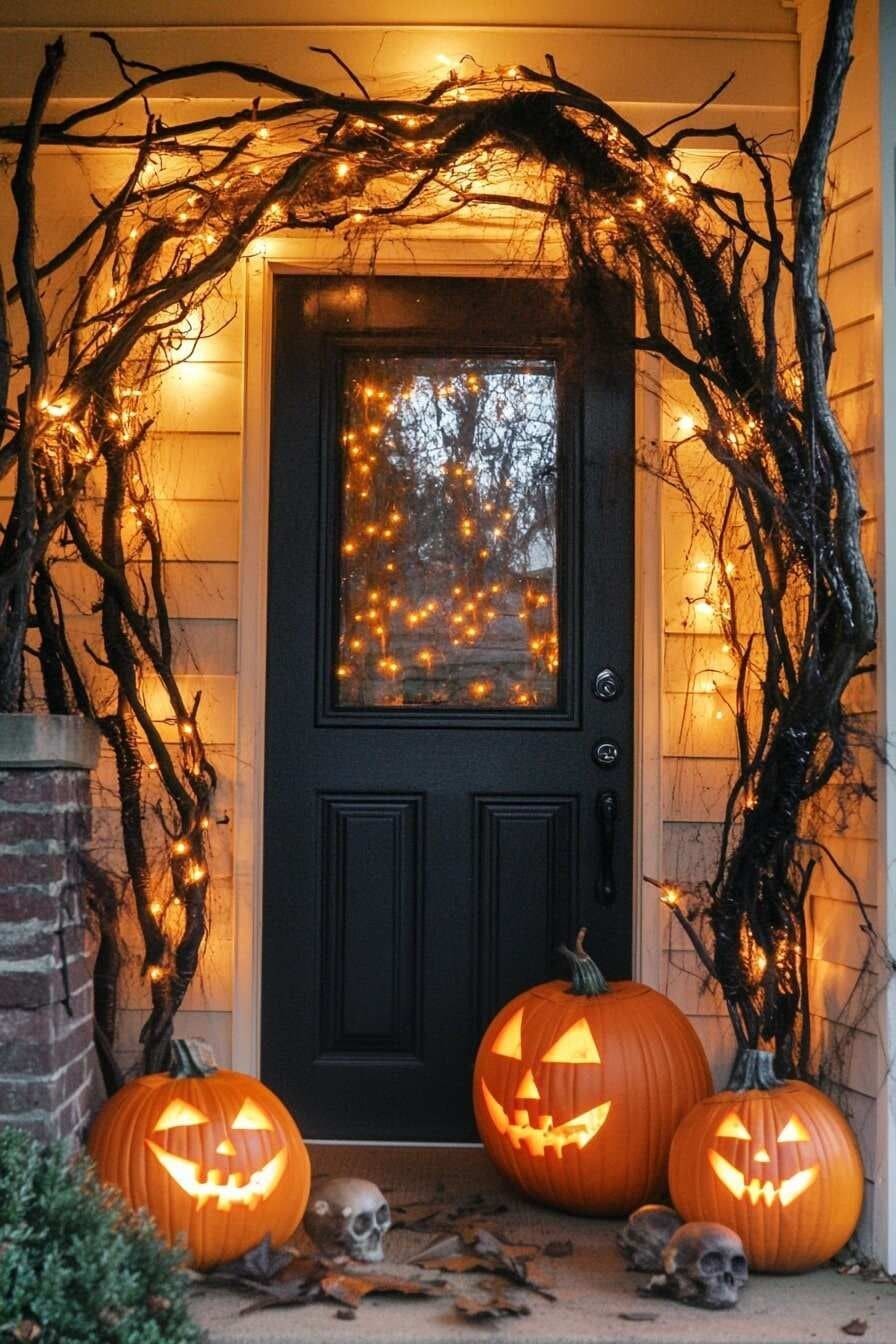
What about stepping up your Halloween game with this eerie and enchanting door arch made from real branches, twinkling orange lights, and glowing jack-o’-lanterns that grin with spooky delight?
It turns your front door into a haunted forest portal, one that looks like it’s hiding ancient secrets behind that soft flickering glow.
Best of all, you can build this look with items you find in your own backyard.
Materials Needed
- 10-15 dried branches (3 to 6 ft each)
- 2 strands of orange LED string lights (50-100 bulbs each)
- 3-4 carved pumpkins (9″-12″)
- 3 plastic skulls
- Black cheesecloth (6 ft)
- Outdoor command hooks
- Extension cord or batteries
Step-by-step Guide
Step 1: Start by leaning the branches against both sides of your door frame, layering shorter ones on top to create a natural arch shape.
Step 2: Secure the base of the branches with hooks or twine, then loosely drape black cheesecloth or spider webbing to add a creepy texture.
Step 3: Wrap orange LED lights around the branches and across the top of the arch. Then let some light strands hang slightly loose to create a tangled effect.
Step 4: Place your jack-o’-lanterns on the ground along the base of the arch and scatter skulls between them for a layered, dramatic scene.
Step 5: Now you can add fallen leaves or dried moss for a final touch of autumnal decay, it’s the detail that makes it hauntingly real.
#5. Floating Ghost Door Surprise
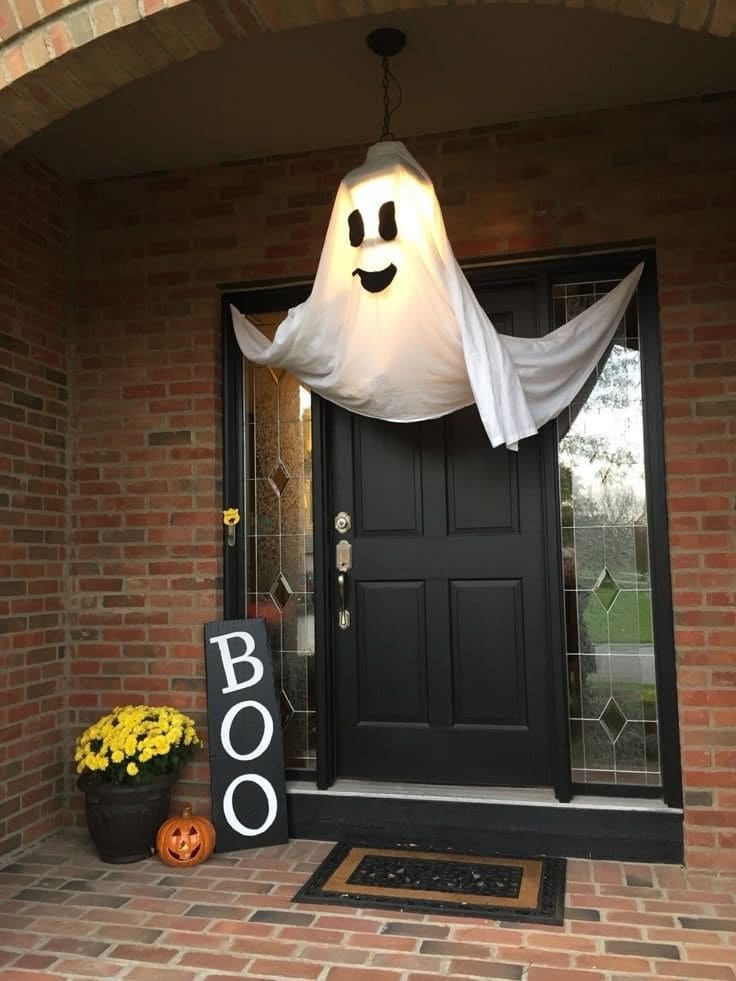
Hovering like a happy Halloween spirit above your doorway, this oversized ghost instantly grabs attention with its friendly face and glowing core.
Its arms stretch wide with draped fabric that feels both festive and whimsical. Beneath it, a simple “BOO” sign leans casually beside a pot of sunny mums and a classic jack-o’-lantern, grounding the look with warmth.
Tip:
If you don’t have a hanging lantern, suspend the ghost from a ceiling hook or plant hanger using fishing line for that weightless effect.
Materials Needed
- 1 white flat sheet
- Hanging light fixture
- Round paper lantern (12-18″)
- LED light or battery-operated lantern
- Black felt
- Scissors and hot glue gun
- Fishing line
- 1 wood or foam “BOO” sign (approx. 30″ tall)
- 1 pot of yellow chrysanthemums
- 1 carved or faux jack-o’-lantern
Step-by-step Guide
Step 1: Cut face shapes (eyes and mouth) from black felt and glue them to the front center of your sheet.
Step 2: Drape the sheet over a paper lantern or balloon. Insert the LED light inside to create a glowing effect.
Step 3: Use fishing line to hang the lantern from your porch light or ceiling hook. Then adjust the arms of the sheet outward for a floating look.
Step 4: Place the BOO sign upright near the door, next to your pot of mums.
Step 5: Finally, add a cheerful jack-o’-lantern to tie everything together with a classic Halloween smile.
#6. Monster Mouth Door Entrance
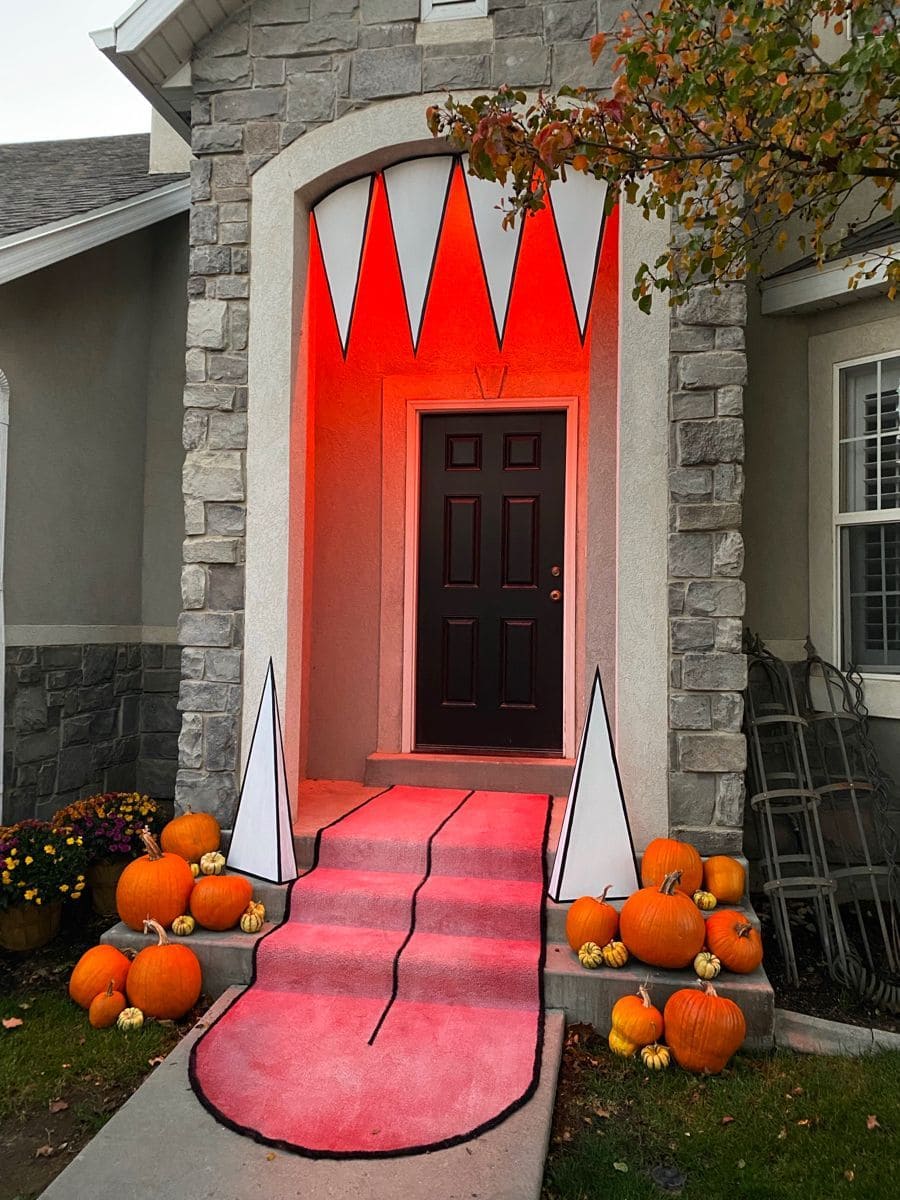
This door doesn’t just welcome guests, it devours them.
Transforming your porch into a monstrous grin, this larger-than-life creature effect uses sharp teeth, a rolled-out tongue, and eerie red lighting to create an unforgettable experience. Every trick-or-treater will pause before stepping into this creature’s gaping jaws.
Furthermore, the pumpkins add just enough classic Halloween charm to balance the bold concept.
Materials Needed
- Red carpet (at least 10 feet long)
- Large foam board
- White and black acrylic paint
- Scissors
- String lights or LED strips with red bulbs
- 15-20 pumpkins and mini gourds
- Double-sided tape
Step-by-step Guide
Step 1: Roll out the red carpet leading up to the door, curving the end to mimic a tongue shape.
Step 2: Cut large triangle shapes from foam board to form top teeth and secure them along the top of the entry.
Step 3: Paint black outlines around the teeth for a cartoonish, bold effect. Then create and place two lower fang props on each side of the walkway.
Step 5: Add red lighting around the entryway and finish with pumpkins scattered around the sides for a festive, eerie touch.
#7. Creepy Mummy Door with Spiders
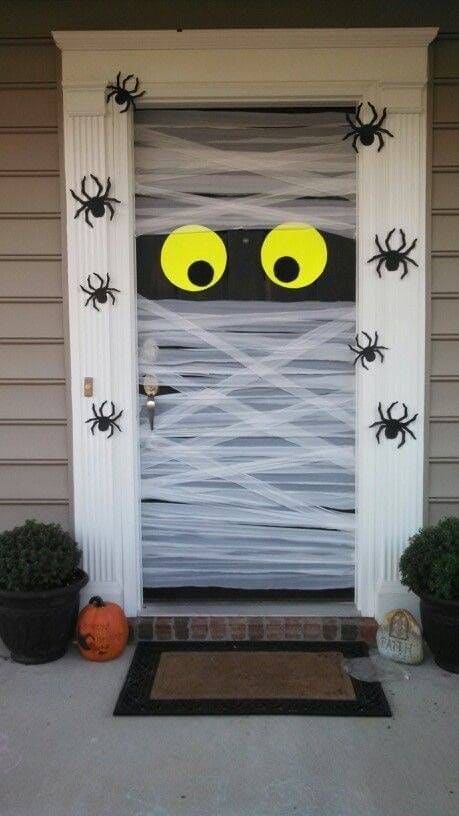
So cute, this one’s a classic and for good reason. The mummy door look is simple, spooky, and delivers instant Halloween vibes without much effort.
A few rolls of white streamers turn your door into a wrapped-up creature, and those bright yellow eyes peeking out? They’re playful and eerie all at once.
You can also add a swarm of oversized plastic spiders crawling across the trim, and suddenly your porch tells a story.
Materials Needed
- 2-3 rolls of white streamers or gauze
- Black and yellow poster board
- Removable double-sided tape
- 10-12 plastic spiders
- Small pumpkins
Step-by-step Guide
Step 1: Cut strips of white streamers or gauze and layer them across the door in a crisscross pattern.
Step 2: Leave a horizontal gap near the top and insert two large yellow circles with smaller black pupils behind the layers.
Step 3: Tape everything securely so it withstands wind or little hands pulling. Then add plastic spiders climbing up the frame using double-sided tape or putty.
Step 4: Finish the look with pumpkins or potted plants at the base for balance and charm.
#8. Pennywise Door Decor
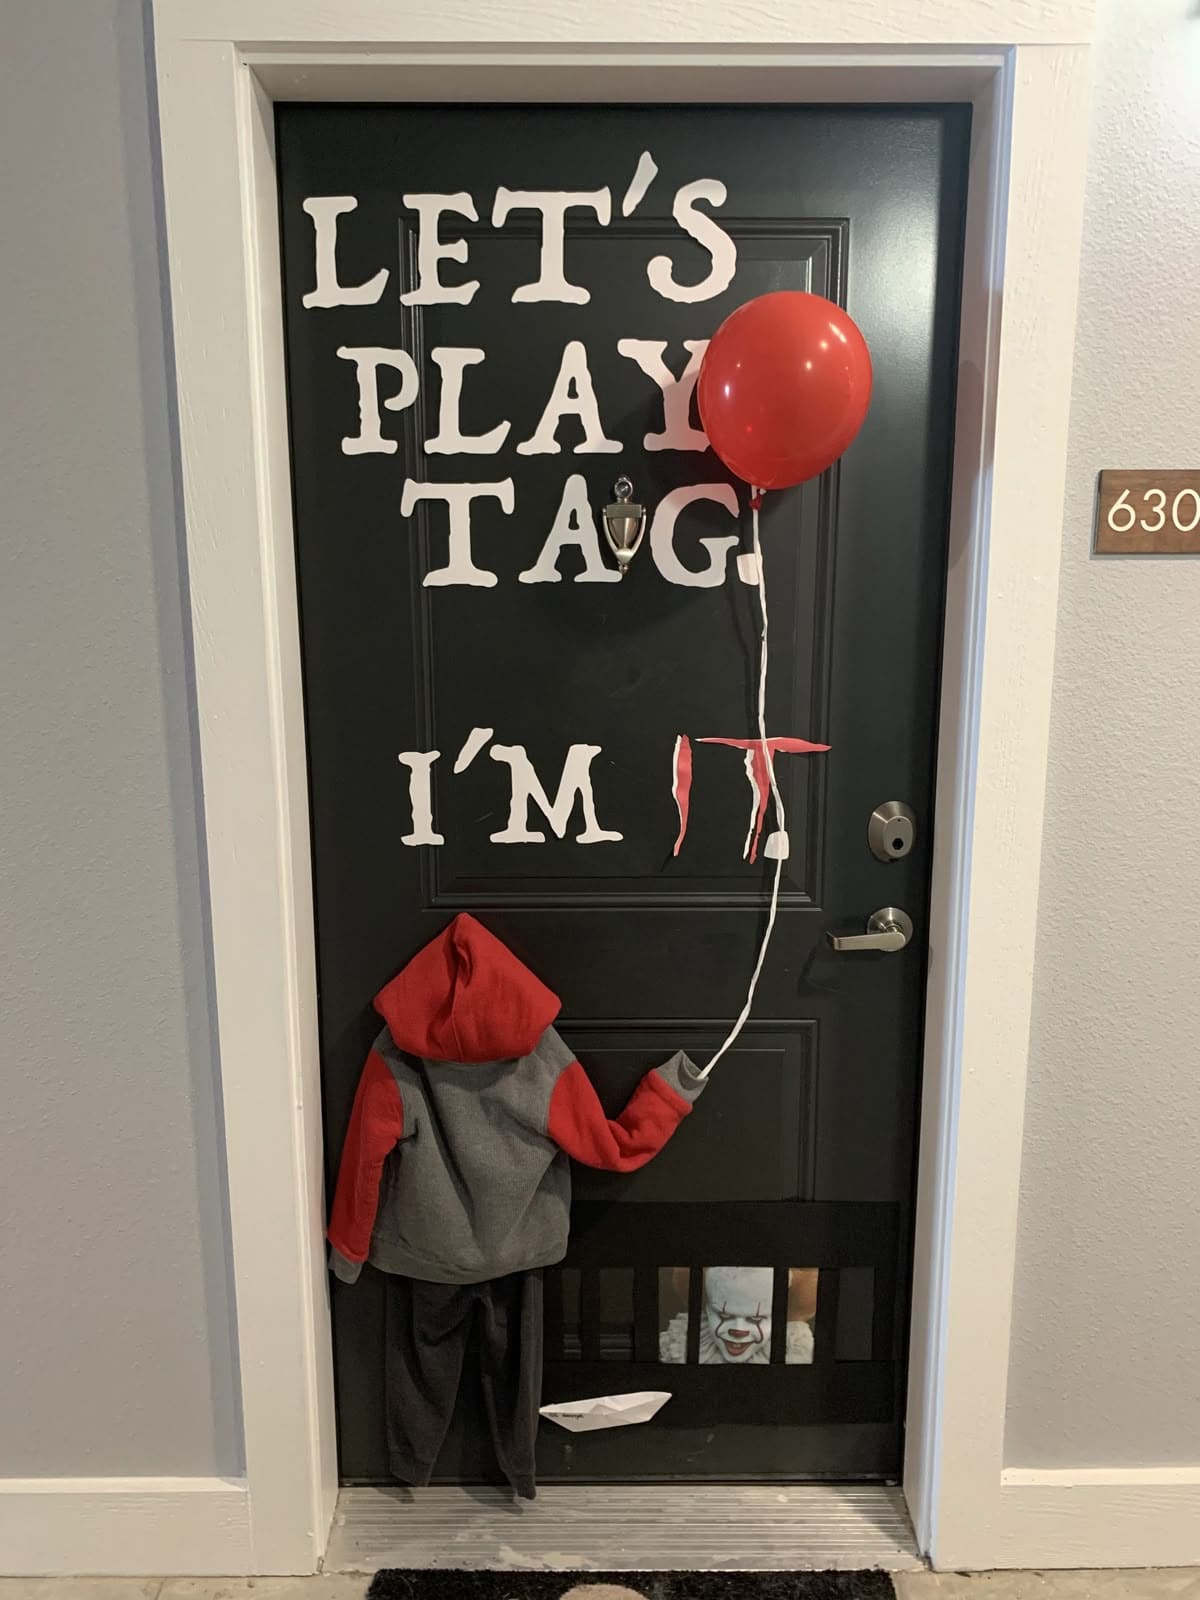
With a red balloon, creepy quote, and subtle nod, this design turns a simple black door into a chilling tribute to Stephen King’s iconic villain.
The child-sized hoodie and pants give the illusion of a kid lured by the clown, while the phrase “Let’s play tag. I’m IT” adds dark humor that horror fans will recognize instantly.
Materials Needed
- Red balloon and white ribbon
- Child’s hoodie and pants (red and gray)
- Stuffing
- White paper letters (“LET’S PLAY TAG. I’M IT”)
- Photo of Pennywise (printed)
- Paper boat (DIY or printed)
- Black tape or
Step-by-step Guide
Step 1: Print or cut out white letters and stick them to the door in a bold, staggered format.
Step 2: Stuff the hoodie and pants, then attach them to the lower portion of the door with tape or pins to mimic a child figure.
Step 3: Tie a red balloon to the stuffed hand or directly to the door handle with ribbon.
Step 4: Print and tape an image of Pennywise peeking through a sewer grate at the bottom of the door.
Step 5: Now, you fold a paper boat and place it nearby or on the grate for a haunting final touch.
#9. Ghostly Glow and Fairy Light Porch
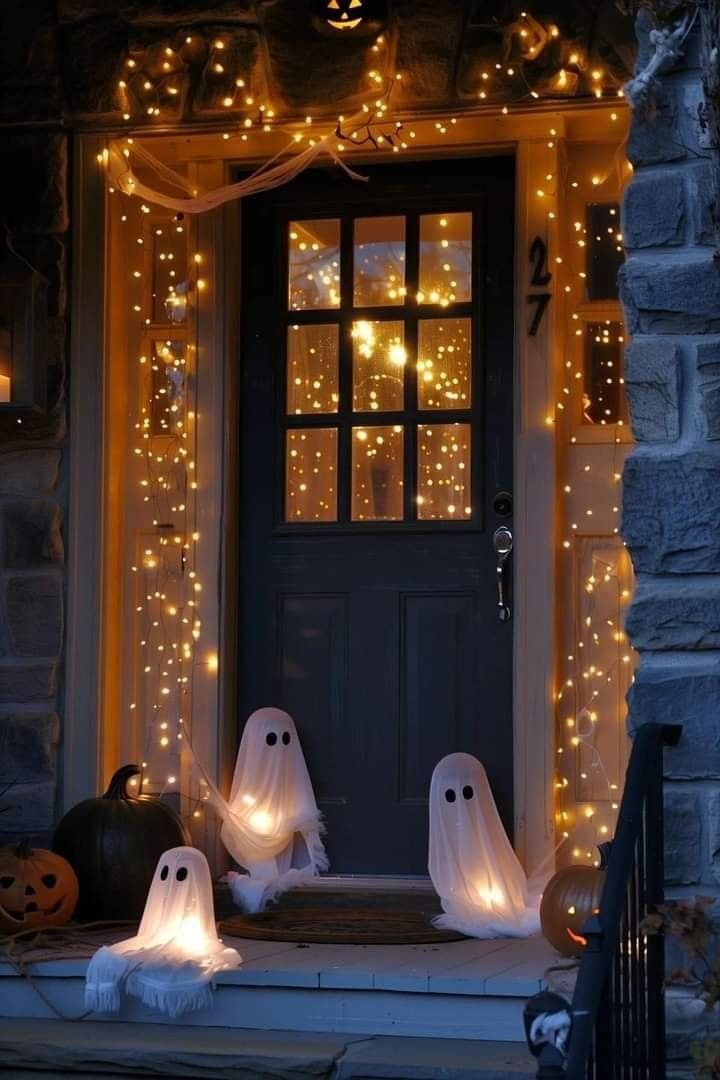
If you’re into gentle spookiness over gory chills, this glowing ghost porch will steal your heart.
The warm fairy lights cascading across the doorway feel like stardust caught in a Halloween spell, while the trio of mini ghost figures brings a playful, almost storybook charm to your stoop.
Tip:
You can use sheer white fabric for a more whimsical effect, and if it’s windy in your area, weigh the ghosts down with hidden rocks.
Materials Needed
- 3 foam or plastic domes (8″-10″ wide)
- 3 white sheer cloths (24″×24″)
- 6 battery-operated LED tealights
- Black felt
- 2-3 strands of warm white string lights (50-100 bulbs each)
- Transparent hooks
- Optional: small rocks or weights
Step-by-step Guide
Step 1: Drape white fabric over the domes to shape your ghost figures, tucking in soft folds to give them that floating look.
Step 2: Cut small oval or round eyes from black felt and stick them onto the fabric with hot glue or fabric tape.
Step 3: Place LED lights underneath the domes to create a soft glow from within each ghost.
Step 4: Drape string lights around the doorway and windows. Then let them hang loosely to create a waterfall of warm sparkles.
Step 5: Finally, add pumpkins, draped gauze, or cobwebs to soften the steps and tie the whole magical setup together.
#10. Haunted Welcome Door With Floating Witch Hats
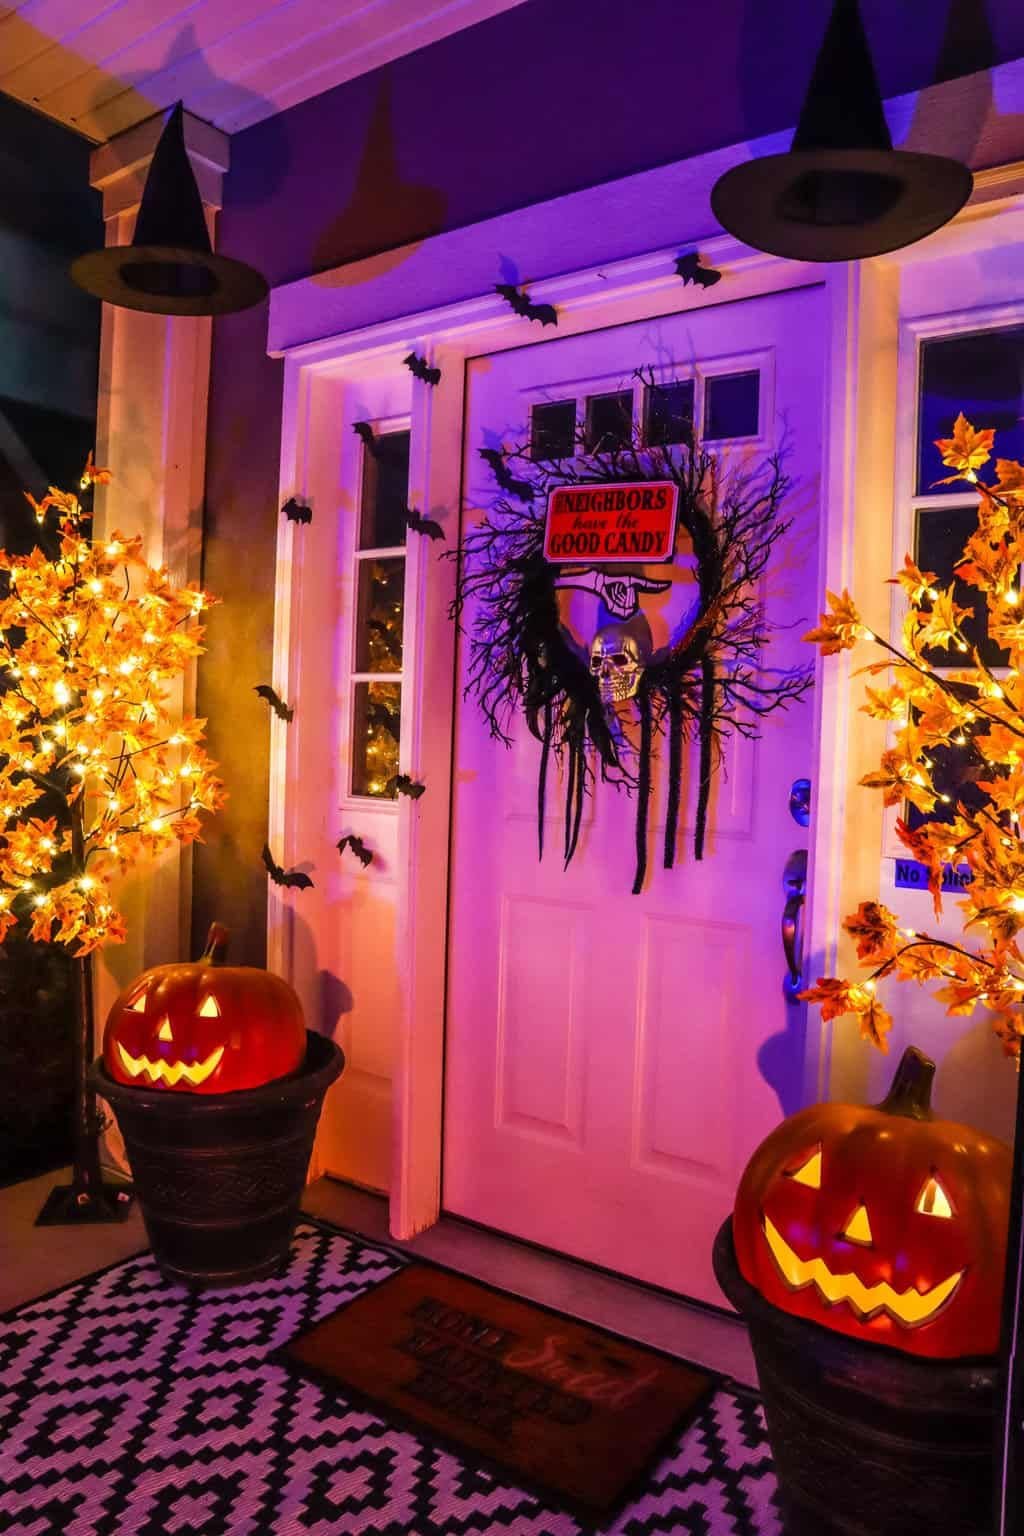
This Halloween porch glows with eerie charm and whimsical mischief. Floating witch hats hang from the ceiling, casting mysterious shadows under warm, golden lighting.
Bonus, a black wreath made of twisted branches and a shiny skull warns visitors to beware, though a cheeky sign insists, “Neighbors have the good candy.” The whole setup is eye-catching yet totally inviting for trick-or-treaters.
Materials Needed
- 3-4 black witch hats
- Clear fishing line or thread for hanging
- Twisted black wreath
- Plastic skull
- Funny Halloween sign
- Battery-operated maple tree lights
- 2 artificial pumpkins or jack-o’-lanterns with lights
Step-by-step Guide
Step 1: Hang witch hats from the porch ceiling using fishing line for a floating effect.
Step 2: Attach the skull to the center of your wreath, then add the sign and hang it on the door.
Step 3: Position your lit maple trees symmetrically on both sides of the door. Now you place a jack-o’-lantern in each planter or pot, and turn on the lights for an inviting glow.
Step 4: Finish with a patterned doormat to ground the look and welcome guests in spooky style and you are done!
#11. Halloween Minnie Mouse Door
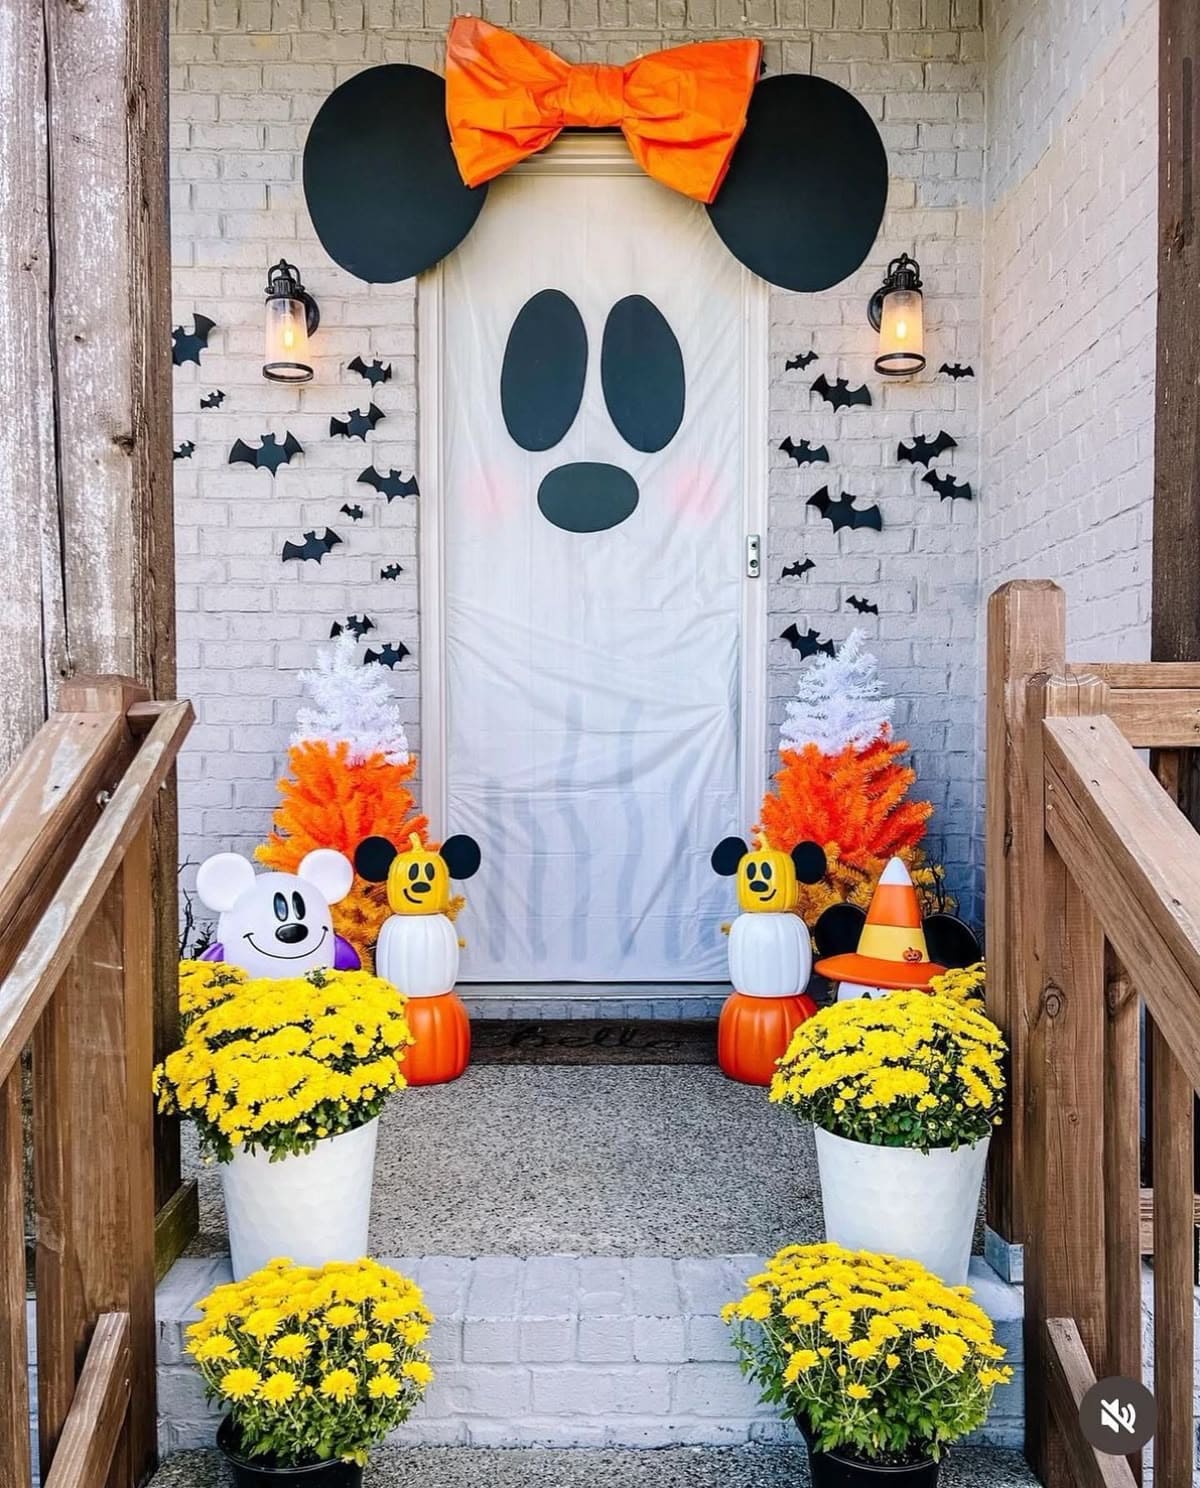
This cheerful display brings Disney magic right to your doorstep. With oversized Minnie ears, a vibrant orange bow, and a spooky-cute face, this front door becomes a lovable Halloween character.
Flanked by Mickey-inspired pumpkins and candy corn trees, it’s a joyful twist on traditional spooky decor. The yellow mums add a punch of sunshine, keeping the vibe playful and kid-friendly.
Materials Needed
- White door covering or plastic tablecloth
- Black foam board
- Large orange bow
- Paper or foam bats
- Mickey/Minnie pumpkin decorations
- Mini faux trees
- 6-8 yellow chrysanthemum pots
Step-by-step Guide
Step 1: Cover the front door with white plastic or fabric. Then cut out two large circles for ears and three oval shapes for the face; attach with removable adhesive.
Step 2: Add a large orange bow at the top center for Minnie’s signature look.
Step 3: Place Mickey-themed pumpkins and candy corn trees on each side of the door for balance.
Step 4: Attach black bats to the wall in a scattered pattern for contrast.
Step 5: Finish with a row of yellow mums to create a sunny, festive entrance.
#12. Glowing Skeleton and Spiderweb Portal
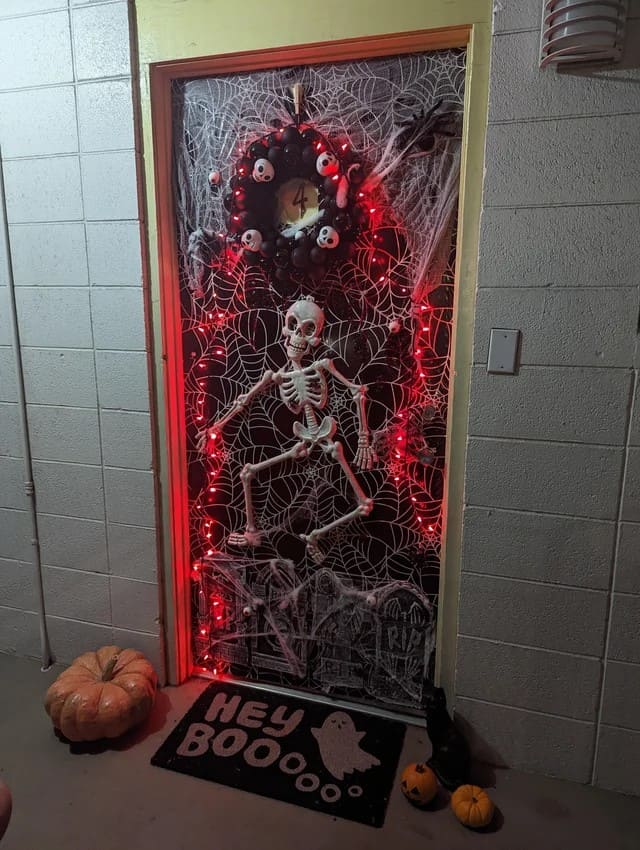
This door looks like it leads straight into the underworld—and that’s exactly the vibe you want for a spine-tingling Halloween.
You can also see the backdrop is layered in synthetic spiderwebs, tangled around eerie red string lights and a dancing skeleton centerpiece.
The welcome mat cheekily says “Hey Boo…”, but the rest screams “Enter if you dare.” This setup is especially striking in low light and perfect for apartment doors or small porches.
Materials Needed
- 1 life-size plastic skeleton
- 1-2 packs of synthetic spider web
- 1 strand red LED lights
- Black balloons + small skulls for wreath
- Halloween doormat with ghost/“boo” message
- Mini faux tombstones and pumpkins
Step-by-step Guide
Step 1: Cover the door with spider webs and add red string lights in a loose frame. Then secure the skeleton in a crawling or dancing pose using adhesive hooks or tape.
Step 2: Create or hang a black balloon wreath and tuck in mini skulls or faux spiders.
Step 3: Finish the bottom area with lightweight tombstones, pumpkins, and a themed doormat.
#13. Spooky Door Vibes
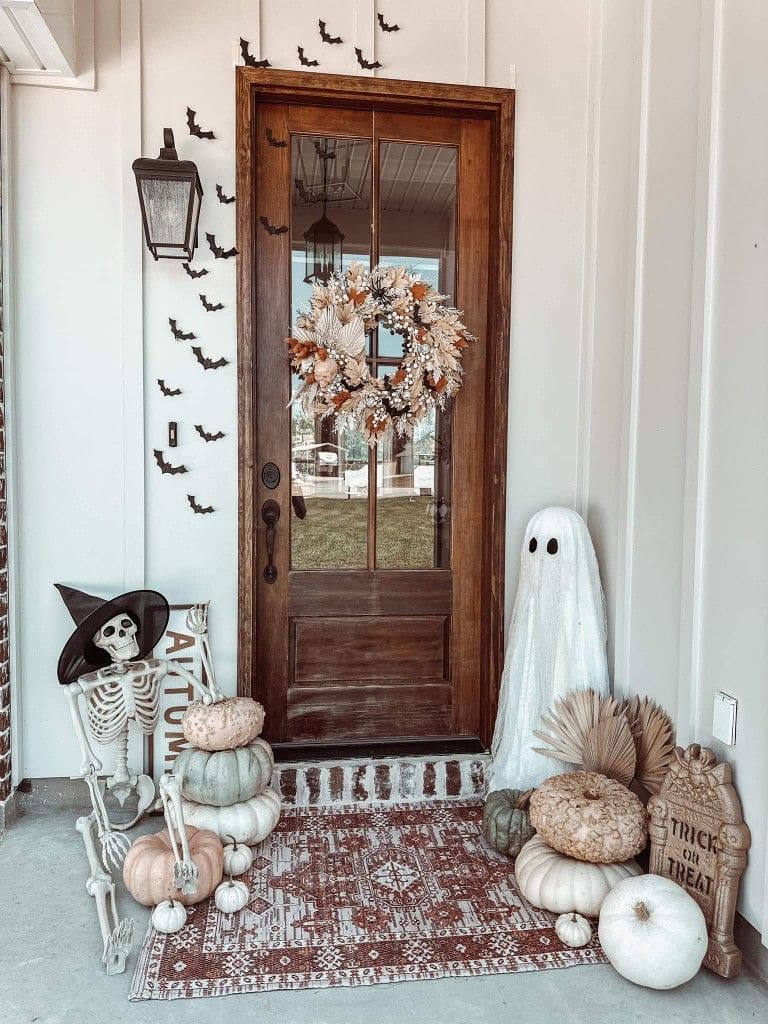
If your style leans more toward soft neutrals and gentle touches, this is your moment. A pastel pumpkin tower becomes a curious perch for a skeleton in a witch hat, while a charming ghost stands quietly by like a shy trick-or-treater.
Bonus, the bat decals flutter upward, drawing the eye to the simple, elegant wreath made from dried blooms and soft grasses.
The muted rug and stacked pumpkins ground everything with autumn warmth, making it feel thoughtful and balanced.
Materials Needed
- 1 poseable skeleton figure (approx. 3-4 ft)
- 1 witch hat (child-sized)
- 6-8 stack of real or faux pumpkins in neutral shades
- 1 standing ghost figure
- Assorted dried palm fronds and pampas grass
- 1 rustic or neutral fall wreath
- 1 Halloween-themed yard sign
- 10-15 black cardstock bat decals
- Double-sided tape
- Outdoor rug in warm, boho print (optional)
Step-by-step Guide
Step 1: Arrange the pumpkins in stacked clusters on either side of the door to build visual height and texture.
Step 2: Seat your skeleton on the ground or a low stool, adjusting its arms or head for personality. Then add the witch hat for a cheeky vibe.
Step 3: Place the ghost figure to one side, anchoring it with a tombstone prop and dried foliage for contrast.
Step 4: Affix your bat decals in a rising pattern on the wall next to the door to simulate flight.
Step 5: Now, hang the wreath and unroll your outdoor rug last, making sure the space feels grounded and inviting.
#14. Cardboard Keep Out Boarded Door
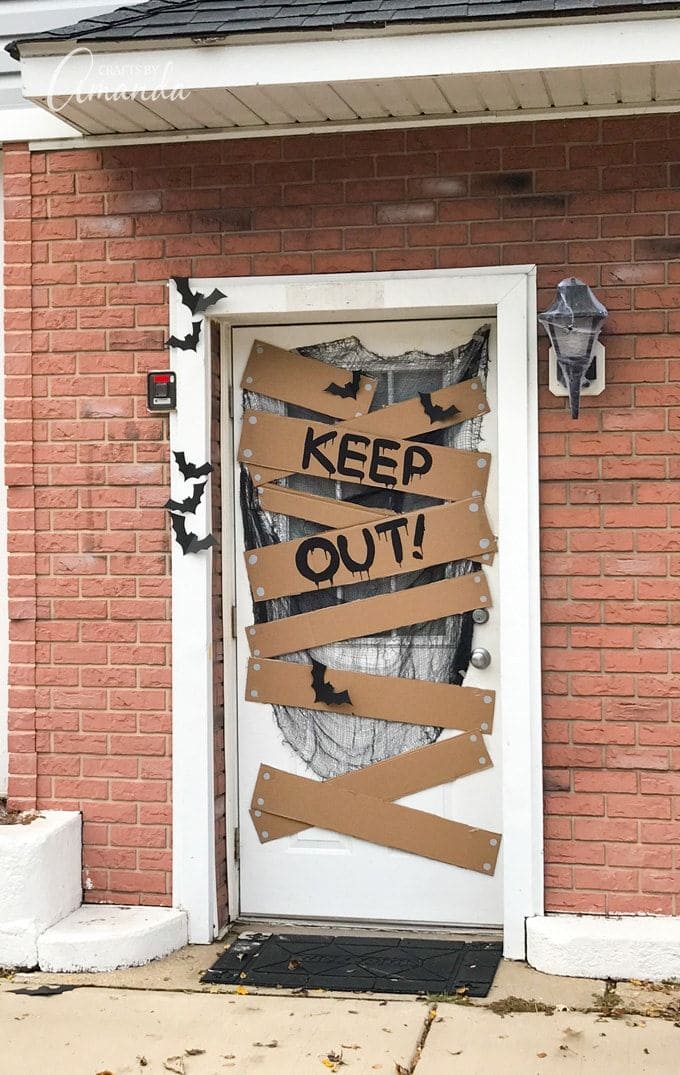
This DIY door is perfect if you want spooky without going full horror. Made with simple cardboard strips painted to mimic wooden boards, it screams haunted house vibes.
Plus, the words “KEEP OUT” drip like black ink, giving it a creepy warning touch. Tattered black netting adds a decayed backdrop while little black bats fly across the doorframe.
Materials Needed
- 6-7 cardboard strips (about 3-4 inches wide)
- Black paint
- Silver marker or paint
- Black gauze
- Black paper or felt bats
- Double-sided tape
Step-by-step Guide
Step 1: Cut your cardboard into long strips and paint or color in faux screws on both ends.
Step 2: Paint “KEEP OUT!” in bold letters on two of the cardboard pieces with black dripping letters.
Step 3: Drape black gauze or mesh fabric over the door for a dark, eerie backdrop. Then attach the cardboard boards across the door in a crisscross pattern, making it look like it’s boarded shut.
Step 4: Finish by sticking bat cutouts around the doorframe and corners.
#15. Zombie Prisoner Door with Keep Out Warning
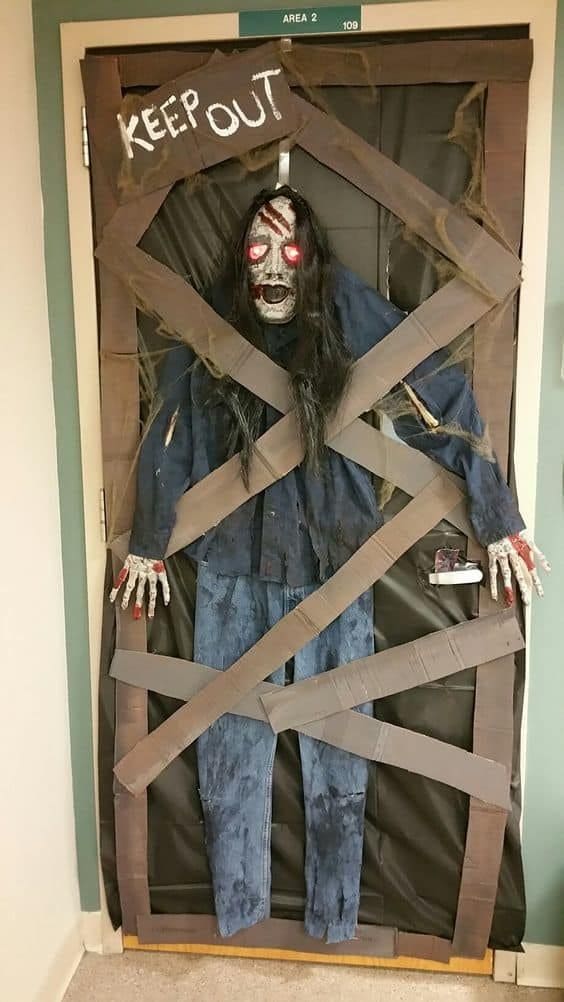
With faux wooden boards crisscrossing the door and a full zombie figure trapped behind them, this setup turns your entrance into a post-apocalyptic nightmare.
Specially, the glowing red eyes, the shredded outfit, and the weathered “KEEP OUT” sign all come together to make it look like something just barely held back.
If you’re going for full-on scare factor this Halloween, this one delivers.
Materials Needed
- Zombie or skeleton prop with glowing red eyes
- Old jeans and shirt
- Black or dark backdrop fabric
- Foam board
- Brown and black paint
- White paint
- Hot glue, tape, or mounting strips
- Fake spider webs
Step-by-step Guide
Step 1: Cover the entire door with black or dark fabric as the background.
Step 2: Dress your zombie figure in old clothes and secure it to the door using mounting strips or string through the sleeves and pant legs.
Step 3: Cut cardboard into plank shapes and paint them brown, adding streaks of black for a rotting wood effect.
Step 4: Write “KEEP OUT” in bold white letters on one plank. Then arrange the rest of the planks in a crisscross pattern and secure them in place to look like they’re containing the creature.
Step 5: Drape some fake spider webs or mesh cloth to give it an aged, abandoned feel.
#16. Stranger Things-Inspired Creepy Portal
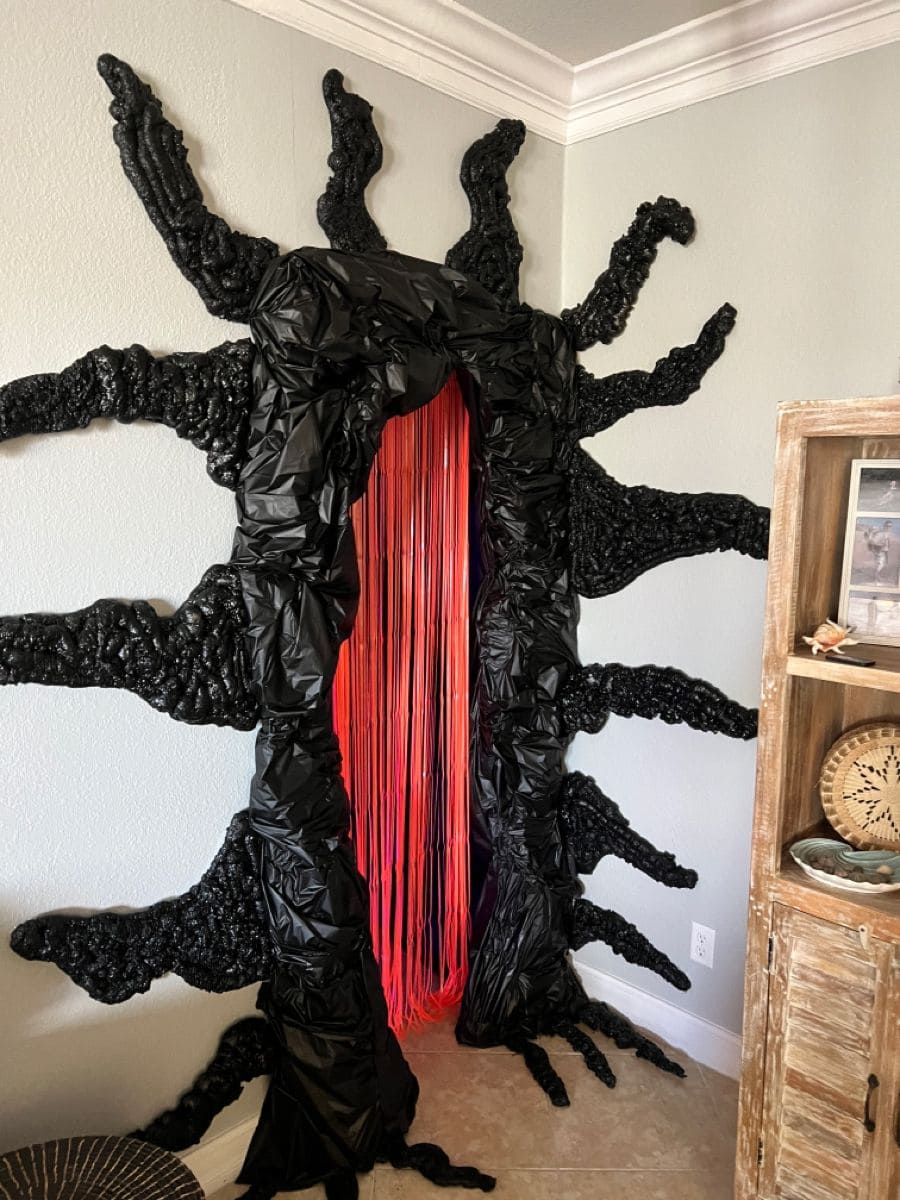
If your goal this Halloween is to stop hearts and spark conversations, this eerie, upside-down-inspired portal will absolutely deliver.
The jagged black foam tendrils and crumpled plastic arch look like they’re reaching out from another dimension. And the glowing red string curtain flickers like the last warning before stepping into something you shouldn’t.
This decor turns any doorway into a full-blown haunted attraction. It’s intense, bold, and perfect for anyone who wants to ditch cute in favor of creepy-cool.
Materials Needed
- Spray foam insulation (4-6 cans)
- 10-12 large black garbage bags
- Spray paint: black matte and glossy
- Red string curtain or streamers (door-sized)
- Hot glue gun and glue sticks
- Painter’s tape
- Cardboard (optional)
Step-by-step Guide
Step 1: Use cardboard to sketch and cut an arch frame, then wrap it in crumpled garbage bags to create the base texture.
Step 2: Spray expanding foam around the edges and across the wall to create root-like tendrils. You now let dry fully (overnight if possible).
Step 3: Once hardened, paint the foam and plastic areas black for consistency. Then mix matte and gloss paint to enhance texture.
Step 4: Hang your red curtain behind the arch using push pins or tape. Make sure it covers the full doorway height.
#17. Body Bag Crime Scene Door Decor
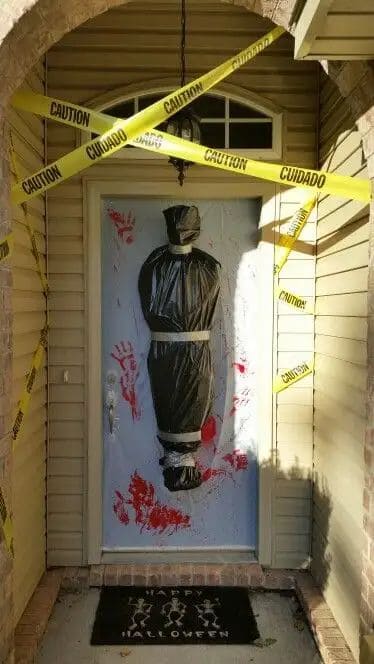
Wow, this one’s straight out of a horror flick. A life-sized body bag hanging from the door, surrounded by smeared red handprints and yellow caution tape, turns your front entrance into a full-blown crime scene.
The hanging effect makes it more intense, especially at dusk when shadows start to play tricks.
If you’re aiming to scare the socks off trick-or-treaters or give your neighbors something to talk about, this setup delivers serious shock value.
Materials Needed
- 1 large black trash bag
- Stuffing material (newspapers, blankets, or packing paper)
- Duct tape
- White or red door covering
- Fake blood
- Printed or painted red handprints
- “Caution” or “Cuidado” tape
- Hook, nail, or hanging chain
Step-by-step Guide
Step 1: Cover the door with a white or pale sheet to make the handprints and body stand out.
Step 2: Create a human shape using blankets or packing paper and wrap it in the black trash bag, sealing ends with duct tape to form the head and feet.
Step 3: Attach the stuffed bag to the top of the door frame or hook it with a chain for a suspended effect. Then smear or stamp red paint handprints across the background to simulate a struggle.
Step 4: Finally, drape “Caution” tape around the door frame to seal off the “scene.”
#18. Friendly Frankenstein Door
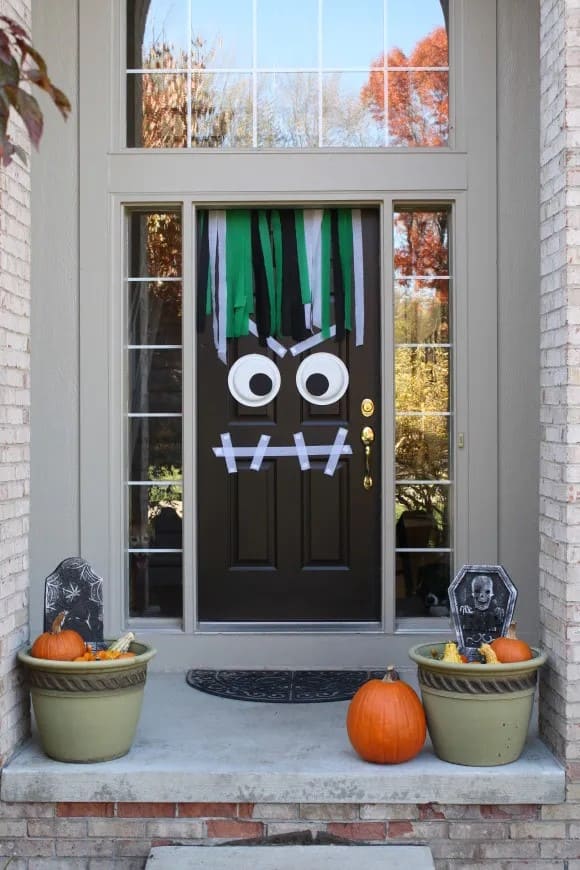
This Frankenstein-themed front door adds just the right amount of spooky and silly. A few wide strips of black, green, and white crepe paper hang down to mimic monster hair, while two oversized white eyes with black pupils pop out against the dark door.
Also, the mouth, made with simple white tape strips in a stitched pattern, gives it that classic stitched-up Frankenstein expression.
Around the base, small tombstones, pumpkins, and fall corn husks add playful fall flair without going overboard. It’s a great choice for Halloween touch.
Materials Needed
- Black, green, and white crepe paper (3-4 strips of each)
- White and black cardstock
- White masking tape
- 2-4 small plastic tombstones
- 4-6 pumpkins
Step-by-step Guide
Step 1: Cut and tape crepe paper strips to the top of the door for Frankenstein’s hair.
Step 2: Make large eyes using white circles and smaller black circles, then tape them in place.
Step 3: Next, use masking tape to create a stitched mouth shape on the lower half of the door.
Step 4: Finish by decorating the steps with pumpkins, faux tombstones, and fall harvest details.
#19. Hanging Skull Chain Door with Gothic Guardians
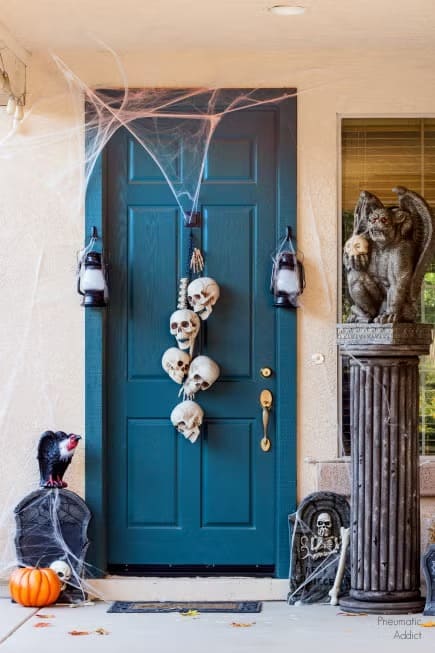
Dark, eerie, and theatrical, this skull-adorned entry gives off the vibe of an ancient crypt waiting to be disturbed.
In addition, twin lanterns frame the door, while webs stretch overhead, tangled in shadowy corners. On each side, faux tombstones and a vigilant gargoyle statue stand guard.
A cackling raven on the left intensifies the mood, and a single pumpkin adds a burst of orange to balance the grayscale decor.
Materials Needed
- 5-6 plastic skulls (8-10 inches)
- Sturdy black rope or jute cord (approx. 5 ft)
- 2 lightweight lanterns
- 1-2 bags stretchable spider web
- Gargoyle statue
- Plastic tombstones and faux raven prop
- 1 medium-sized pumpkin
Step-by-step Guide
Step 1: Thread the skulls onto the rope, spacing them evenly and knotting in between for stability.
Step 2: Mount the skull chain to the top center of the door using strong adhesive hooks or an over-the-door hanger.
Step 3: Attach battery lanterns on both sides with removable hooks. Then you stretch spider webs across the top and corners of the doorway.
Step 4: Place tombstones, pumpkin, and gargoyle on either side of the door to complete the scene.
#20. Stacked Pumpkin Door Entrance
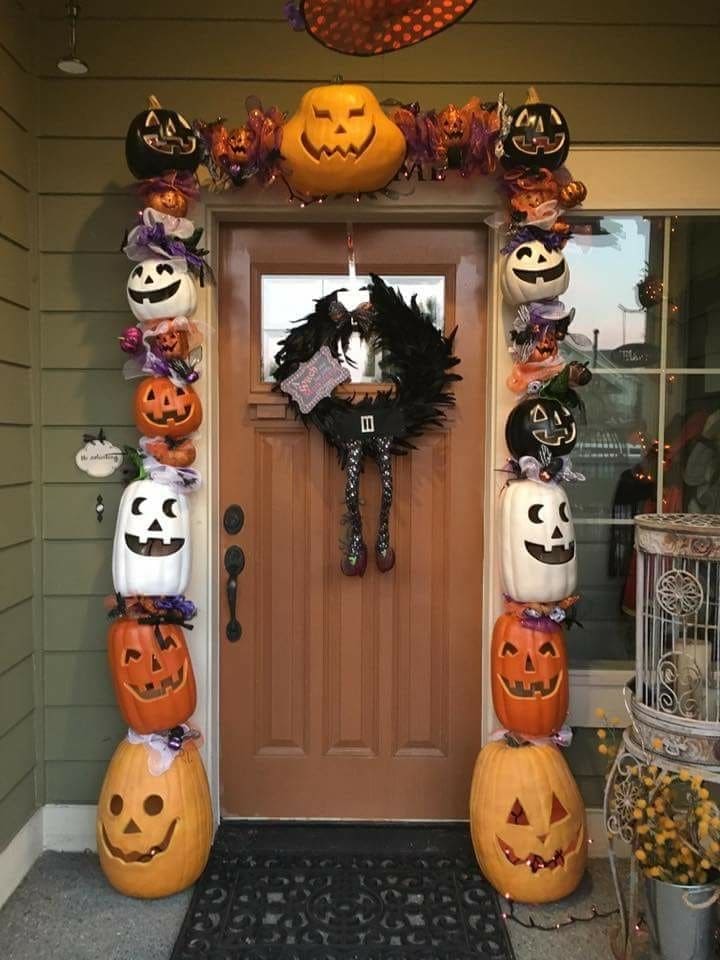
You can see this vibrant jack-o’-lantern archway is a bold and playful twist on classic Halloween porch decor.
Carved foam pumpkins in black, white, and traditional orange are stacked high on both sides of the doorway, forming festive towers that frame the entry with cheerful spookiness.
Moreover, this setup is festive without being frightening, perfect for welcoming little goblins, princesses, and pirates on Halloween night.
Materials Needed
- 12-16 hollow plastic or foam jack-o’-lanterns
- Hot glue gun
- Purple and orange mesh ribbon
- 1 large faux pumpkin
- Halloween wreath with feathers and witch legs
- String lights (optional)
Step-by-step Guide
Step 1: Drill holes or cut slits in the bottom/top of each foam pumpkin to allow for stacking with wooden dowels or stakes.
Step 2: Decorate each pumpkin tower with mesh ribbon or bows between layers for added flair and color.
Step 3: Secure the arch using a curtain rod, foam frame, or support wire, then attach the top pumpkin and ribbon garland.
Step 4: Finally, add a black wreath with witchy details to the door to center the whole design.
#21. Ghostly Greetings and Giant Spider Flair
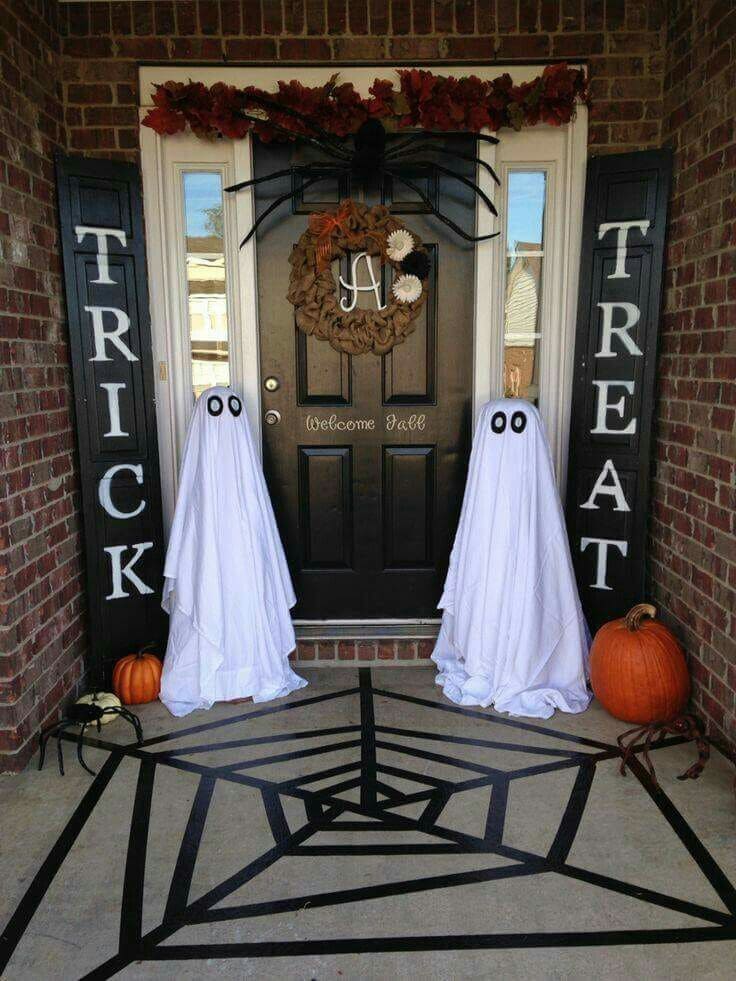
This front porch proves you don’t need gore to make a bold Halloween statement. Two ghostly figures made from draped white sheets stand guard on either side of the door, creating a friendly fright for trick-or-treaters.
Specially, the hand-taped spiderweb stretching across the concrete draws the eye and adds a geometric punch to the layout.
Above the door, a giant spider crouches over a rustic wreath, perfectly blending spooky with seasonal charm.
Materials Needed
- 2 white sheets
- 2 black foam balls
- Plastic pumpkin buckets
- Black painter’s tape
- Large faux spider (24-30 inches wide)
- Wreath with seasonal accents
- Vertical “TRICK” and “TREAT” signs
Step-by-step Guide
Step 1: Drape the white sheets over lightweight stands (pumpkin buckets or tomato cages work well) and secure googly eyes or felt circles for ghost faces.
Step 2: Use black painter’s tape to form a large spiderweb on the porch floor starting from the center and working outward.
Step 3: Hang a fall wreath and a giant spider above the doorframe using nails or adhesive hooks.
Step 4: Place your “TRICK” and “TREAT” signs on either side and scatter a few pumpkins to complete the festive look.
#22. Double-Door Halloween Scene
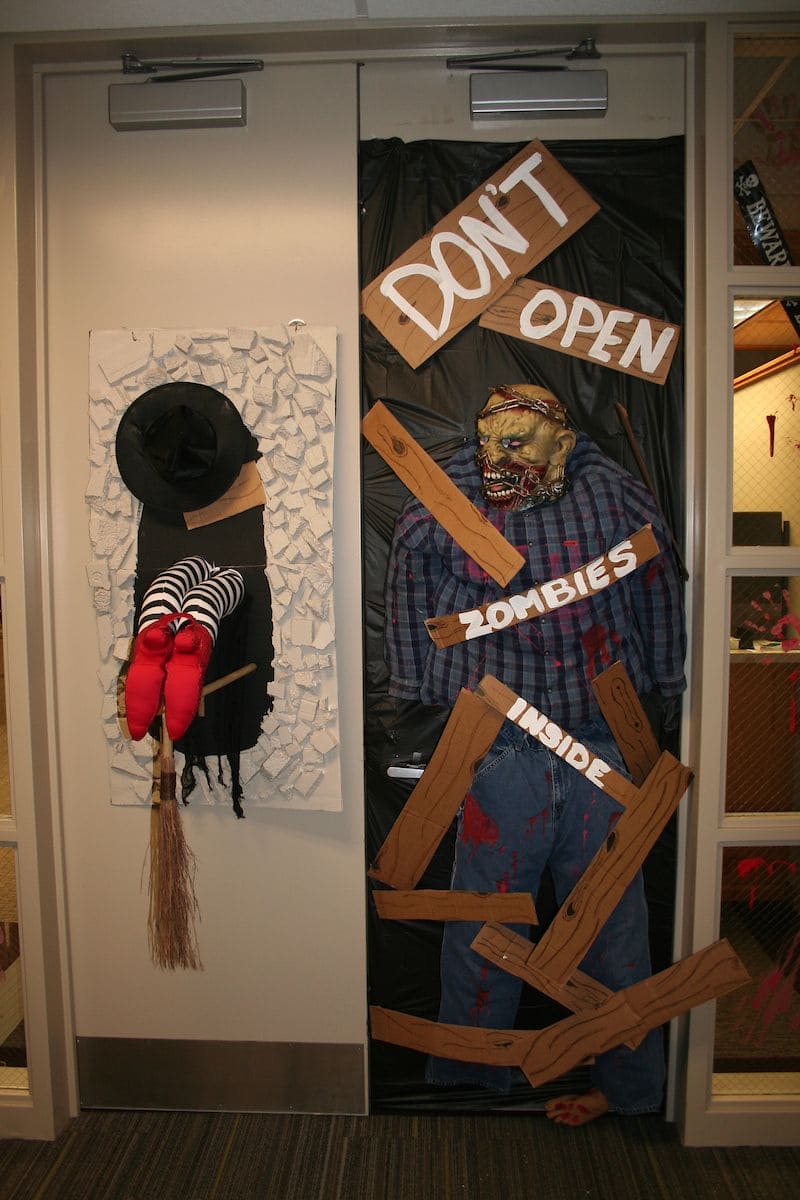
Look at this, on one door, a zombie in a flannel shirt appears to be breaking through with jagged cardboard boards labeled “DON’T OPEN – ZOMBIES INSIDE,” instantly giving off post-apocalyptic vibes.
Moreover, the gory details and creepy mask make it a thrilling jump-scare setup.
The layered paper rubble and black cape bring a fun Wizard of Oz-style visual twist. Together, they balance fear and humor in one unforgettable porch scene.
Materials Needed
- Zombie mask, plaid shirt, and jeans
- Black plastic tablecloth or backdrop
- Cardboard planks and white paint
- Witch hat, striped tights, red shoes, black fabric
- Broomstick, glue gun, and fake blood (optional)
Step-by-step Guide
Step 1: Cover one door in black plastic and attach the zombie outfit to appear like it’s breaking out from behind fake wood planks.
Step 2: Paint or write “Don’t Open – Zombies Inside” on the planks and glue them in a crisscross pattern over the body.
Step 3: On the other door, layer textured white panels or paper to mimic a crumbled wall.
Step 4: Finally, attach the witch hat, striped legs, shoes, and broom at a tilted angle to look like a crash site.