21 Unique DIY Halloween Wreath Ideas That Will Wow Every Trick-or-Treater
When Halloween night arrives, your front door sets the stage for the spooky fun ahead. A well-crafted wreath instantly tells visitors they’ve stepped into a world of thrills, chills, and a touch of creative magic.
These wreath ideas go beyond the ordinary, blending eerie charm with personal style to create a truly memorable welcome.
Imagine ghostly figures peeking out, creepy dolls staring back, or pumpkins grinning in wicked delight, each design has its own personality.
You’ll find projects that are budget-friendly, easy to customize, and perfect for making your door the talk of the neighborhood. Get ready to wow every trick-or-treater who dares to knock.
#1. Haunting Grim Reaper Wreath
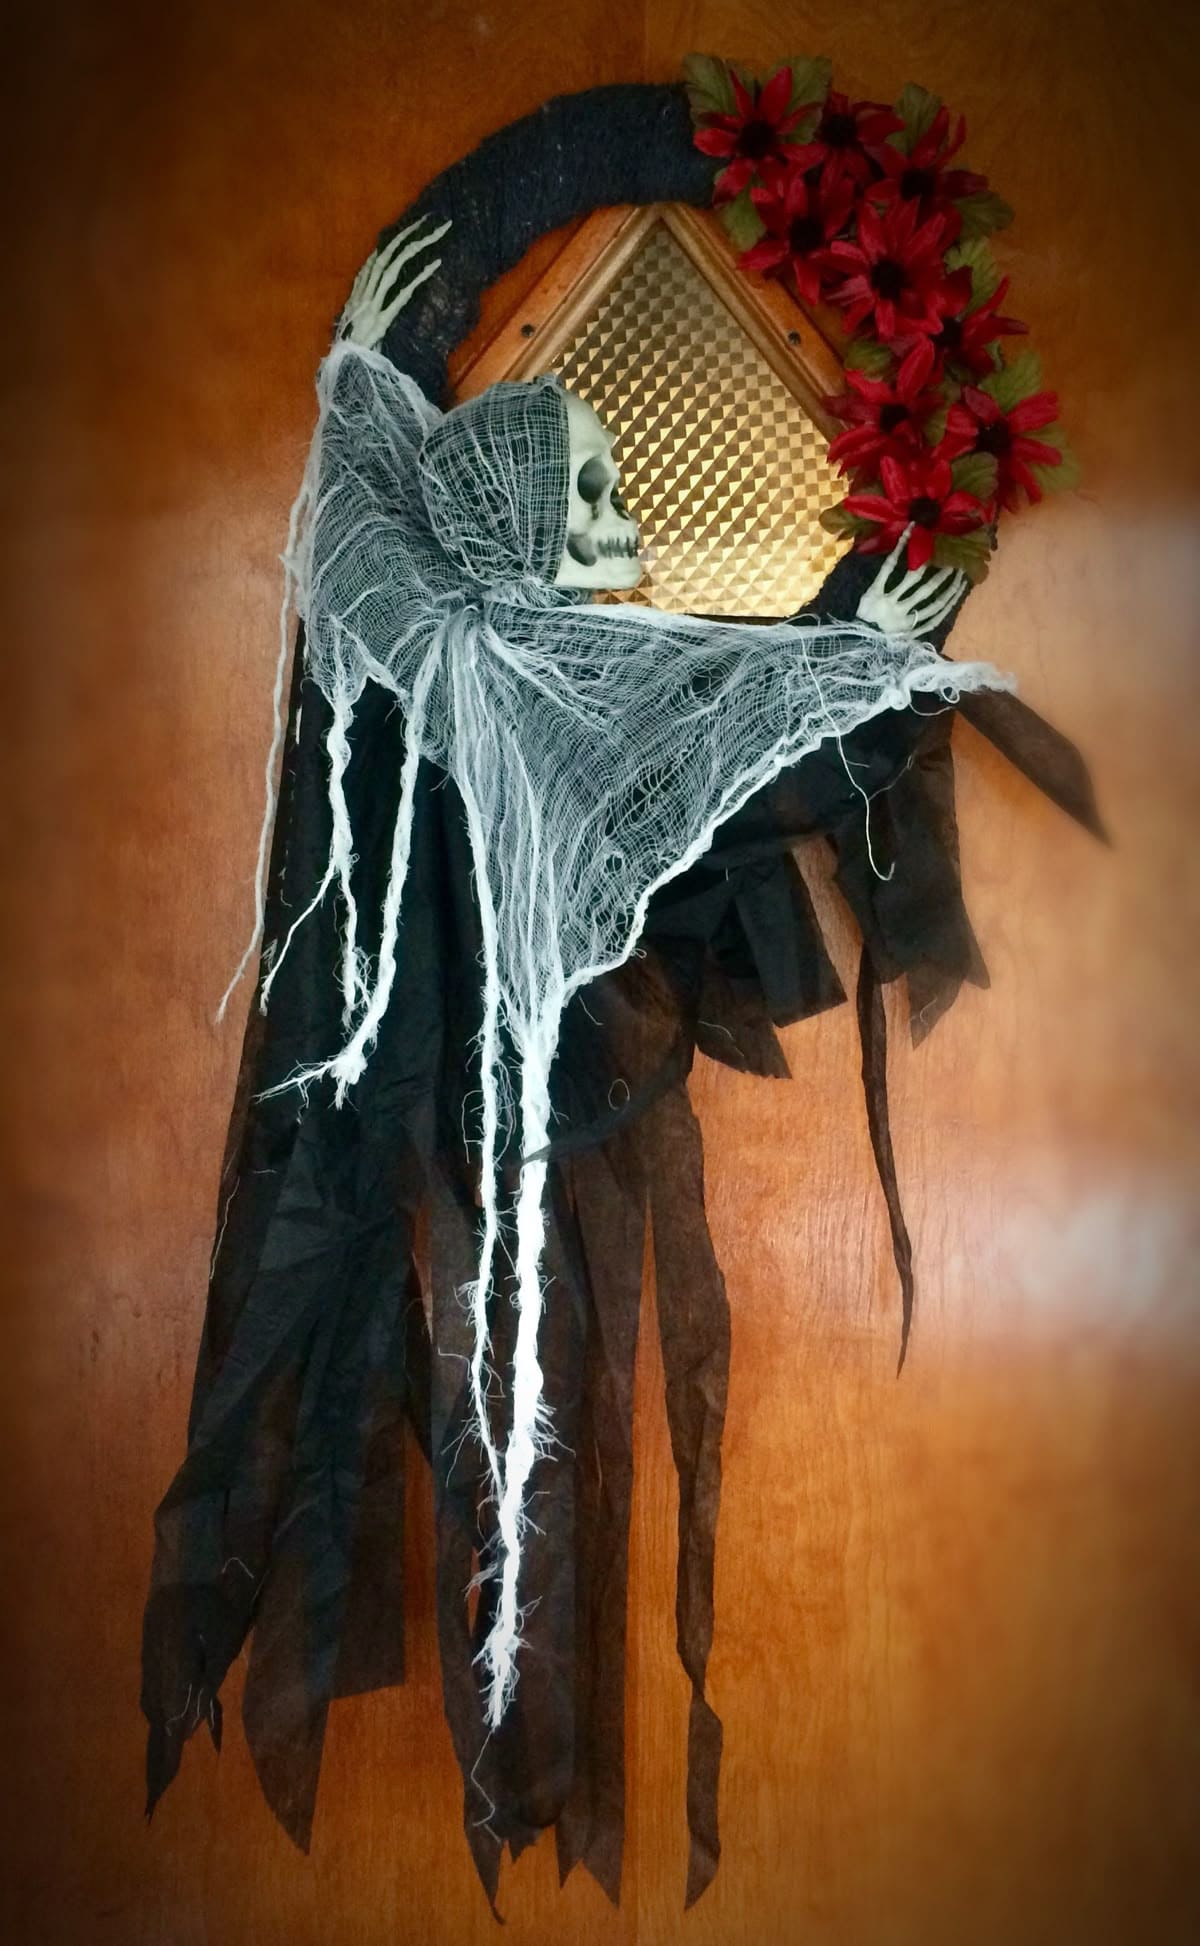
If you want your Halloween guests to feel a spine-tingling chill before they even knock, this Grim Reaper wreath is the way to go. Its skeletal arms seem to cling to the door like it’s guarding the threshold, while the dark tattered fabric drapes down in ghostly wisps.
The deep red flowers give just the right splash of eerie elegance. It’s dramatic, creepy, and incredibly easy to pull together.
Materials Needed
- 1 grapevine or foam wreath base (14-16 inches)
- 1 plastic Grim Reaper decoration with poseable arms (about 24 inches)
- 1 yard black cheesecloth or gauzy fabric
- 2-3 yards black crepe or tissue streamers
- 6-8 faux red flowers with green leaves
- Hot glue gun and glue sticks
- Floral wire or zip ties
Step-by-step Guide
Step 1: Lay your wreath base on a flat surface and position the Grim Reaper so its arms wrap partly around the frame. Secure with floral wire or zip ties.
Step 2: Drape black cheesecloth over the Reaper’s body, letting it fall naturally for a ghostlike look. Then use small dabs of hot glue to keep it in place without flattening the texture.
Step 3: Cut streamers into long strips and attach them to the bottom half of the wreath so they trail down.
Step 4: Cluster the faux red flowers along one side of the wreath. Then glue them in tightly to create a rich pop of color that contrasts against the dark fabric.
Step 5: Hang it on your door and step back and it’s now ready to welcome your visitors in true Halloween style.
#2. DIY Twig and String Spider Web
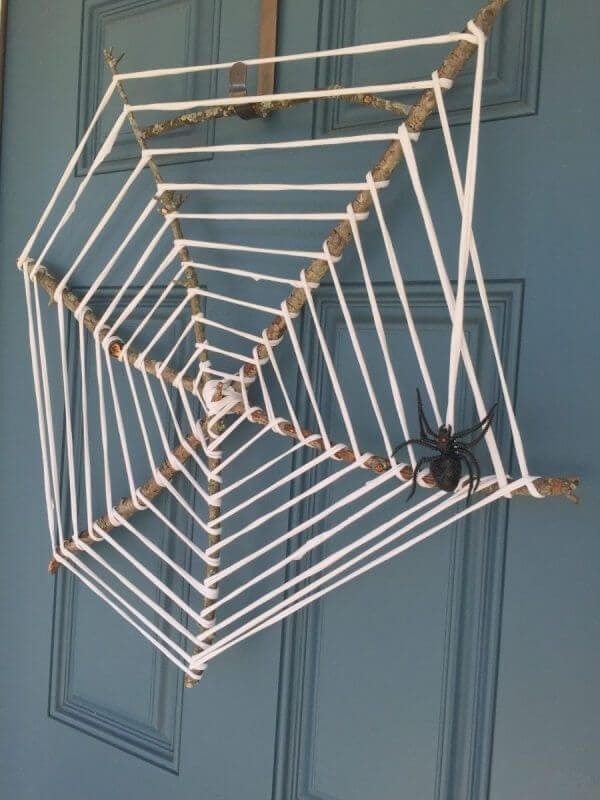
You can also add a rustic yet eerie charm to your Halloween entryway thanks to this wreath.
Crafted from sturdy branches tied together at angles, the frame forms a perfect base for weaving white cord into a striking geometric web. The simplicity of the design makes it easy to create while still delivering a bold impact.
Also, a single oversized black spider perched on one side gives the piece just the right amount of creepy-crawly drama.
Materials Needed
- 4 sturdy branches, each about 18-20 inches long
- White cotton cord or yarn (10-12 ft)
- Hot glue gun & glue sticks
- Plastic spider decoration (large size)
- Scissors
Step-by-step Guide
Step 1: Arrange branches into a square frame and secure the corners with hot glue and cord.
Step 2: Tie one end of the cord to the center and weave it around the branches, forming concentric shapes like a web.
Step 3: Adjust the tension for a neat, even design, then tie off the end securely.
Step 4: Glue the plastic spider onto the web for the final spooky touch and you are done!
#3. Spooky Graveyard Halloween Wreath

Wow, this eerie Halloween wreath captures the chilling stillness of an abandoned graveyard. The base is wrapped in rustic jute rope, giving it a natural, earthy feel.
At the center stands a tall, black, leafless tree, its gnarled branches reaching out like skeletal fingers. Wisps of faux spiderweb cling to the limbs, adding to its haunted charm.
Beneath the tree lies a tiny cemetery scene, complete with a miniature tombstone, black picket fence, mossy ground, and bright orange pumpkins for a pop of color.
This wreath blends rustic texture with spooky details, making it perfect for anyone who loves a touch of haunted elegance on their door.
Materials Needed
- Wreath form (14-16″)
- Jute rope or twine (20-25 ft)
- Miniature black tree decoration
- Faux spiderweb and small plastic spiders
- Mini skeleton figure
- Mini tombstone and black picket fence
- 3-4 mini pumpkins
- Moss and small stones
- Hot glue gun & glue sticks
Step-by-step Guide
Step 1: Wrap the wreath form completely with jute rope, securing the ends with hot glue.
Step 2: Attach the miniature tree to the top center, ensuring it’s firmly fixed.
Step 3: Stretch faux spiderweb across the tree branches for a haunted effect.
Step 4: Arrange moss, pumpkins, and stones at the base to form the graveyard floor.
Step 5: Finally, add the tombstone, fence, and skeleton, then glue everything securely in place.
#4. Skeleton Gentleman Gothic Halloween Wreath
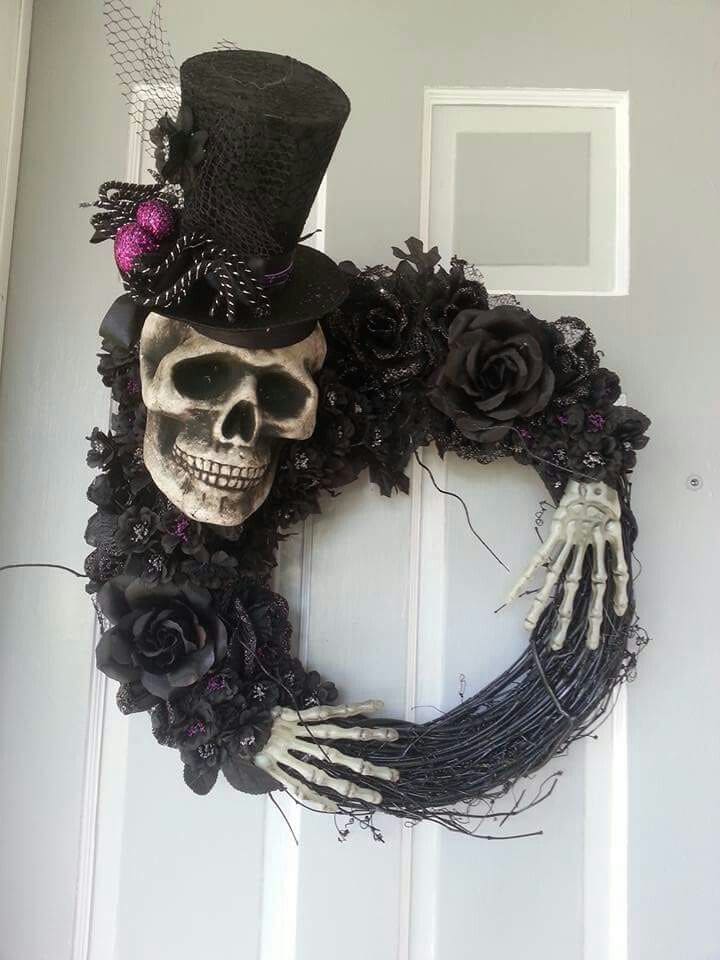
In this design, a grinning skeleton head, topped with a black top hat adorned in netting, feathers, and glittering purple accents, creates a dashing yet chilling focal point.
Deep black roses and dark florals cover half the wreath, adding depth and a mysterious allure. The skeletal hands clutch the twisted black grapevine base, giving the impression of a gentleman ghost holding his own portal to the underworld.
Perfect for a bold front door statement, this wreath blends sophistication and spookiness in one unforgettable design.
Materials Needed
- Grapevine wreath base (14-16″) painted black
- Skeleton head and hands (life-size)
- Black faux roses and dark florals
- Top hat (miniature or craft size)
- Black netting and feathers
- Glittered purple Halloween picks
- Hot glue gun & glue sticks
Step-by-step Guide
Step 1: Paint the grapevine wreath base black and let it dry fully.
Step 2: Attach the skeleton head and hands securely to the wreath frame.
Step 3: Arrange and glue black roses and florals around one half of the wreath.
Step 4: Decorate the top hat with netting, feathers, and glittered accents, then secure it to the skull.
#5. Cozy Pumpkin Cat Halloween Wreath
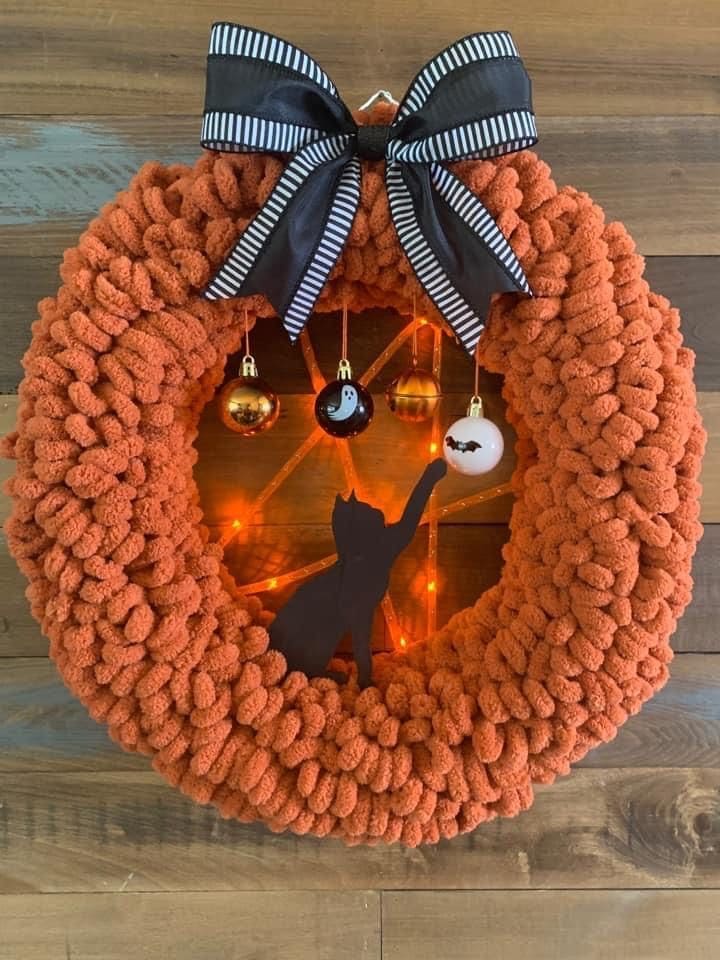
This wreath blends Halloween charm with a soft, cozy feel. The thick, pumpkin-orange yarn base creates a warm, inviting texture, perfect for autumn.
At its center, a playful black cat silhouette reaches up toward dangling Halloween ornaments like a shiny pumpkin, a ghost, and a ba bringing movement and character to the design.
Behind them, a glowing orange spiderweb of lights casts a warm, flickering ambiance that makes the wreath eye-catching even at night. A bold black bow with white-striped edges crowns the piece, adding sophistication.
Materials Needed
- Wreath base (14-16″)
- Chunky orange yarn (20-25 ft)
- Black cat silhouette cutout (wood or cardstock)
- 3-4 mini Halloween ornaments
- String lights with orange glow (battery-operated)
- Black ribbon with white stripes (2-3 ft)
- Hot glue gun & glue sticks
Step-by-step Guide
Step 1: Wrap the chunky yarn snugly around the wreath base until fully covered.
Step 2: Attach the lighted spiderweb at the center and secure the black cat silhouette in place.
Step 3: Hang the mini ornaments so they dangle within the wreath’s opening. Finish with a large decorative bow at the top.
#6. Black Cat Halloween Wreath
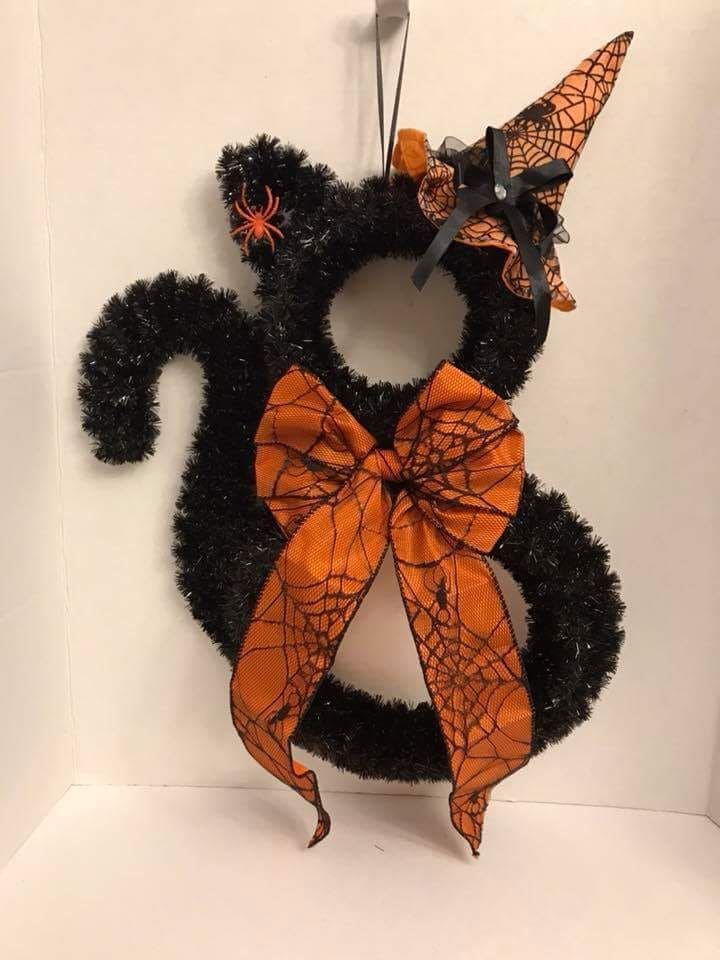
Shaped like a sitting cat, this adorable yet spooky black cat wreath is covered in shimmering black garland that catches the light just enough to feel magical.
Perched on the cat’s head is a miniature witch’s hat, complete with the same orange-and-black web design, making it look ready for a midnight broom ride.
Bonus, a tiny plastic spider clings to one ear, giving a subtle creepy touch. Perfect for front doors or indoor walls, this wreath blends whimsy and Halloween tradition, making it a fun seasonal accent without being too scary.
Materials Needed
- Cat-shaped wreath form (approx. 18-20″)
- Black tinsel garland (15-20 ft)
- Orange spiderweb-pattern ribbon (2.5″ wide, 3-4 ft)
- Mini witch hat (about 6″)
- 2 plastic spider decorations
- Hot glue gun & glue sticks
Step-by-step Guide
Step 1: Wrap the entire cat-shaped form with black tinsel garland, securing with hot glue as you go.
Step 2: Tie a large bow with the spiderweb ribbon and attach it to the center of the wreath body.
Step 3: Position and glue the mini witch hat onto one ear of the cat.
Step 4: Add plastic spiders to the ear or bow for extra Halloween flair.
#7. Fire-Breathing Dragon Halloween Wreath
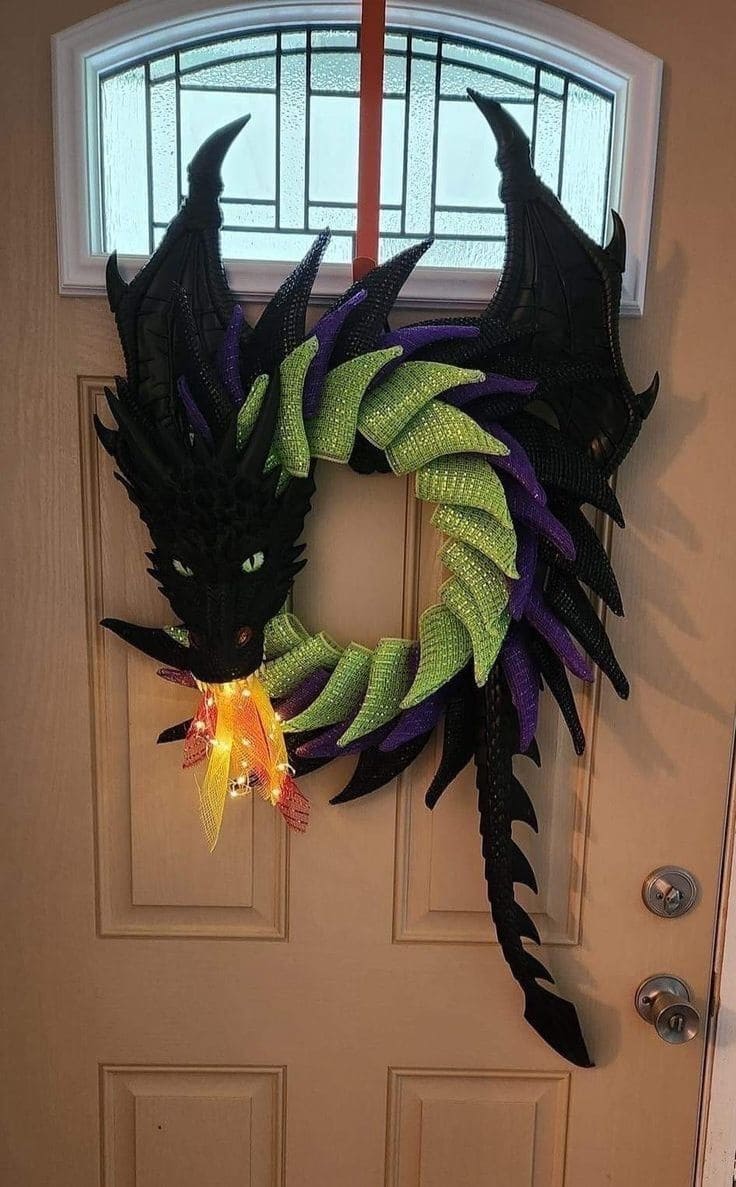
Featuring the fierce head, wings, and tail of a black dragon, this stunning Halloween wreath coils around the wreath frame with scales crafted from shimmering green and purple mesh.
The dragon’s piercing green eyes give it an intense, lifelike presence, while its open mouth breathes fire made of glowing orange and yellow mesh ribbons illuminated by tiny lights.
Suspended by an orange ribbon, it’s a dramatic showpiece that blends spooky Halloween energy with mythical adventure. Perfect for fantasy lovers who want something bold and unforgettable on their front door.
Materials Needed
- Wreath frame (14-16″)
- Black dragon head, wings, and tail decorations
- Mesh ribbon in green, purple, orange, and yellow (2-3 rolls each)
- Battery-operated string lights (warm white)
- Hot glue gun & glue sticks
- Orange hanging ribbon (1 yard)
Step-by-step Guide
Step 1: Wrap green and purple mesh around the wreath frame in an overlapping pattern to create a layered, scale-like effect.
Step 2: Attach the dragon head, wings, and tail to the frame with hot glue, ensuring they curve naturally.
Step 3: Create fire by cutting orange and yellow mesh into flame shapes, then secure them to the dragon’s mouth.
Step 4: Weave string lights into the flame mesh for a glowing effect.
Step 5: Finally, hang using the orange ribbon for a bold entrance statement.
#8. Cheerful Ghost and Pumpkin Halloween Wreath

What about blending spooky charm with cheerful energy? Adorned with six adorable white ghosts, each with a different facial expression, this wreath brings personality and a bit of comedy to your décor.
Nestled between the ghosts are tiny orange pumpkins and bright green plastic spiders, adding a pop of festive color. The black tinsel garland wrapped around the base provides contrast, while a vibrant orange bow on top ties it all together.
This wreath works beautifully on a front door to welcome trick-or-treaters with a smile rather than a scare.
Materials Needed
- Wreath frame (14-16″)
- Black tinsel garland (6-8 ft)
- 6 small ghost decorations (fabric or felt)
- 8-10 mini plastic pumpkins
- 15-20 plastic spiders (green)
- Hot glue gun & glue sticks
- Orange ribbon (1 yard)
Step-by-step Guide
Step 1: Wrap the black tinsel garland around the wreath frame, securing with hot glue.
Step 2: Glue the ghost decorations evenly around the wreath.
Step 3: Fill spaces with mini pumpkins and plastic spiders for color and texture.
Step 4: Now you just tie the orange ribbon into a bow at the top and secure it firmly.
#9. Glowing Spider Web Twig Wreath
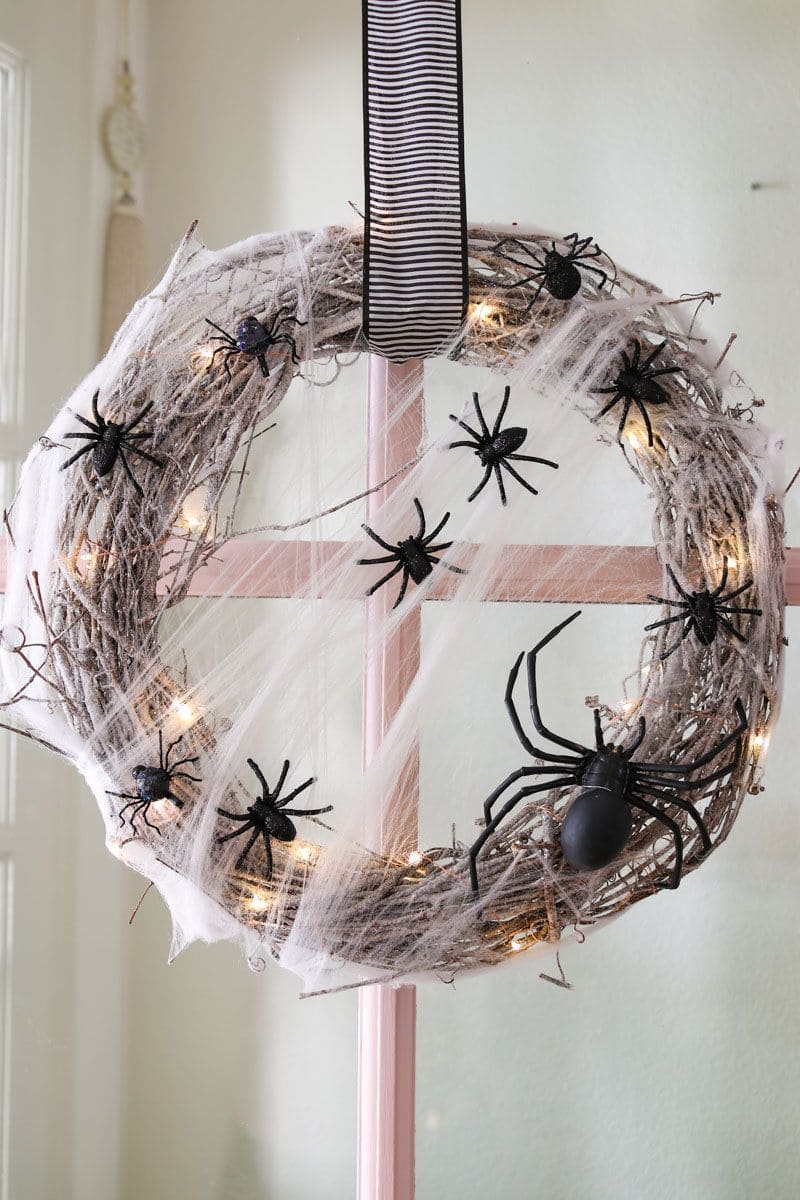
This eerie yet elegant Halloween wreath turns your front door into a spider’s lair. A base of intertwined twigs is draped with wispy white webbing, creating the perfect creepy backdrop for a swarm of black spiders.
Each spider clings to the wreath in different positions, with one oversized arachnid making a dramatic statement near the bottom.
Plus, warm white fairy lights woven through the twigs add a subtle glow that makes the web shimmer at night.
Materials Needed
- 18-inch twig wreath base
- Stretchable white spider webbing
- 8-10 plastic spiders (varied sizes)
- Battery-operated warm white fairy lights
- Black-and-white striped ribbon
- Hot glue gun & glue sticks
Step-by-step Guide
Step 1: Wrap the twig wreath lightly with fairy lights, securing the battery pack at the back.
Step 2: Stretch spider webbing thinly across the wreath for a realistic look.
Step 3: Attach spiders in varied positions, gluing them securely in place.
Step 4: Loop the striped ribbon through the top for hanging, and fluff the web if needed.
#10. Colorful Spider Web Yarn Wreath
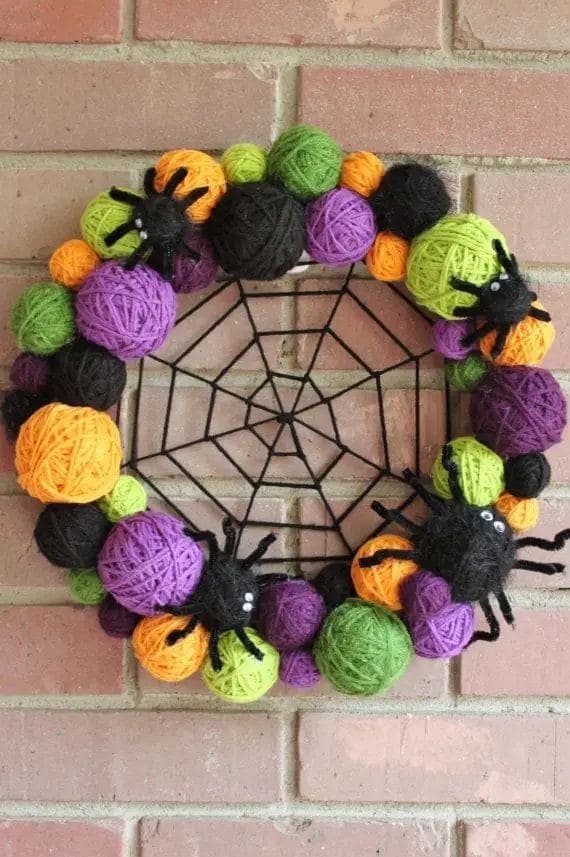
This Halloween wreath turns simple yarn balls into a vibrant, spooky showpiece. A mix of purple, orange, green, and black yarn balls form a playful yet eerie border, surrounding a black yarn spiderweb at the center.
Perched on the edges, fuzzy black spiders with googly eyes look ready to scuttle across the web, adding just the right amount of creepy charm.
Bonus, the bold colors bring a festive pop that contrasts beautifully with the web’s stark black lines, making it an eye-catching decoration for any door or wall.
Materials Needed
- 20-25 yarn balls in orange, purple, green, and black
- Foam or wire wreath base (14-16″)
- Black yarn for spiderweb (10-12 ft)
- 3-4 plastic or yarn spiders
- Hot glue gun & glue sticks
Step-by-step Guide
Step 1: Wrap black yarn across the wreath center to form a spiderweb pattern, securing each strand with glue.
Step 2: Arrange and glue yarn balls around the wreath’s outer edge, alternating colors for balance.
Step 3: Attach spiders to the yarn balls and web for a spooky finishing touch.
Refer to: 20 Halloween Ceiling Decor Ideas That Will Leave Everyone Spellbound
#11. Pom-Pom Spider Web Wreath
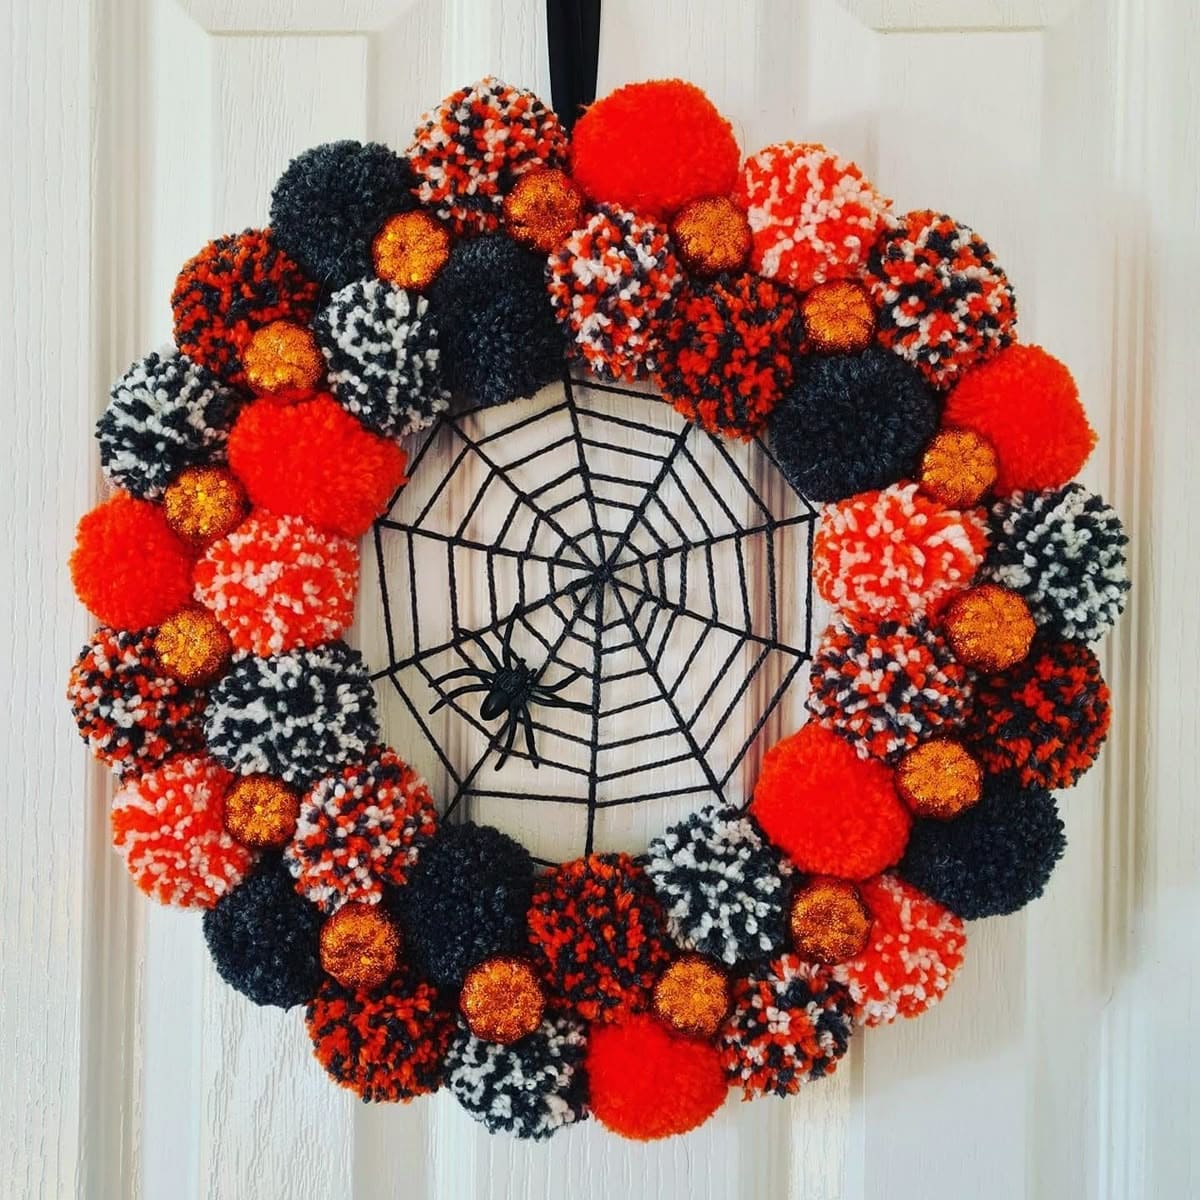
This playful Halloween wreath feels like a burst of candy colors mixed with just the right amount of spooky. Fluffy pom-poms in orange, black, and white create a festive ring, their soft texture inviting you to reach out and touch.
Tucked between them, glittery orange accents shimmer under the light, giving the whole piece a lively glow. The center steals the show, a black yarn spiderweb stretched across the middle, complete with a little plastic spider waiting for unsuspecting“visitors.
Specially, it’s a delightful balance of fun and fright, perfect for your front door or party backdrop. You’ll love how it brings cheer and a hint of Halloween mischief in one display.
Materials Needed
- Metal or wire wreath frame (12-14″)
- Yarn in black, orange, white, and mixed patterns (approx. 50-60 yards each)
- Pom-pom maker or cardboard rings
- 6-8 glittery orange mini balls (2-3″)
- Plastic spider (2-3″)
- Hot glue gun & glue sticks
Step-by-step Guide
Step 1: Wrap black yarn across the center of the frame to form a spiderweb pattern, securing ends with hot glue.
Step 2: Create pom-poms in various colors and sizes, trimming them for a neat, full look.
Step 3: Glue pom-poms around the wreath frame, alternating colors for a balanced design.
Step 4: Add glittery orange balls between pom-poms for sparkle, then place the spider in the web’s center.
#12. DIY Adorable Ghost Wreath
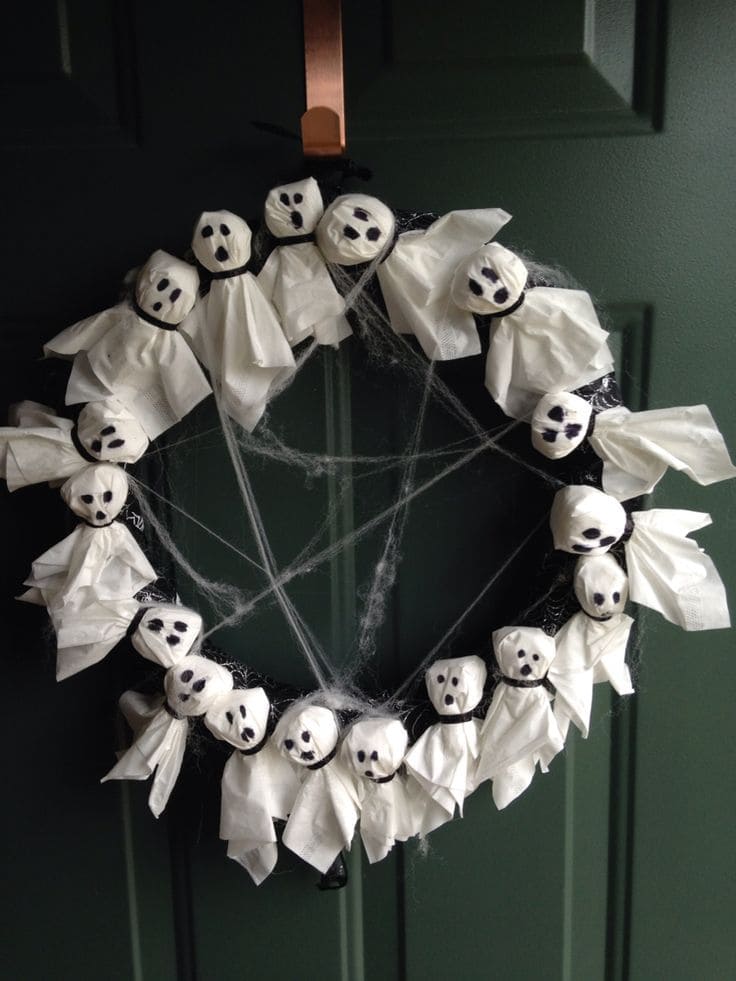
This playful ghost wreath is a charming mix of spooky and cute, perfect for greeting trick-or-treaters with a smile. Made from miniature ghost figures crafted out of tissues, each one has a hand-drawn face and is tied around the head to give shape.
The little ghosts are arranged around a wreath form, connected with wispy spider webbing for an extra Halloween touch.
Materials Needed
- 1 wreath form (12-14 inches)
- 20-25 tissues (2-ply)
- Small foam balls or crumpled paper (1-1.5 inches)
- Black permanent marker
- Black string or ribbon (¼ inch wide)
- Fake spider web
- Hot glue gun & glue sticks
Step-by-step Guide
Step 1: Place a foam ball in the center of a tissue and wrap it to form a ghost head.
Step 2: Tie the neck securely with black string, then draw spooky or silly faces with a marker.
Step 3: Hot glue each ghost evenly around the wreath form.
Step 4: Now you can stretch spider webbing across the inner part of the wreath for a creepy finish.
#13. Googly-Eyed Ping Pong Ball Halloween Wreath
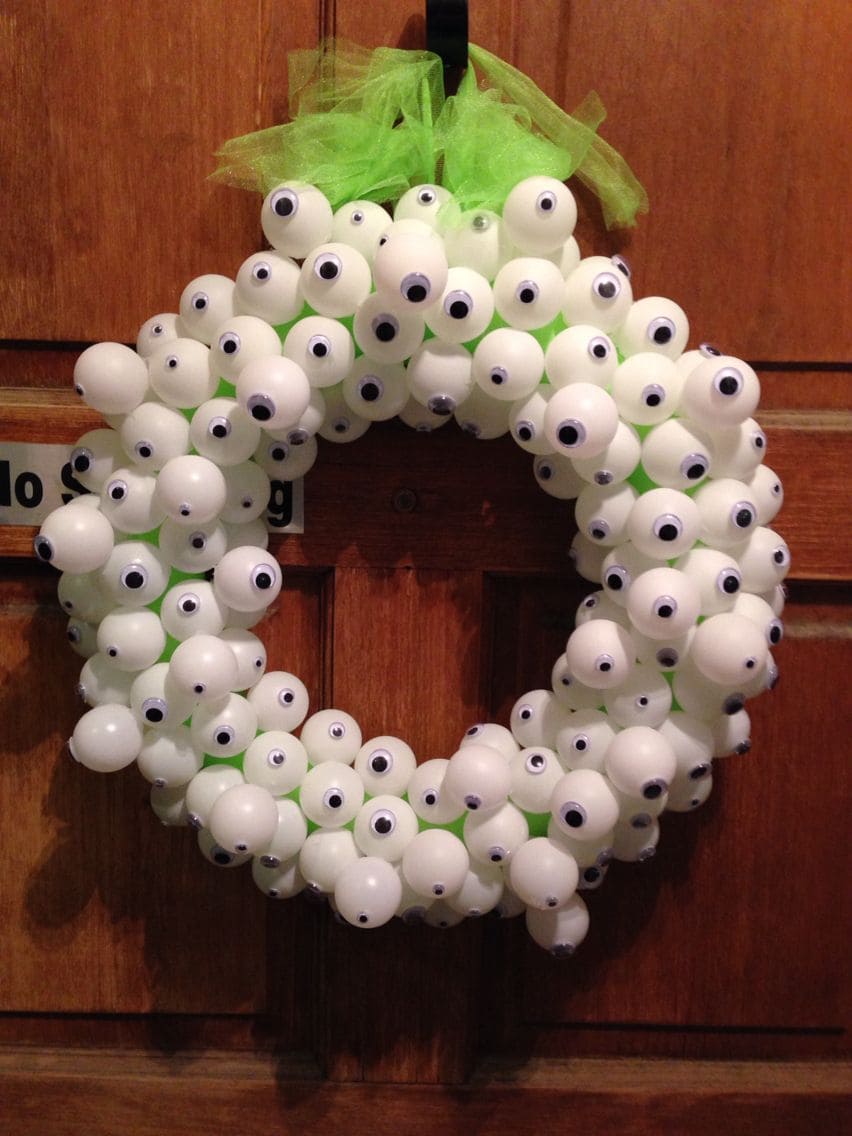
This quirky wreath will have all eyes on your front door! Made from dozens of ping pong balls topped with wiggly googly eyes, it gives off a hilariously eerie vibe perfect for Halloween.
The white balls stand out boldly against the natural background, while the random eye directions make it feel alive, as if it’s following anyone who passes.
Plus, a pop of neon green mesh at the top adds an extra splash of color and whimsy. It’s fun, lightweight, and surprisingly easy to put together, making it an ideal DIY for adults and kids alike who want a spooky yet silly decoration.
Materials Needed
- Wreath frame (14-16″)
- 80-100 white ping pong balls (40 mm)
- Assorted sizes of googly eyes (10-20 mm)
- Hot glue gun & glue sticks
- Neon green mesh ribbon (1 yard)
Step-by-step Guide
Step 1: Glue a googly eye to each ping pong ball, you can mix sizes for a playful look.
Step 2: Attach the balls to the wreath frame with hot glue, covering all sides.
Step 3: Tie and secure the green mesh ribbon at the top for a pop of color.
Step 4: Hang on your door and watch guests giggle as they feel watched.
#14. Twilight Bat Swarm Wreath
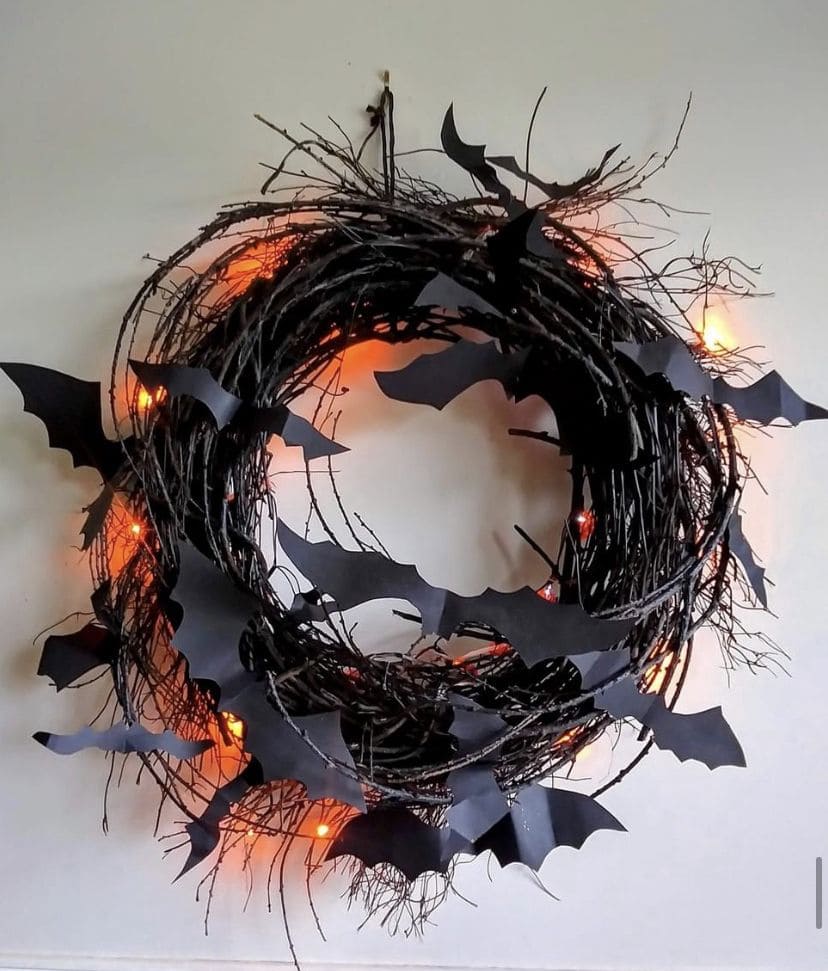
At dusk, the sky fills with wings bring that magic right to your doorway. This rustic grapevine wreath, dotted with soft orange lights and a flurry of paper bats, looks dramatic but comes together in a calm evening of crafting.
I bet you’ll love how the silhouettes seem to take off the moment the lights click on.
Materials Needed
- Grapevine wreath (16-18″)
- 1 pack battery fairy lights (10-20 ft, warm orange)
- 8-12 sheets black cardstock (8.5″×11″)
- Scissors or craft knife + bat template
- Hot glue gun & glue sticks
- Floral wire (24-26 gauge)
- 2 AA/AAA batteries (for lights)
Step-by-step Guide
Step 1: Tuck the light strand into the grapevine, weaving it loosely so the bulbs peek through. Then secure the battery pack on the back with floral wire.
Step 2: Cut a flock of bats in mixed sizes, some tiny, some wide-winged. A few asymmetrical cuts make them feel alive.
Step 3: Bend each bat’s body slightly along the center so the wings lift off the wreath.
Step 4: Hot glue bats in a sweeping spiral, concentrating more on one side to mimic motion.
Step 5: Flip on the lights and fluff twigs forward for extra shadowy texture.
#15. Skeleton in a Gothic Floral Urn Wreath
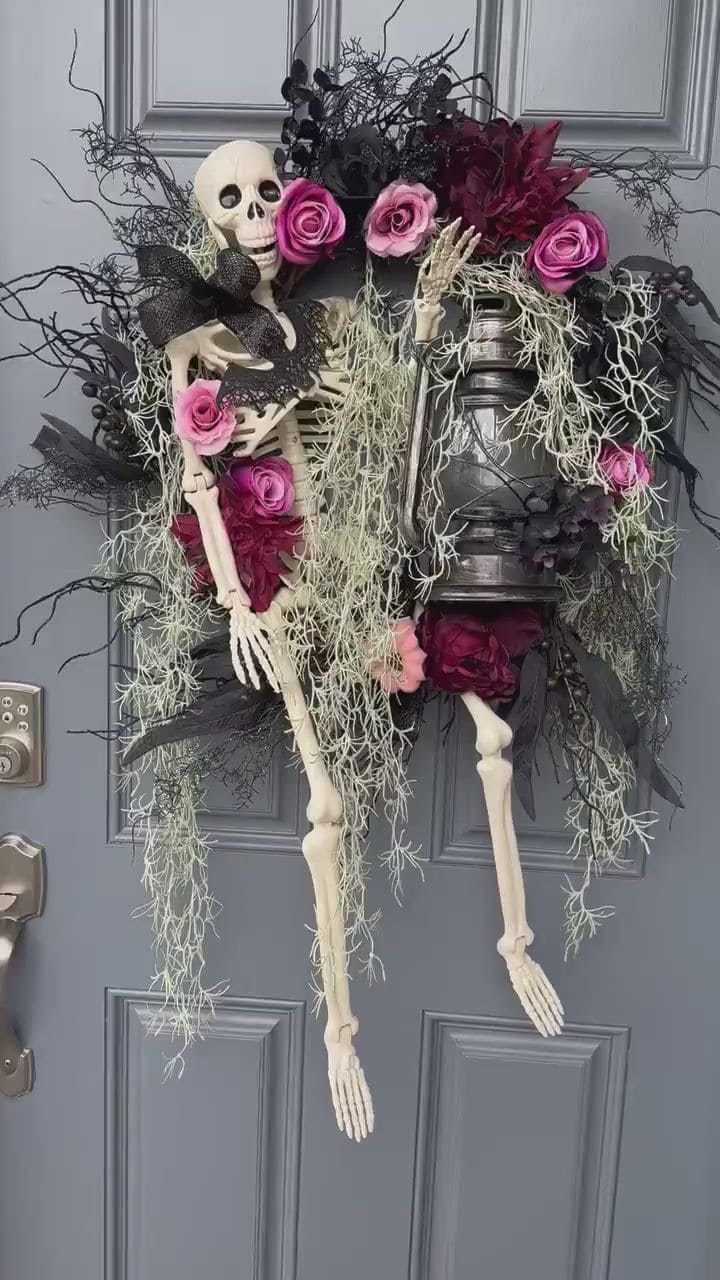
You can see this dramatic Halloween wreath looks like it belongs on the door of a haunted Victorian mansion. A full skeleton leans casually against a black urn, surrounded by lush cascades of Spanish moss, deep burgundy dahlias, and romantic pink roses.
The dark, feathery foliage adds eerie texture, while a glittery black bow near the collar gives the skeleton an oddly charming flair.
With one rose playfully tucked between its teeth, this piece strikes a perfect balance between creepy and romantic, ideal for those who like their Halloween décor with a theatrical twist.
Materials Needed
- Skeleton prop (full or half-size)
- Black urn planter (lightweight)
- Spanish moss (about 3-4 ft)
- Burgundy faux dahlias and peonies
- Pink faux roses
- Black glitter ribbon
- Black faux foliage and twigs
- Hot glue gun & glue sticks
Step-by-step Guide
Step 1: Attach the urn securely to the wreath base or frame so it sits upright.
Step 2: Position the skeleton leaning against the urn and fix in place with zip ties or glue.
Step 3: Layer Spanish moss to create draping greenery around the urn and skeleton.
Step 4: Finally, add burgundy and pink flowers throughout for a lush, gothic look, then finish with the black bow.
#16. Trick-or-Treat Ghost Wreath
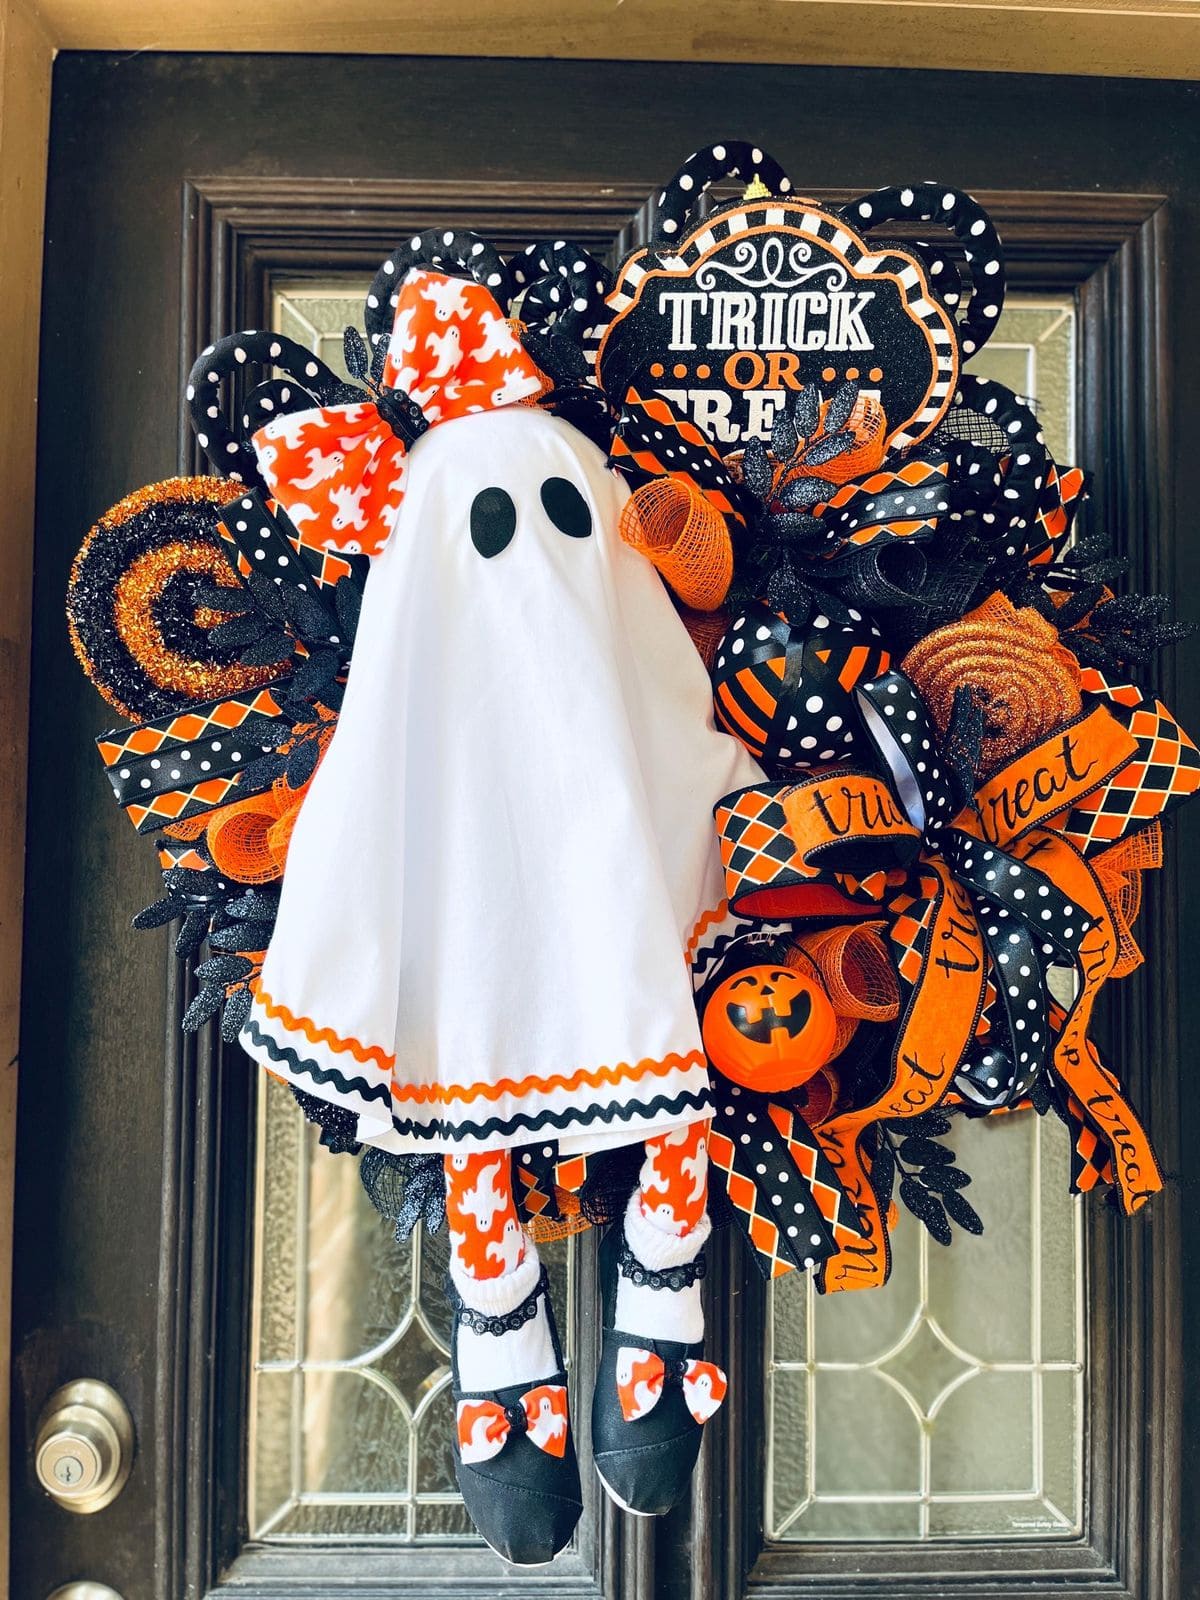
Look at this playful Halloween wreath! It is impossible to miss, featuring a charming ghost front and center, dressed in a white sheet trimmed with festive orange and black accents.
The ghost’s little legs, clad in ghost-print socks and black shoes with matching bows, dangle for a whimsical touch that makes the whole piece come alive.
Surrounding it, an explosion of black, orange, and polka-dotted ribbons frame a bold “Trick or Treat” sign, while glittering swirls and a tiny pumpkin bucket add extra seasonal flair.
Materials Needed
- Wreath base (14-16″)
- White fabric for ghost body (18-20″)
- Orange and black ribbon (assorted patterns, 6-8 ft each)
- Mini “Trick or Treat” sign
- Small pumpkin bucket
- Black felt
- Hot glue gun & glue sticks
Step-by-step Guide
Step 1: Secure the ghost figure in the center of the wreath base, draping the fabric naturally.
Step 2: Attach the “Trick or Treat” sign at the top and arrange ribbons in layered bows around it.
Step 3: Add embellishments like the pumpkin bucket and glittery swirls for a festive finish.
#17. Fuzzy Spider Surprise Wreath
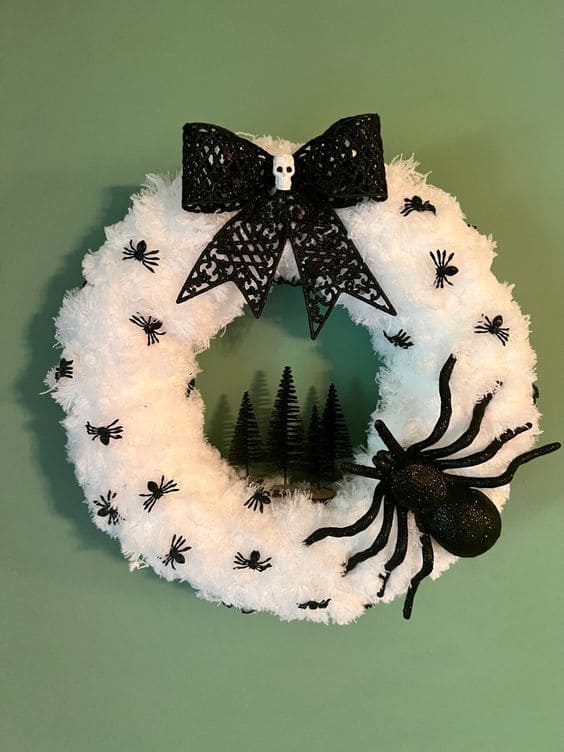
At first glance, this fluffy white wreath might seem like something you’d hang for winter but look closer and you’ll notice it’s crawling with creepy charm.
Dozens of tiny black spiders peek through the soft yarn, turning cozy into spine-tingling. The bold black bow with a skull accent sets the gothic tone, while the giant glittery spider lurking at the side makes a statement no guest will miss.
It’s an unexpected twist on traditional wreaths—perfect for those who love blending whimsy with just the right amount of eerie.
Materials Needed
- Foam wreath form (14–16″)
- 2-3 skeins white fluffy yarn (approx. 80-100 yards each)
- 1 large plastic spider (8-10″)
- 20-25 small plastic spiders (1-2″)
- Hot glue gun & glue sticks
- Black decorative bow with skull embellishment (8-10″ wide)
Step-by-step Guide
Step 1: Wrap the fluffy yarn tightly around the wreath form until completely covered, securing the ends with hot glue.
Step 2: Arrange and glue small spiders evenly across the surface, letting a few crawl over the edges for a realistic touch.
Step 3: Position the large spider to one side, slightly angled so it looks like it’s about to pounce.
Step 4: Attach the black bow with skull detail at the top for a dramatic, gothic finish.
#18. Skeleton Couple on Gothic Clothespin Wreath
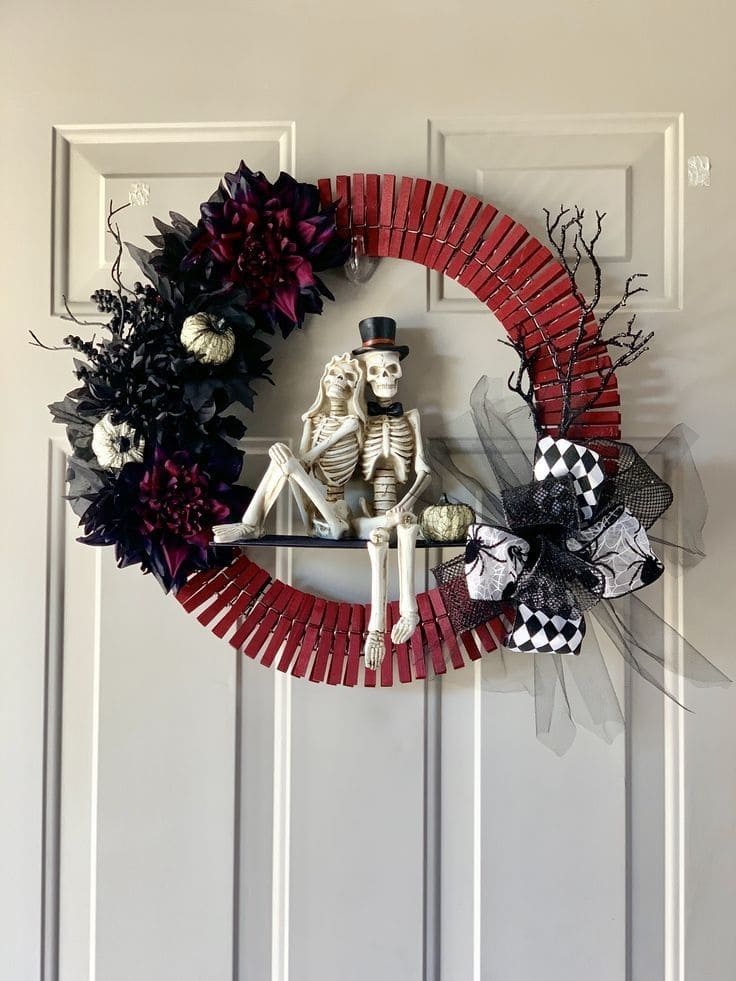
This Halloween wreath tells a story of eternal love with a spooky twist. A vibrant red clothespin-covered ring frames a skeleton couple sitting side by side, the gentleman in a tiny top hat and the lady leaning in close.
Specially, deep black and burgundy blooms, paired with miniature white pumpkins, bring rich contrast and gothic charm to one side of the wreath.
On the opposite side, a bold bow in harlequin and spiderweb patterns adds a playful yet eerie touch, while black twig accents give it a haunted forest feel.
Materials Needed
- Wreath frame (14–16″)
- Clothespins (about 70), painted red
- Skeleton couple figurine
- Miniature top hat (craft size)
- Black and burgundy faux flowers
- Mini white pumpkins
- Black twig branches
- Decorative Halloween ribbon
- Hot glue gun & glue sticks
Step-by-step Guide
Step 1: Clip painted red clothespins evenly around the wreath frame.
Step 2: Secure the skeleton couple figurine to a small flat base or shelf, then attach it to the wreath.
Step 3: Arrange and glue faux flowers and pumpkins to one side of the wreath.
Step 4: Finally, add twig branches and tie a large decorative bow on the opposite side for balance.
#19. DIY Creepy Doll Head Wreath
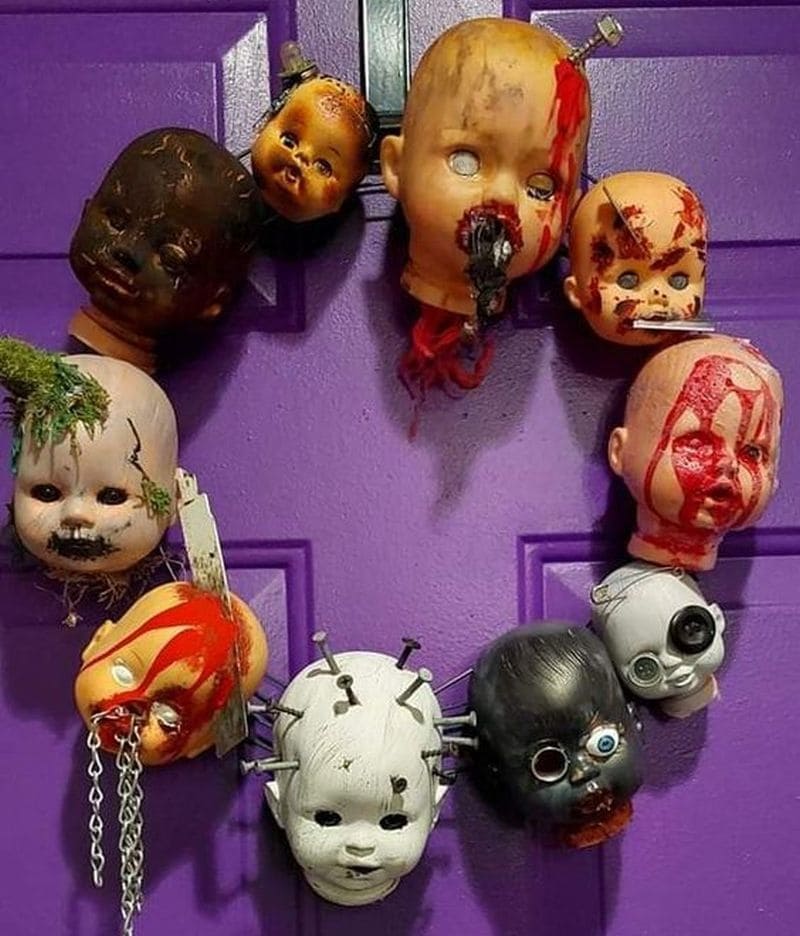
Wow, this unsettling doll head wreath takes Halloween horror to a whole new level. Perfect for those who love shock-value decorations, it’s crafted from old, damaged doll heads transformed into eerie, nightmarish characters.
Painted, burned, nailed, or splattered with fake blood, each head tells its own terrifying story. The combination of lifeless eyes, disturbing wounds, and creative props like chains or screws makes this an unforgettable front-door statement.
This is a project for the brave-hearted, sure to get gasps from visitors. You hang it on a bright-colored door for maximum creepy contrast.
Materials Needed
- 8-10 old doll heads (varied sizes)
- Black, red, and white acrylic paint
- Fake blood or red paint
- Props (chains, screws, nails, small tools)
- Hot glue gun & glue sticks
- Wire wreath form
- Craft knife
Step-by-step Guide
Step 1: Prepare each doll head by removing any hair and cleaning the surface.
Step 2: Use paint, fake blood, and distressing techniques (burn marks, scratches) to create unique horror effects.
Step 3: Add props like nails, chains, or tools for an extra disturbing look. Then hot glue the doll heads securely around the wreath form.
Step 4: Hang in a visible spot to guarantee chills for all who pass by.
#20. Black-and-White Jack Skellington Pom-Pom Wreath
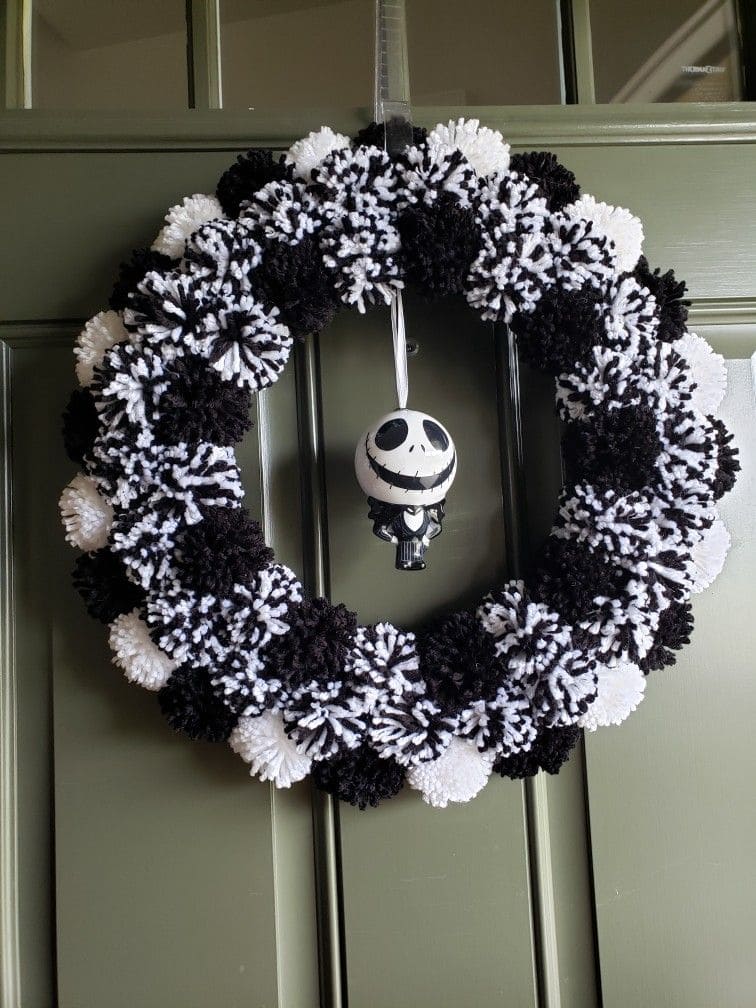
This wreath is pure monochrome magic with a spooky twist. Layers of fluffy black, white, and marbled pom-poms form a cozy, textured ring that feels just as fun as it looks.
The star of the show is a dangling Jack Skellington ornament that swings playfully in the center, giving it a distinct Nightmare Before Christmas vibe.
Plus, the simple color scheme makes it pop beautifully against any door, while the mix of patterns in the pom-poms adds depth and charm.
Materials Needed
- Metal wreath frame (12-14″)
- Yarn in black, white, and black-and-white mix (50-60 yards each)
- Pom-pom maker or cardboard rings
- Jack Skellington ornament (approx. 4-5″)
- Hot glue gun & glue sticks
- Ribbon or string for hanging ornament (12″)
Step-by-step Guide
Step 1: Make pom-poms in all three yarn styles, trimming for even, fluffy edges.
Step 2: Attach pom-poms around the wreath frame, mixing colors evenly for contrast.
Step 3: Tie your Jack Skellington ornament with ribbon, letting it dangle in the center.
Step 4: Secure everything with hot glue, then hang on your door for instant Halloween charm.
Tip: You can swap Jack out for other themed ornaments to reuse the wreath year-round.
#21. DIY Wooden Jack-O’-Lantern Door Sign
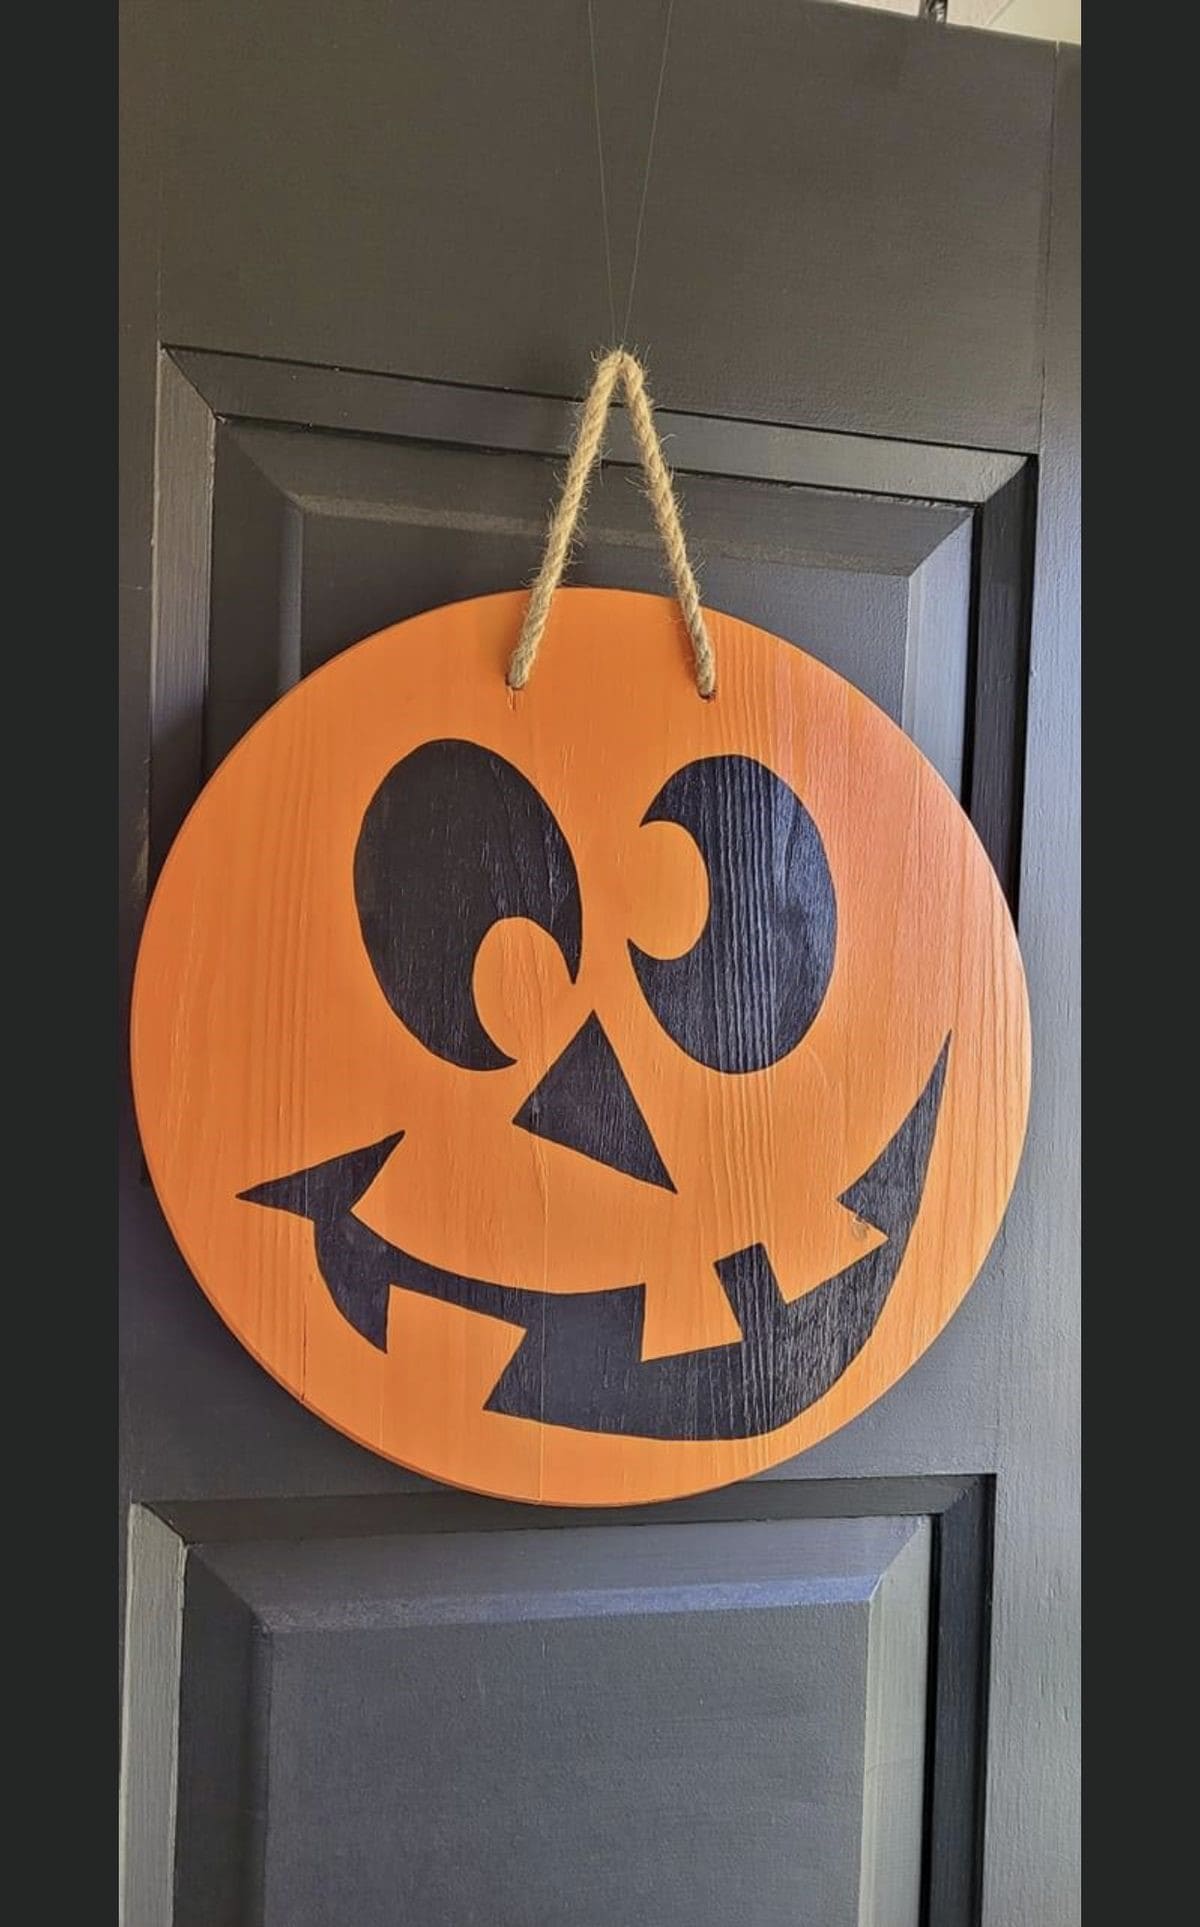
This cheerful jack-o’-lantern door sign is a perfect way to welcome guests with a touch of Halloween spirit without the spook factor.
Made from a smooth wooden round, it’s painted in bright pumpkin orange with bold black facial features, giving off that classic carved-pumpkin look. The natural jute rope adds a rustic charm, making it easy to hang on any door.
It’s a great project if you want something festive but friendly, perfect for households with kids or for anyone who prefers a playful vibe over creepy decor.
Materials Needed
- 1 wooden round (12-14 inches diameter)
- Orange and black acrylic paint
- Paintbrushes (1 large, 1 fine tip)
- Jute rope (12-14 inches)
- Drill with small bit
- Clear sealant (optional)
Step-by-step Guide
Step 1: Sand the wooden round until smooth, then wipe away dust.
Step 2: Paint the entire surface orange and let it dry fully.
Step 3: Sketch and paint the jack-o’-lantern face with black paint.
Step 4: Drill two holes at the top and thread the jute rope through. Then seal with a clear coat if displaying outdoors.
See also: 23 Must-See Halloween Party Table Decor Ideas for a Spooktacular Night