22 Spookye Halloween Painted Pot Ideas to Haunt Your Home
When Halloween creeps around the corner, even your plants deserve to join the spooky fun. Painted pots are an easy, creative way to bring a touch of eerie charm to your home.
Picture bright pumpkins with grinning faces, ghostly whites with haunting eyes, or bold colors inspired by your favorite spooky movies. These little works of art can sit on your porch, line your windowsill, or even serve as candy holders for trick-or-treaters.
Specially, you don’t need to be an artist to make them, just some paint, a brush, and a splash of imagination. Here are 22 ideas to help you brew up your own haunting creations.
#1. Hand-Painted Mushroom, Pumpkin, and Ghost Pots
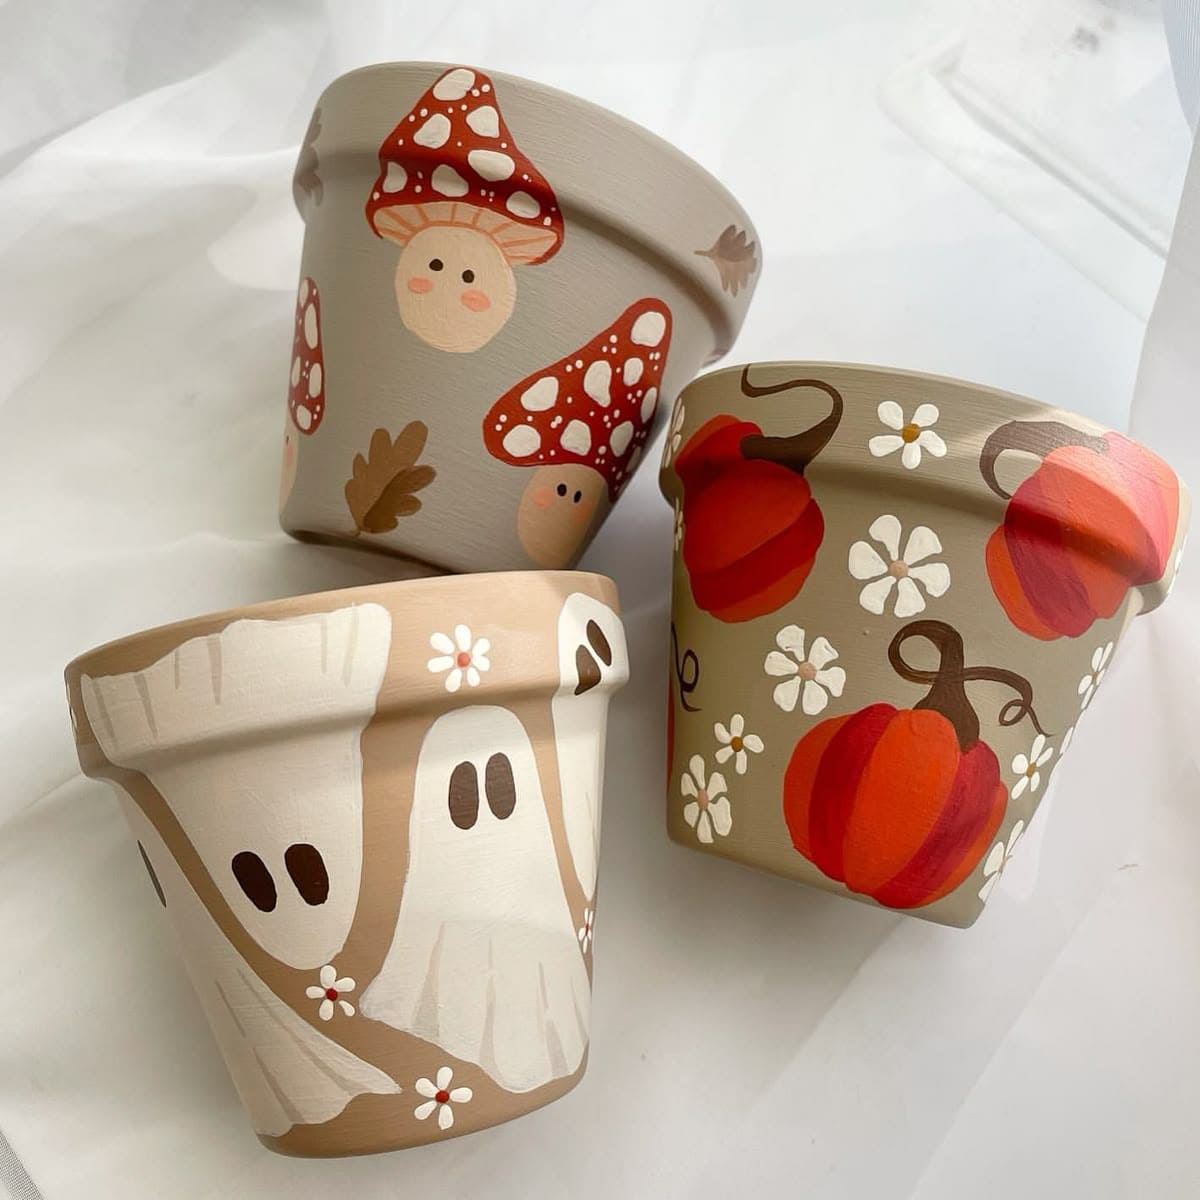
These charming hand-painted terracotta pots bring a cozy, storybook feel to your seasonal decor.
One pot features whimsical red-capped mushrooms with tiny faces, another bursts with bright pumpkins and dainty white flowers, and the third shows sweet little ghosts drifting among blooms.
They’re a wonderful way to combine artistry with gardening, and each one feels like it has its own little personality.
Materials Needed
- 3 terracotta pots (4-6 inches each)
- Acrylic paints in assorted colors
- Fine-tip paintbrushes (sizes 0-2)
- Pencil for sketching designs
- Matte sealant spray (1 can)
Step-by-step Guide
Step 1: Lightly clean and dry the terracotta pots to remove dust or residue.
Step 2: Sketch your mushroom, pumpkin, and ghost designs with a pencil for guidance.
Step 3: Use fine brushes to paint each design, layering colors for depth. Allow each layer to dry before adding details.
Step 4: Once fully dry, spray each pot with matte sealant to protect the artwork. Now you can display them indoors or outdoors, adding plants that match the seasonal theme.
#2. Bloody Drip Halloween Planter
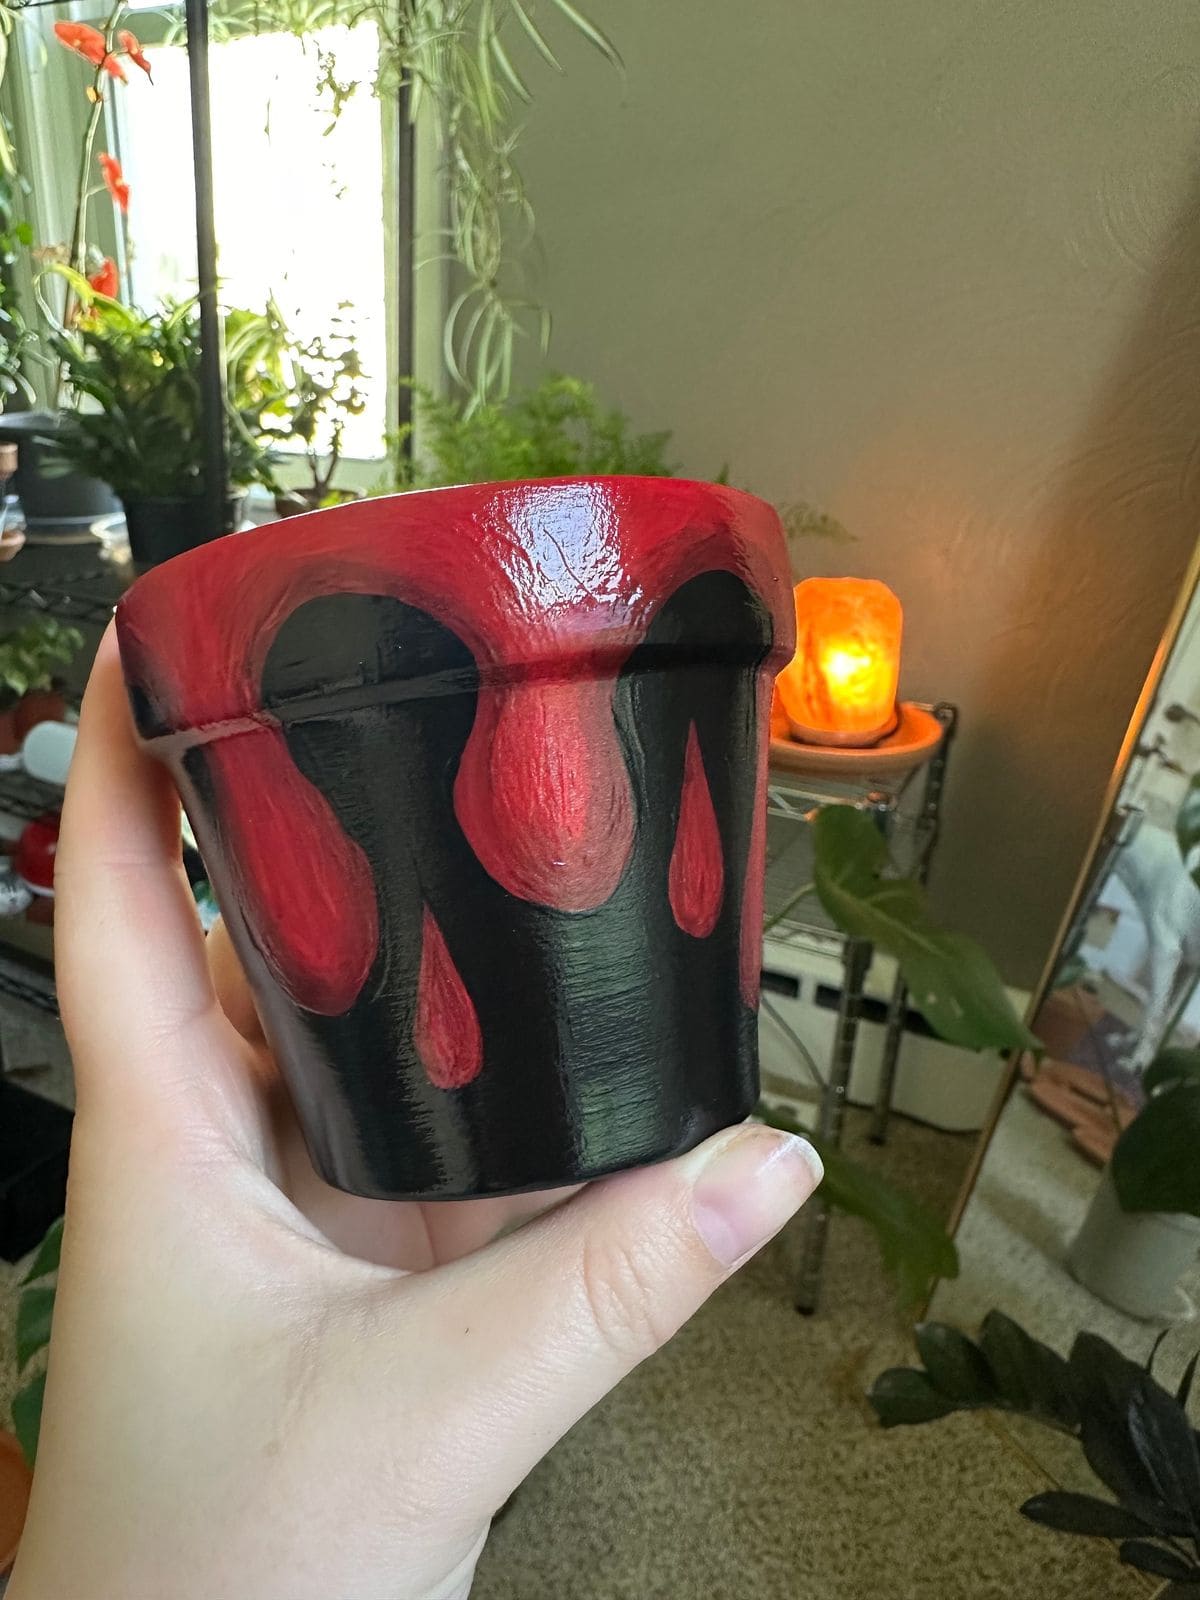
Painted in deep black as the base, this eerie bloody drip planter is topped with realistic red drips that look like fresh paint or something far more sinister, slowly sliding down the pot.
The glossy finish makes the red stand out even more, catching the light in a way that feels almost alive. Perfect for a creepy succulent, black rose, or faux bone arrangement, it can be a standout piece on your porch, windowsill, or Halloween party table.
Materials Needed
- 1 terracotta pot (5-6 inches in diameter)
- Black acrylic paint (1 small bottle)
- Red acrylic paint (1 small bottle, glossy finish)
- Fine detail paintbrush and medium flat brush
- Clear acrylic sealer spray (1 can)
Step-by-step Guide
Step 1: Clean your terracotta pot and let it dry completely.
Step 2: Paint the entire pot with 2-3 coats of black acrylic paint, allowing each coat to dry.
Step 3: Using the detail brush, paint red drip shapes starting from the rim downward, varying the lengths for a natural effect.
Step 4: Fill in the drips and rim with red paint, adding extra layers for a bold look.
Step 5: Once dry, spray with clear acrylic sealer to protect the design and give it a glossy, finished shine.
#3. Alien & Planet Galaxy Flower Pots
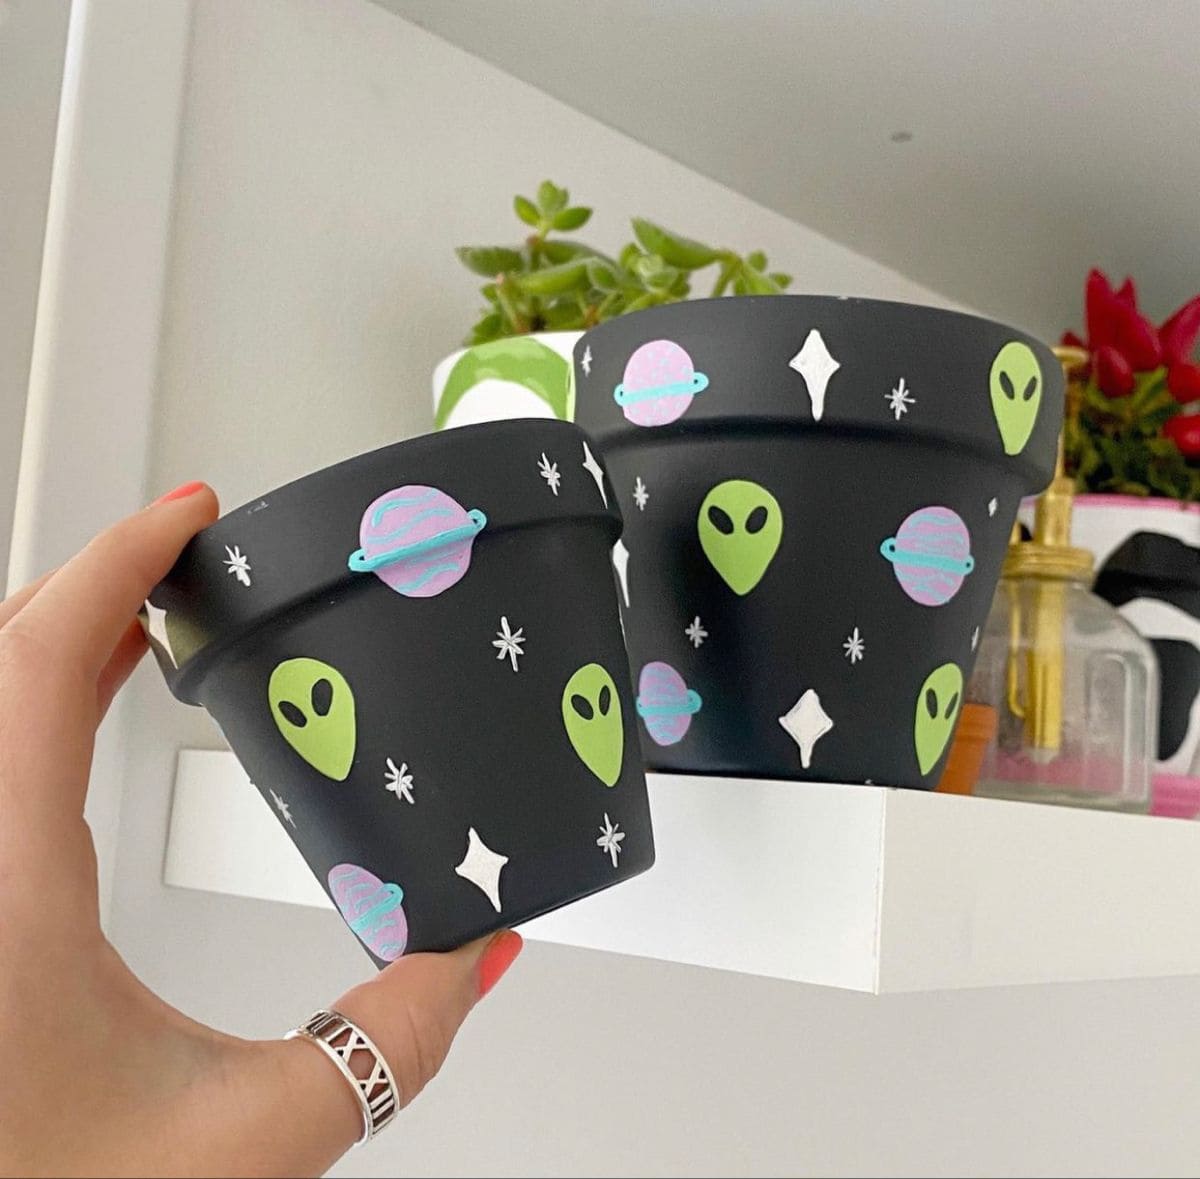
These hand-painted galaxy pots bring a quirky, interstellar twist to your plant collection. Against a sleek matte black background, bright green alien faces, pastel planets, and tiny starbursts pop with playful energy.
The contrasting colors create a fun cosmic vibe that makes even the smallest succulent feel like it’s from another planet.
Plus, this is a perfect weekend DIY project if you want to give plain terracotta pots a personality boost. They make fantastic gifts for friends who adore space-themed decor.
Materials Needed
- 2 terracotta pots (4″-6″ diameter)
- Matte black acrylic paint (120 ml)
- Pastel acrylic paints (green, pink, purple, blue – 20 ml each)
- Small detail paintbrush set (size 0-2)
- White paint marker (1 mm tip)
- Clear acrylic sealer spray (150 ml)
Step-by-step Guide
Step 1: Clean the terracotta pots and let them dry completely.
Step 2: Apply 2-3 coats of matte black paint for a smooth base, letting each coat dry before adding the next.
Step 3: Use pastel paints to create alien faces, planets, and other galaxy elements. Then add stars and sparkles with the white paint marker for extra detail.
Step 4: Once dry, seal with a clear acrylic spray to protect your design.
#4. Glow-in-the-Dark Ghost Planter
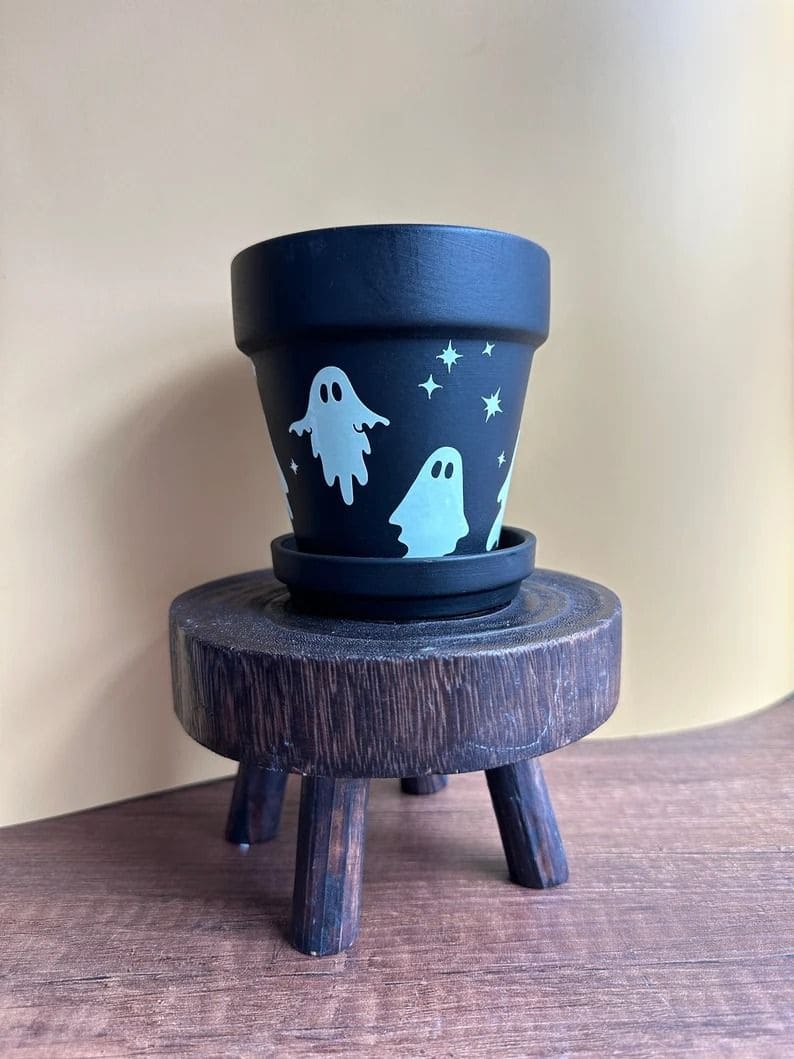
This charming ghost-themed planter is perfect for adding a hint of Halloween fun to your home or porch. Painted in a deep matte black, the pot is adorned with adorable glow-in-the-dark ghost and star decals that come alive once the lights go out.
You can display it indoors on a windowsill or outdoors on a small stand to let its ghostly glow greet guests at night. Plus, it’s a quick DIY project that’s both functional and decorative.
Materials Needed
- 1 terracotta pot (4-6 inches in diameter)
- Black acrylic paint (1 small bottle)
- Glow-in-the-dark vinyl stickers (ghosts and stars)
- Paintbrush (1-2 inches wide)
- Clear acrylic sealer spray (1 can)
Step-by-step Guide
Step 1: Clean your terracotta pot and let it dry completely. Then apply 2-3 coats of black acrylic paint, letting each coat dry before the next.
Step 2: Once fully dry, stick on the glow-in-the-dark ghost and star decals.
Step 3: Seal the design with a clear acrylic spray to protect it from water and wear.
Step 4: Add your favorite plant and place it where it can charge under light for the best nighttime glow.
#5. Ghostface Halloween Planter
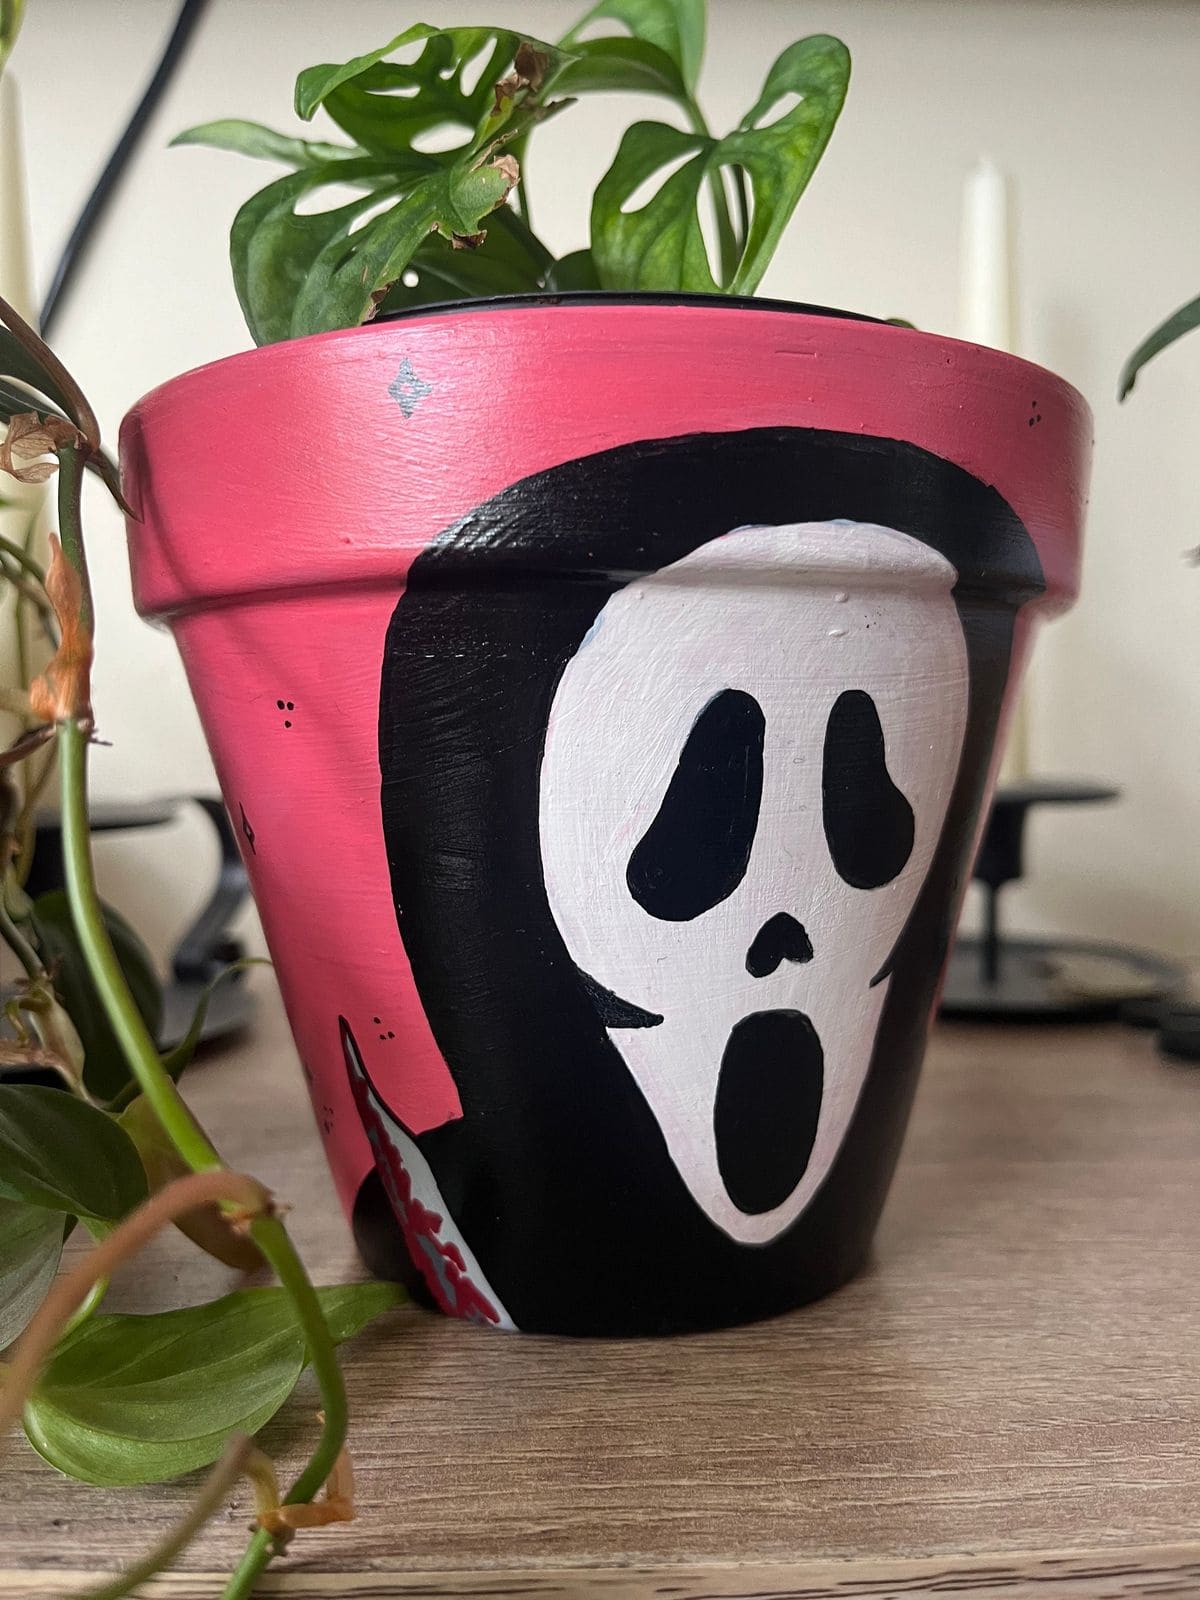
You can see this hand-painted terracotta planter turns any plant nook into a scene straight out of a classic horror flick.
Featuring the chilling Ghostface mask from Scream against a vivid pink backdrop, it blends creepy charm with bold color. A bloody knife detail peeks from the side, adding that extra slasher twist.
Perfect for small to medium houseplants, it’s a fun conversation piece for Halloween or year-round décor.
Materials Needed
- 1 terracotta pot (6″ diameter, 5″ height)
- Acrylic paints (black, white, pink, red)
- Fine-tip paintbrushes (sizes 0-2)
- Sealer spray (matte or gloss finish)
Step-by-step Guide
Step 1: Clean and dry your terracotta pot to remove dust.
Step 2: Paint the background pink, covering the entire outer surface evenly.
Step 3: Sketch Ghostface’s outline in pencil, then fill in the black hood and white mask.
Step 4: Add the black facial features, then paint a bloody knife detail on the side. Let it dry fully before sealing with a protective spray to preserve the artwork.
#6. Mini Purple Monster Planter
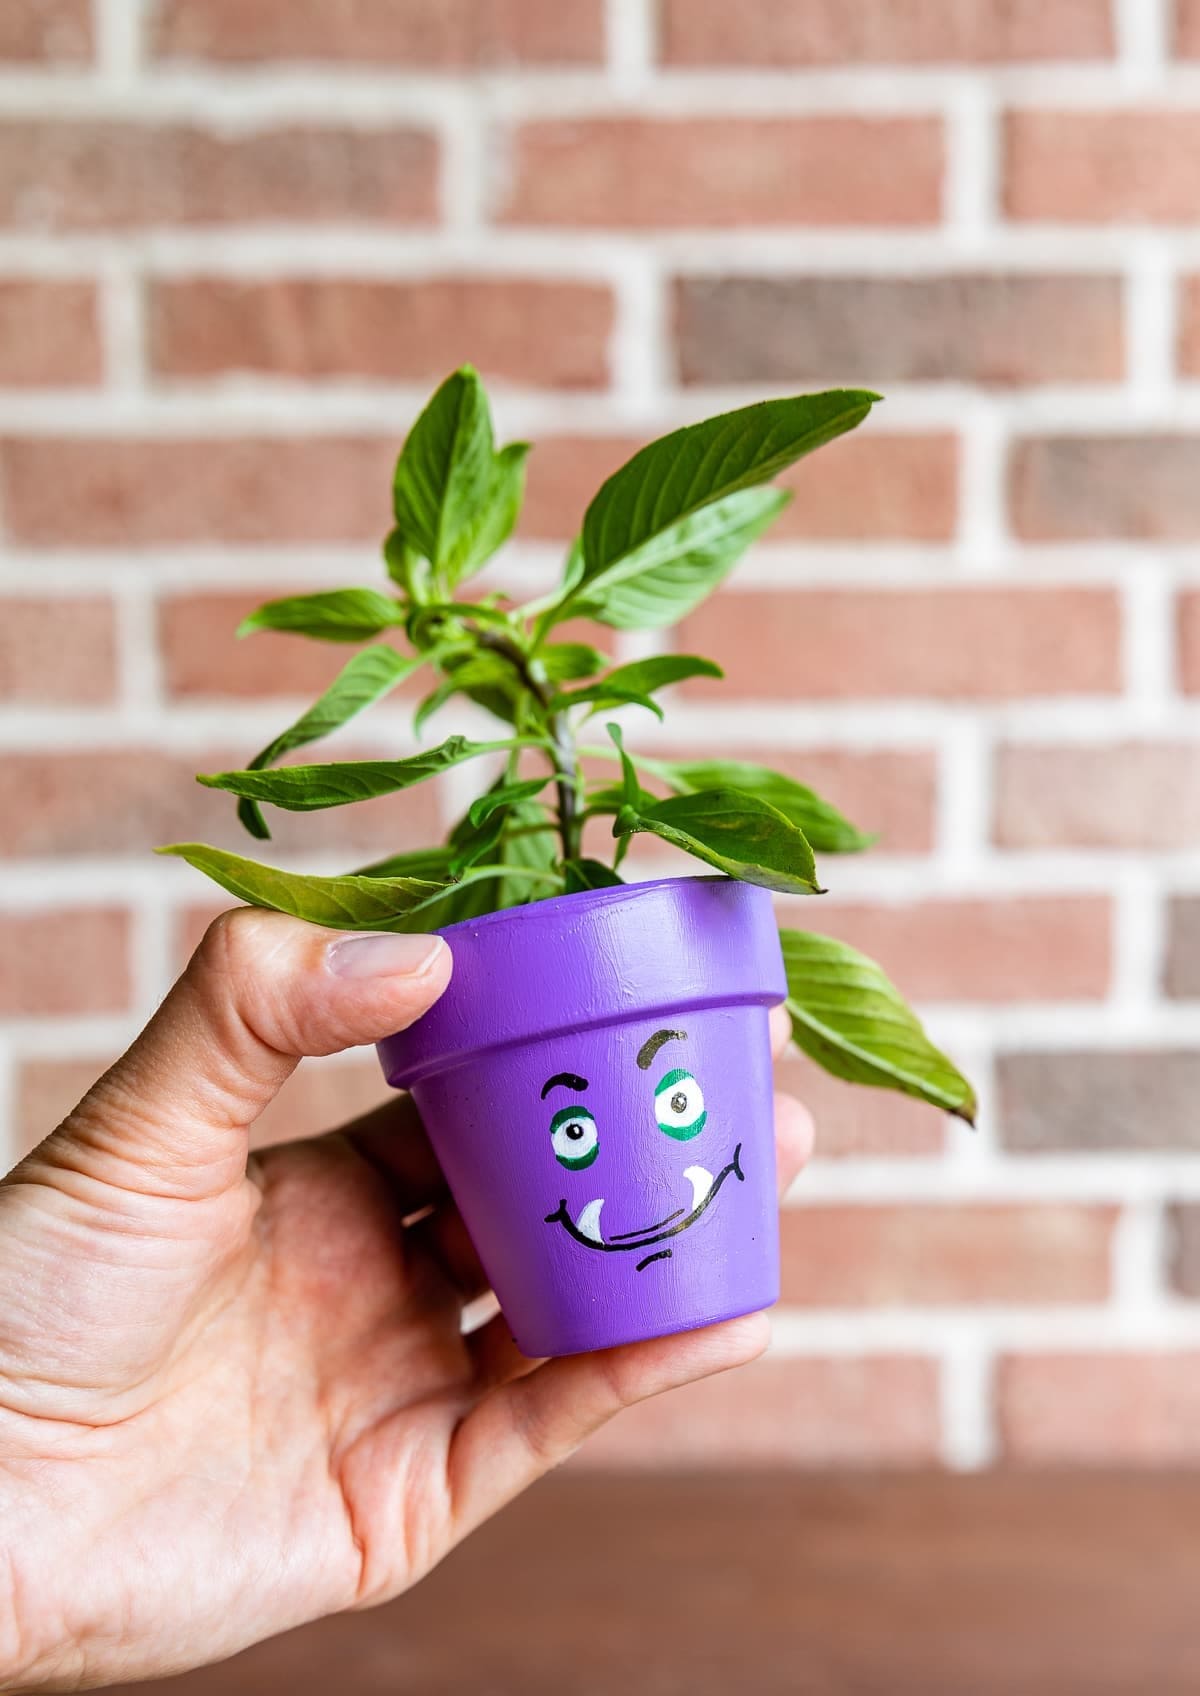
With its goofy grin, green eyes, and tiny fangs, it’s perfect for Halloween decor or simply brightening up a desk or windowsill.
You can use it to grow herbs, succulents, or small flowers. The project is quick and fun, making it an ideal craft for kids or a weekend creative break for yourself.
Materials Needed
- 1 small terra cotta pot (2.5″-3″ diameter)
- Purple acrylic paint (1-2 oz)
- Small paintbrushes (1 fine tip, 1 medium flat)
- Black, white, and green acrylic paint (0.5 oz each)
- Clear acrylic sealer spray (optional)
- Potting soil (enough to fill pot)
- Small plant or herb of choice
Step-by-step Guide
Step 1: Clean the terra cotta pot and let it dry completely before painting.
Step 2: Apply 2-3 coats of purple acrylic paint, letting each coat dry before adding the next.
Step 3: Use a fine-tip brush and black paint to outline the monster’s eyes, mouth, and brows. Next, add green and white details for the eyes, and white for the fangs.
Step 4: Once the face is dry, spray with a clear acrylic sealer for extra protection.
Step 5: Fill the pot with soil, plant your herb or flower, and enjoy your quirky creation.
#7. Soot Sprite Halloween Pot
![]()
If you’ve ever wanted your houseplants to have a bit more personality, these cheeky soot sprites are here to help.
Inspired by Studio Ghibli’s charming dust bunnies, this terracotta pot bursts with whimsical black puffballs, each with wide, startled eyes and tiny yellow stars scattered between them.
Against the warm orange base, the sprites pop with animated energy, making it perfect for Halloween without being scary. It’s a conversation piece that feels both nostalgic and festive.
Materials Needed
- 1 terracotta pot (6-inch diameter)
- 1 bottle orange acrylic paint (8 oz)
- 1 bottle black, white and yellow acrylic paint (each 4 oz)
- 3 fine detail brushes (sizes 0, 1, and 3)
- Pencil for sketching
- Clear acrylic sealer spray (1 can)
Step-by-step Guide
Step 1: Paint the pot’s exterior with orange acrylic paint and let it dry completely.
Step 2: Lightly sketch the soot sprites in various sizes around the pot for balance.
Step 3: Fill in each sprite with black paint, then add large white circles for eyes.
Step 4: Dot the pupils in black, and paint tiny yellow stars or bits of soot for extra character.
Step 5: Once fully dry, seal the entire pot with a clear acrylic spray to preserve your design.
#8. Hocus Pocus Halloween Planter
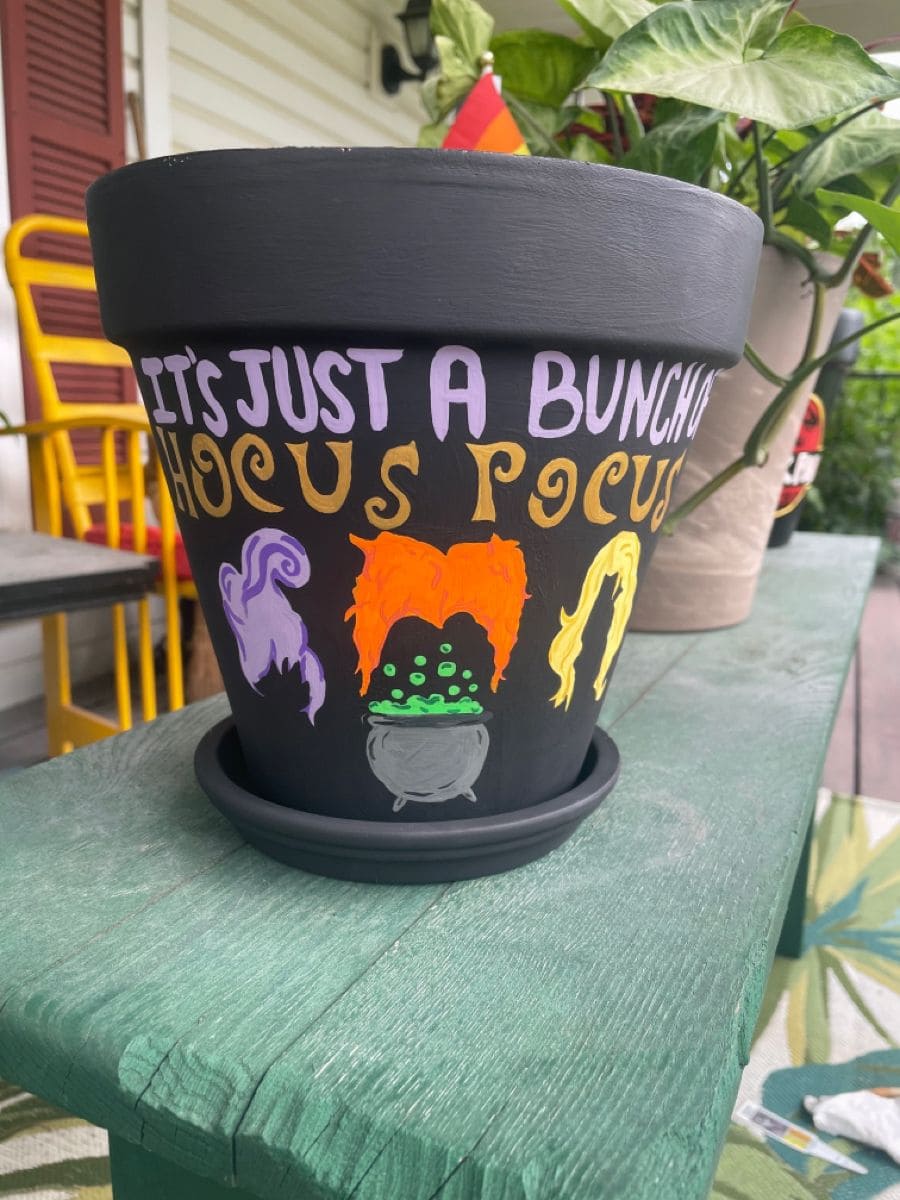
This whimsical Halloween planter is a spellbinding nod to the beloved Sanderson Sisters from Hocus Pocus.
Painted on a sleek matte black pot, the design features the trio’s iconic hairstyles, purple for Mary, fiery orange for Winifred, and golden yellow for Sarah, framing a bubbling green cauldron.
Above them, the playful phrase “It’s Just a Bunch of Hocus Pocus” adds a magical touch in vibrant hand-painted lettering.
Materials Needed
- 1 terracotta planter pot (10-12 inches)
- 1 matching saucer (10-12 inches)
- Matte black acrylic paint (8 oz)
- Paintbrush set (small detail & medium flat brush)
- Colored acrylic paints (purple, orange, yellow, green, white)
- Chalk pencil or white pencil
- Clear acrylic sealant spray (matte finish)
Step-by-step Guide
Step 1: Paint the entire pot and saucer with matte black acrylic paint, applying two coats for even coverage. Let dry completely.
Step 2: Using a chalk pencil, lightly sketch the Sanderson Sisters’ hair outlines, the bubbling cauldron, and the lettering.
Step 3: Fill in the hair with purple, orange, and yellow paint. Add green bubbles inside the cauldron and outline it with grey or white.
Step 4: Paint the lettering, white for “It’s Just a Bunch of” and golden yellow for “Hocus Pocus.” Let dry.
Step 5: Once all paint is dry, spray the pot with a matte clear sealant to protect your artwork from water and fading.
#9. Day of the Dead Cactus Pot
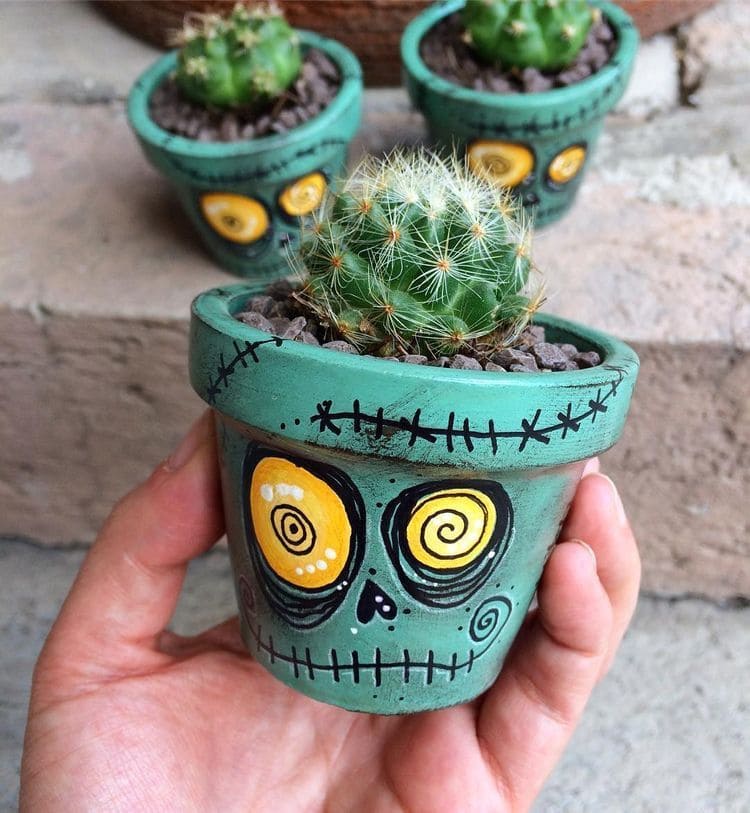
You can see this quirky little terracotta pot takes on a Day of the Dead-inspired personality with its wide, swirling yellow eyes, stitched mouth, and bold black details.
The teal-green paint gives it a rustic, weathered look, while the hand-drawn doodles like tiny swirls, stitches, and a triangle nose add character.
This craft combines art and plants into one charming display. Its size makes it easy to scatter a few around your home or gift to fellow plant lovers with a spooky streak.
Materials Needed
- 1 small terracotta pot (3-4 inches)
- Teal or turquoise acrylic paint (1 small bottle)
- Black and yellow acrylic paint (1 small bottle each)
- Fine and medium paintbrushes
- Matte sealant spray (1 can)
- 1 small cactus plant
- Potting soil and pebbles
Step-by-step Guide
Step 1: Paint the pot in teal and let it dry fully.
Step 2: Use black paint to outline the eyes, stitches, mouth, and nose; fill the eyes with yellow paint and add white dots for highlights.
Step 3: Add small swirl and stitch details around the rim for extra flair. Then seal with matte spray to protect your artwork.
Step 4: Fill the pot with soil, plant your cactus, and top with pebbles for a finished look.
#10. Spiderweb Halloween Planter
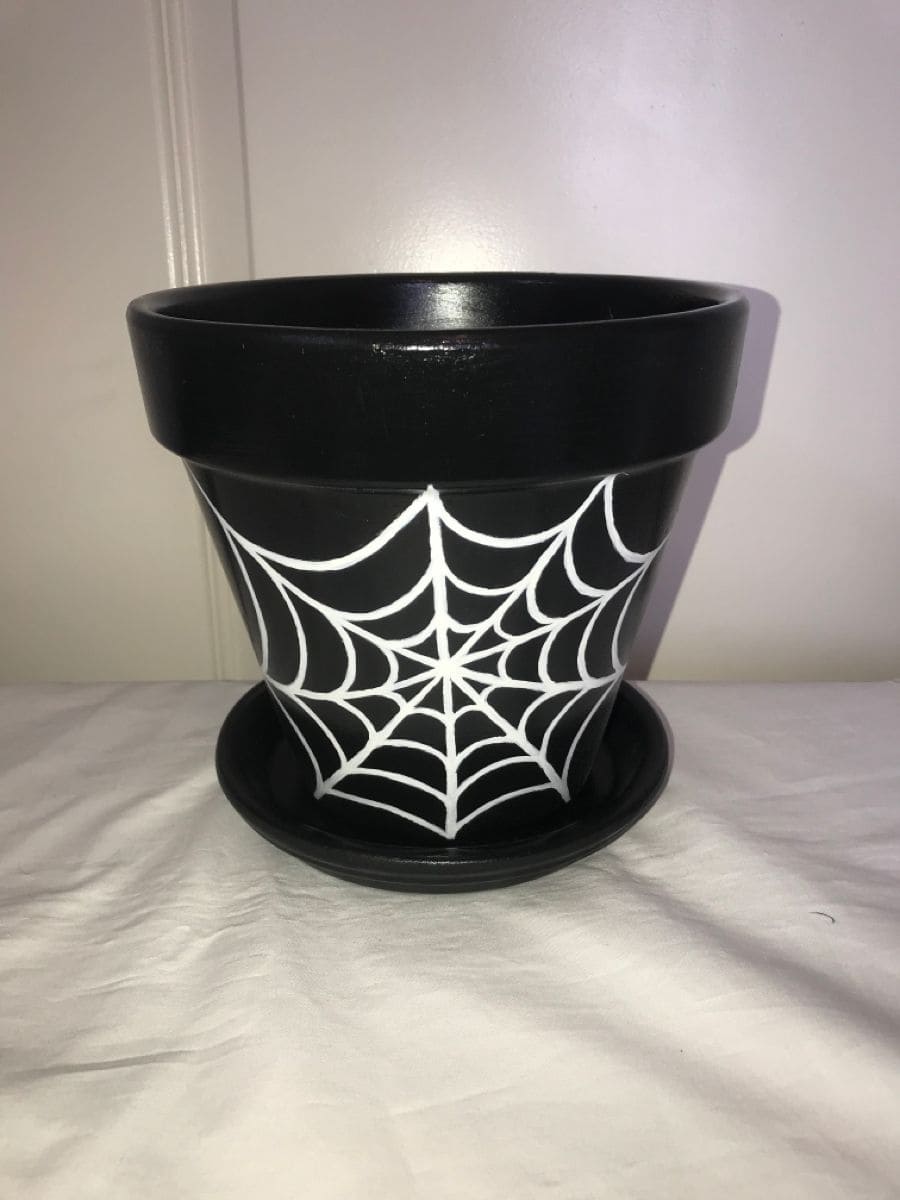
Perfect for showcasing mums, mini pumpkins, or even faux creepy plants, this black terracotta planter is a versatile accent for your porch or tabletop.
The contrast between the dark base and intricate web design makes it pop, creating an instant seasonal vibe without going over the top.
Materials Needed
- 1 terracotta pot (8-10 inches diameter)
- Black acrylic paint (1 bottle)
- White acrylic paint or paint pen (1 piece)
- Small paintbrush (1-2 pcs)
- Clear sealant spray (1 can)
Step-by-step Guide
Step 1: Clean and dry the terracotta pot to remove any dust or debris.
Step 2: Paint the entire pot black using acrylic paint and let it dry completely.
Step 3: Use a white paint pen or small brush to draw a spiderweb pattern, starting from a central point and working outward with curved connecting lines.
Step 4: Once dry, spray with a clear sealant to protect your design from moisture.
Step 5: Now you can fill with your favorite Halloween plants or decorative accents.
#11. Ghost Lily Painted Terracotta Pot
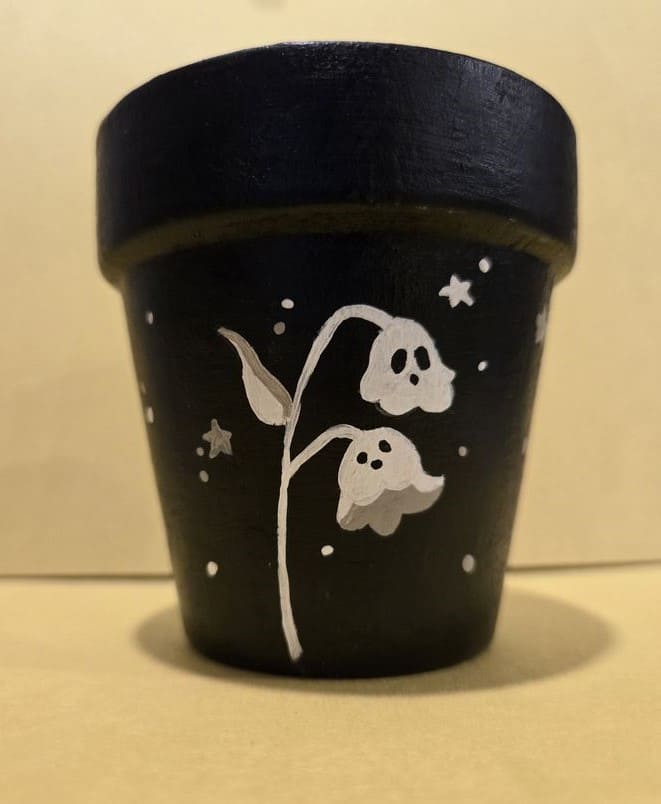
Wow, this little terracotta pot transforms into a charmingly eerie home for your plants with just some paint and a playful imagination.
The matte black background makes the ghostly lily-of-the-valley design pop, while scattered white stars give it a whimsical night-sky effect. It’s a quick, beginner-friendly craft that adds a subtle spooky touch to your garden or windowsill.
Materials Needed
- 1 terracotta pot (4″ diameter)
- 1 bottle matte black acrylic paint (2 fl oz)
- 1 bottle white acrylic paint (2 fl oz)
- 1 fine-tip paintbrush (size 0-1)
- 1 medium flat paintbrush (size 8-10)
- Matte sealant spray (1 can)
Step-by-step Guide
Step 1: Start by wiping your terracotta pot clean of any dust, so the paint will adhere smoothly.
Step 2: With the medium flat brush, paint the entire pot in matte black, covering evenly. Let it dry and apply a second coat if needed.
Step 3: Using the fine-tip brush, paint the ghostly flower stems and blooms in white. Next, add two small black dots for each flower’s eyes, giving them a spooky yet sweet expression.
Step 4: Fill in the background with small white stars and dots to mimic a starry night.
Step 5: Once completely dry, spray the pot with matte sealant to protect your design from chipping.
#12. Upside-Down Pumpkin Planter Display
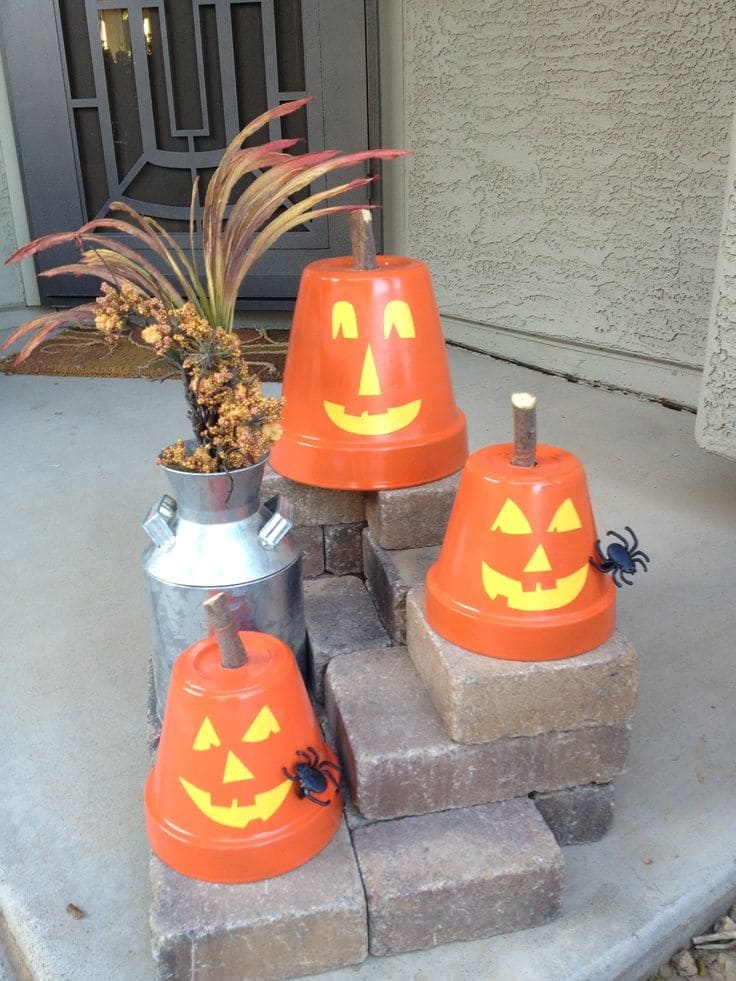
This playful Halloween porch idea transforms simple orange planters into cheerful jack-o’-lanterns with a twist. Each bucket features a bright yellow pumpkin face decal and a short stick “stem” at the base, giving it the look of a carved pumpkin without the mess.
Arranged at varying heights on stacked bricks, they create an eye-catching focal point for your entryway.
To add a little spook, plastic spiders perch on the sides, ready to surprise guests. This setup is lightweight, easy to store, and perfect for those who love whimsical holiday décor.
Materials Needed
- 3 orange plastic planters (10″–14″ diameter)
- 3 wooden sticks (4″-6″ length)
- Yellow vinyl or adhesive paper
- 2-3 plastic spiders
- Hot glue gun and glue sticks
- 12-15 bricks or pavers
Step-by-step Guide
Step 1: Cut out jack-o’-lantern faces from yellow vinyl and stick them to the front of each planter.
Step 2: Insert a small wooden stick into the planter’s drainage hole, securing with hot glue to form the stem.
Step 3: Arrange bricks into staggered steps for varying heights.
Step 4: Place the planters upside down on top of the bricks. Then attach plastic spiders to the planters using hot glue for a creepy-cute touch.
#13. Evil Eye Protection Halloween Pot
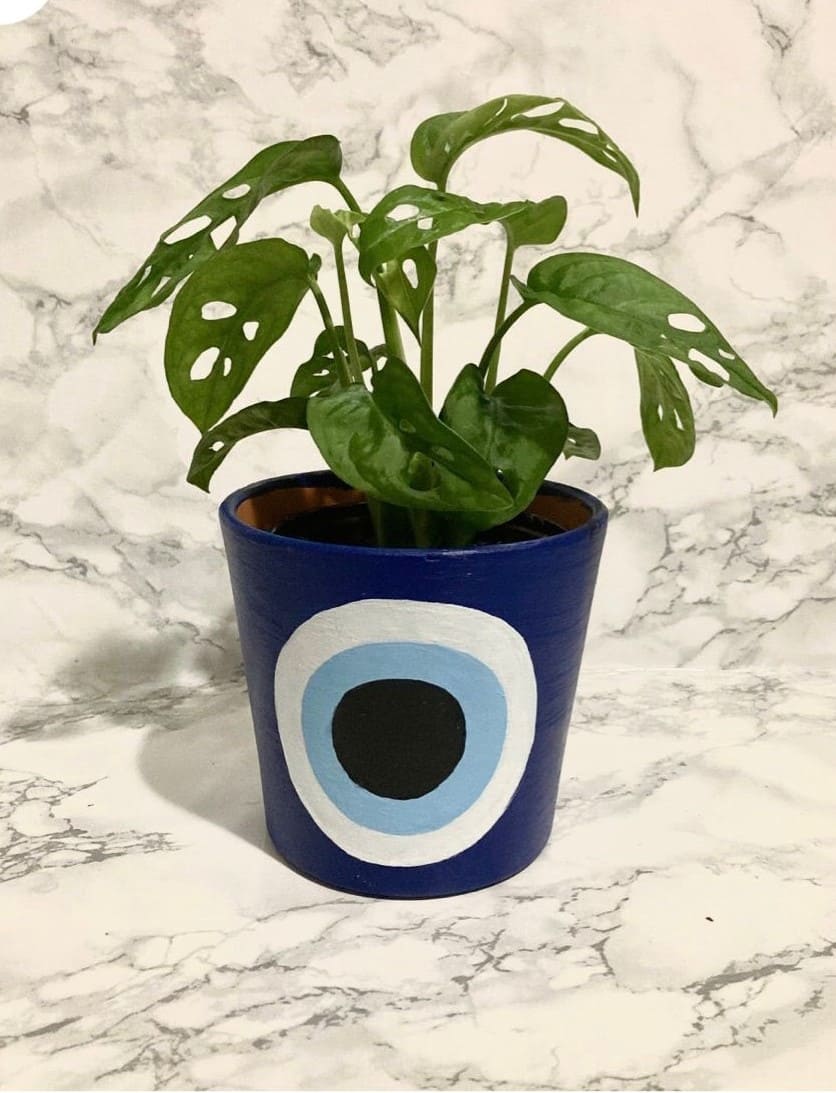
Sometimes, a little mystery is the perfect Halloween touch and this bold evil eye design delivers just that.
Deep midnight blue surrounds the pot, while concentric rings of white, icy blue, and jet black form a striking watchful pattern.
You can place it on your porch or windowsill, and it feels like the pot itself is keeping a lookout, warding off any unwanted spirits. It’s simple yet powerful, the kind of craft you’ll finish in one sitting but enjoy all season long.
Materials Needed
- 1 terracotta pot (6-inch diameter)
- 1 bottle navy blue acrylic paint (8 oz)
- 1 bottle light blue, white and black acrylic paint (each 4 oz)
- 3 medium round paintbrushes (size 8, 6, and 4)
- Painter’s tape (1-inch width)
- Clear acrylic sealer spray (1 can)
Step-by-step Guide
Step 1: Give your terracotta pot a quick wipe to remove dust.
Step 2: Paint the entire outer surface with navy blue, using broad strokes. Let it dry fully, about 30 minutes.
Step 3: Freehand or use painter’s tape to mark a centered circle. Then fill it with white paint, letting a smooth edge form.
Step 4: Inside the white circle, paint a smaller light blue circle. Let dry, then add a black circle in the center for the eye.
Step 5: Once dry, spray with a clear sealer to protect the design from chips or water damage.
#14. Haunted Mansion Moonlight Planter
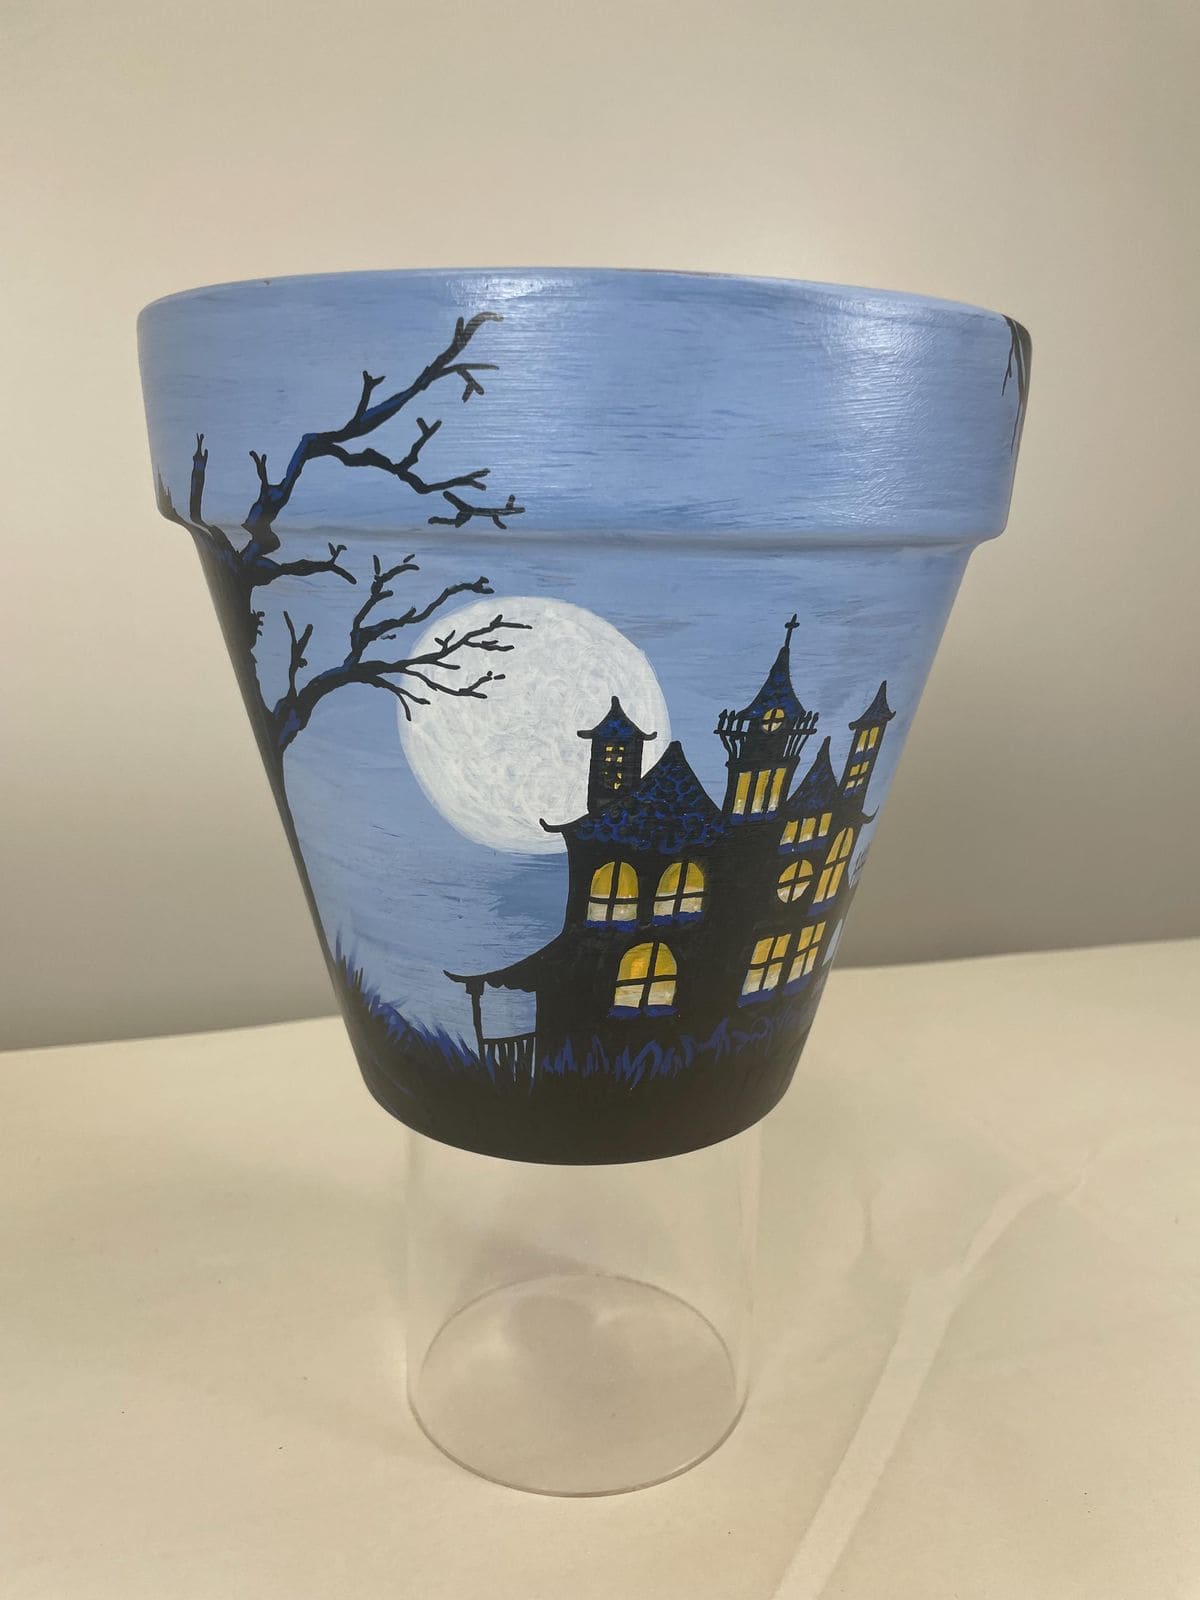
This hand-painted terracotta pot captures the eerie beauty of a moonlit Halloween night. A glowing full moon casts its silvery light across a silhouette of a spooky mansion, complete with crooked towers and warm, flickering windows.
Bare, twisting tree branches reach out under the pale sky, adding a touch of mystery. The soft blue background blends perfectly with the black lower half, creating depth and shadow.
This piece isn’t just a planter, it’s a little scene that tells a story, perfect for displaying autumn blooms or even holding wrapped Halloween treats by the door.
Materials Needed
- 1 terracotta pot (8-10″ diameter)
- Acrylic paints (sky blue, black, white, yellow)
- Fine-tip paintbrushes (sizes 0-4)
- Sealer spray (matte or gloss)
- Pencil for sketching
Step-by-step Guide
Step 1: Lightly sketch your haunted mansion, moon, and tree outlines onto the terracotta pot.
Step 2: Paint the background in gradient blue, blending darker tones toward the bottom.
Step 3: Fill in the moon with white, then add black silhouettes of the house and tree.
Step 4: Add yellow to the windows for a glowing effect and paint grass details along the base. Let dry completely before sealing with a protective spray.
#15. Spooky Ghost Terracotta Planter
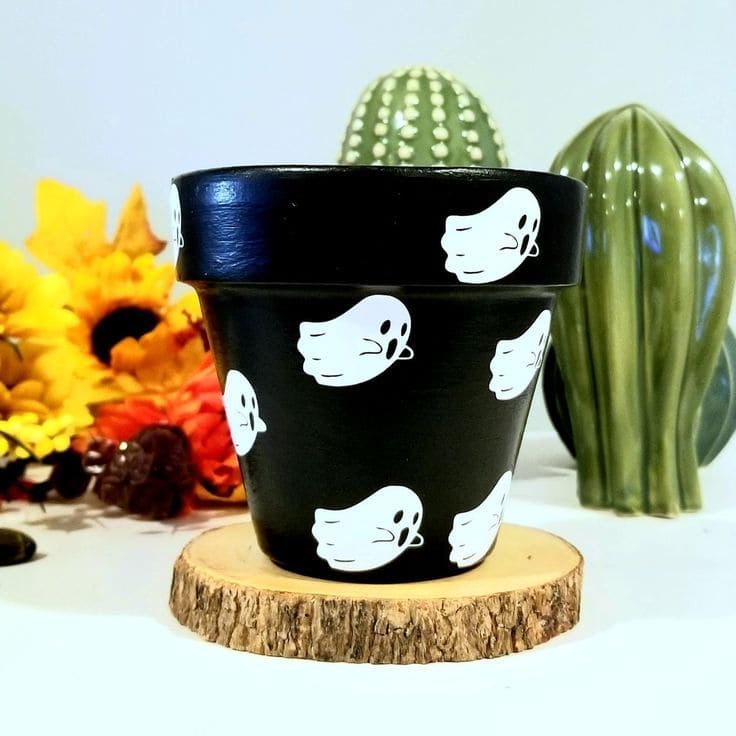
Wow, this charming ghost-themed terracotta pot is a perfect blend of cute and spooky for your Halloween decor.
The pot is painted a deep, glossy black, providing the perfect backdrop for the playful white ghost patterns scattered around it. Each little ghost seems to be floating across the surface, giving the pot a whimsical yet seasonal vibe.
It’s perfect for displaying small succulents, cacti, or even autumn blooms, making it an easy way to bring Halloween spirit into your home or garden without going overboard.
Materials Needed
- 1 terracotta pot (4-6 inches)
- Black acrylic paint (100 ml)
- White acrylic paint (50 ml)
- Small detail paintbrush (size 1-2)
- Clear acrylic sealer spray (1 can)
Step-by-step Guide
Step 1: Clean the terracotta pot to remove dust, then let it dry completely.
Step 2: Apply two coats of black acrylic paint, allowing each layer to dry fully.
Step 3: Using the detail brush, paint small white ghost shapes evenly around the pot.
Step 4: Add facial features with black paint for extra character. Then seal the design with a clear acrylic spray to protect against moisture.
#16. Spooky Jack-O’-Lantern Terracotta Pot
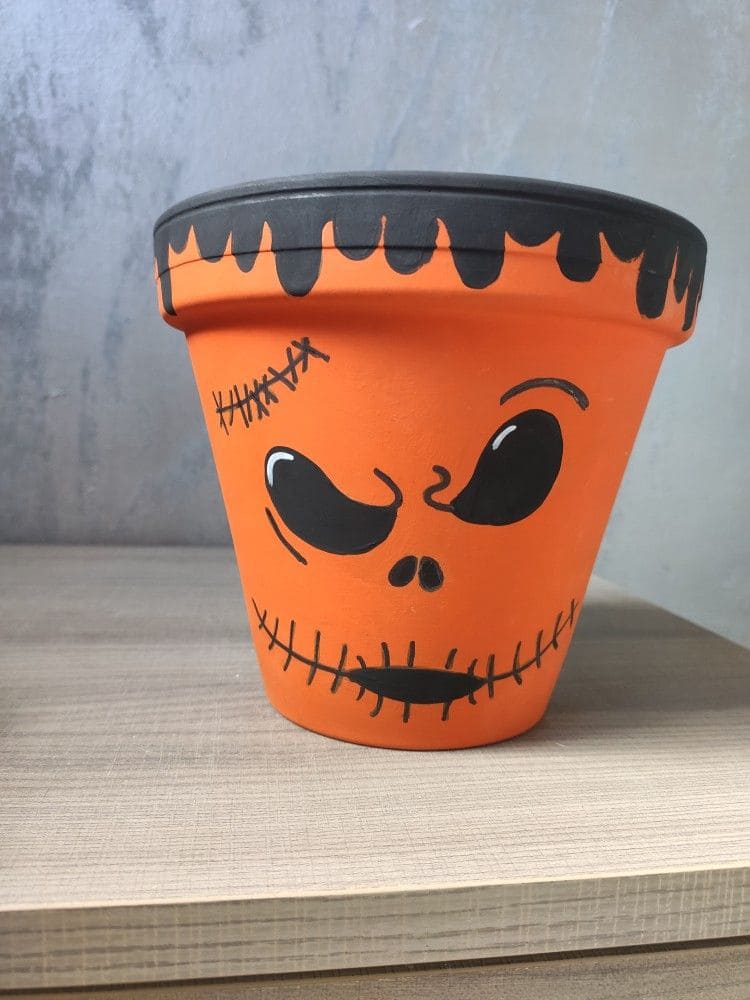
This bold orange terracotta pot brings a playful fright to your Halloween decor. Painted with deep black, expressive eyes and a stitched, mischievous grin, it’s perfect for adding personality to your porch, windowsill, or party table.
The dripping black paint detail along the rim gives it a slightly eerie, handmade charm like something pulled right from a haunted pumpkin patch.
You can plant seasonal blooms, use it as a candy holder, or simply display it as a spooky accent. Its hand-painted style ensures each pot has its own unique character.
Materials Needed
- 1 terracotta pot (6-8 inches)
- Orange acrylic paint (1 small bottle)
- Black acrylic paint (1 small bottle)
- Medium and fine paintbrushes
- Matte sealant spray (1 can)
Step-by-step Guide
Step 1: Paint the entire pot in bright orange and let it dry completely.
Step 2: Using black paint, add the dripping rim effect at the top.
Step 3: Sketch and fill in the spooky eyes, stitched mouth, and nose with a fine brush.
Step 4: Allow all paint to dry, then spray with a matte sealant for protection. Then fill with plants, candy, or decorative items for Halloween fun.
#17. Halloween Plant Witch Painted Pot
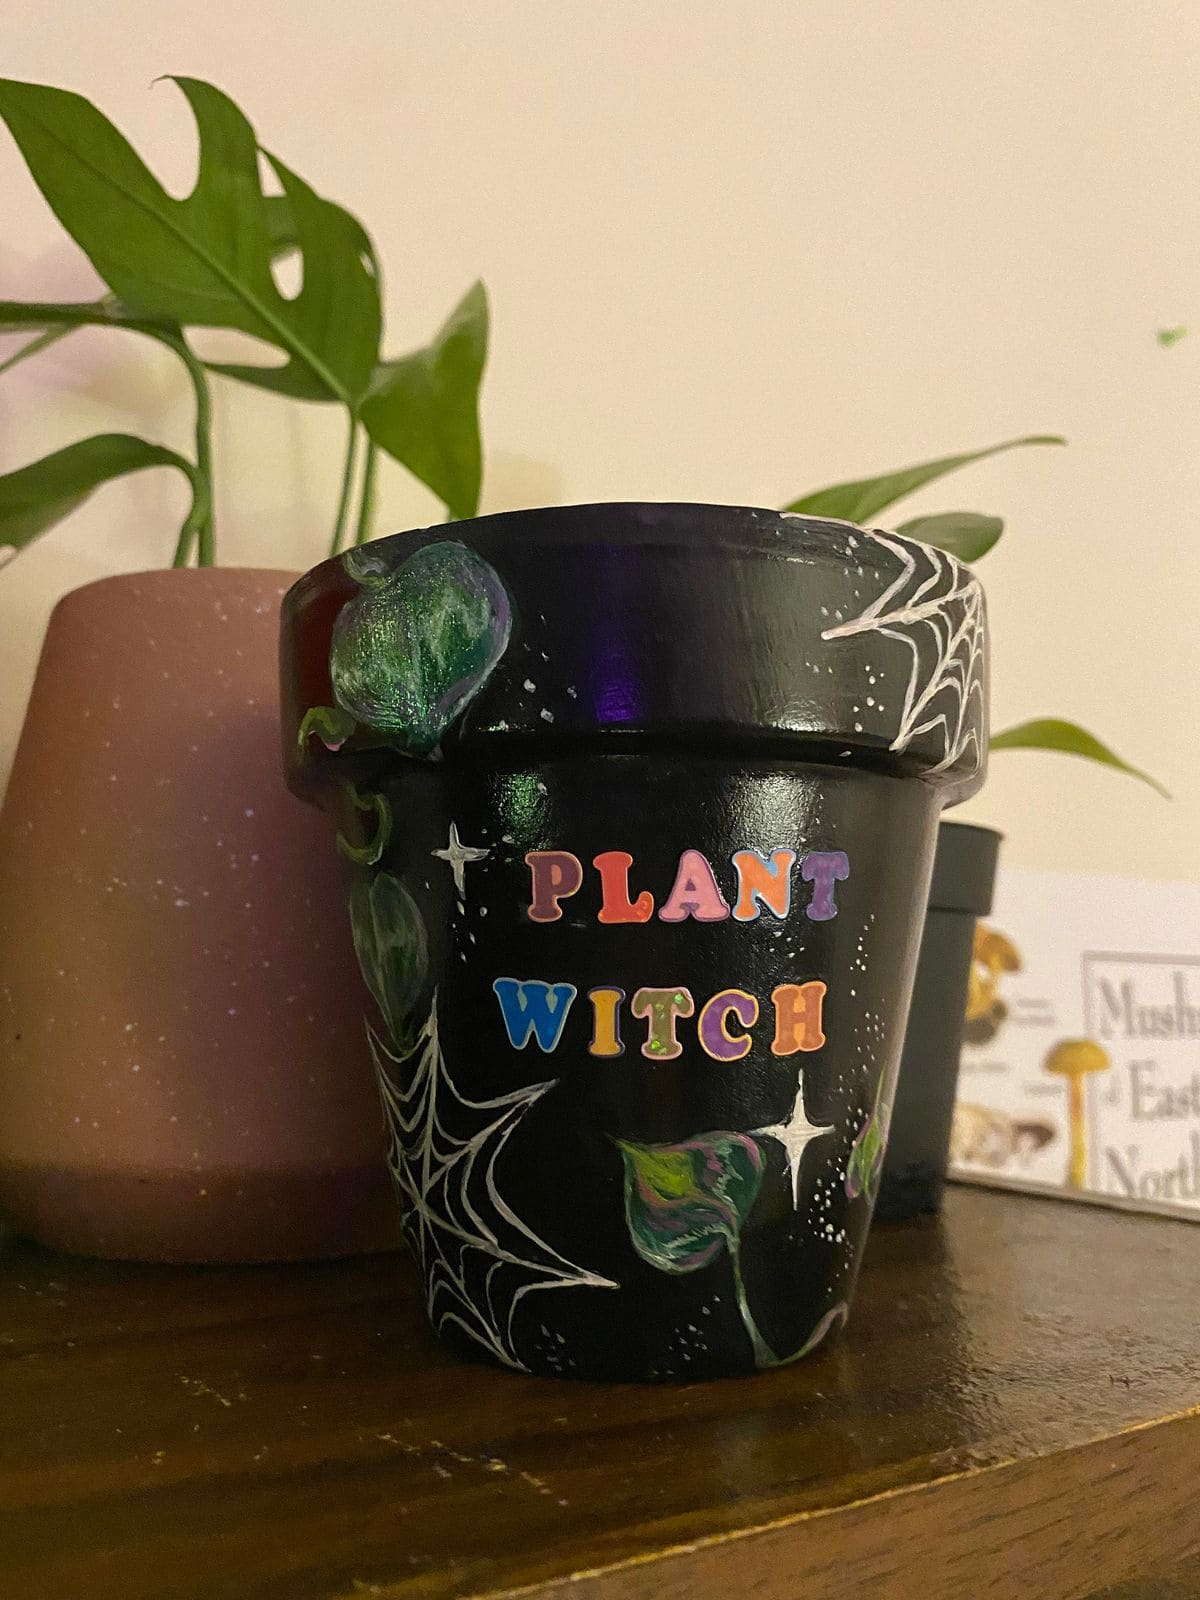
In this design, the black-painted terracotta pot features hand-painted spiderwebs, twinkling stars, and trailing green leaves for a magical, moonlit garden feel.
The colorful block letters spelling “Plant Witch” make it playful yet witchy, perfect for Halloween or year-round decor.
Whether you place it on your shelf, in the garden, or use it as a gift for a fellow plant enthusiast, it’s a bewitching way to give your greenery a stylish home.
Materials Needed
- 1 terracotta pot (6-8 inches diameter)
- Acrylic paint (black, green, white, and assorted colors for lettering)
- Small detail paintbrushes
- Painter’s tape (optional)
- Clear acrylic sealer spray
Step-by-step Guide
Step 1: Clean the terracotta pot and let it dry completely before painting.
Step 2: Apply two coats of black acrylic paint for a rich, even background. Let each coat dry fully.
Step 3: Use detail brushes to paint spiderwebs, leaves, and tiny stars around the surface.
Step 4: Add “Plant Witch” lettering in bright, bold colors for a standout look.
Step 5: Once dry, seal the pot with a clear acrylic spray to protect your design from water and fading.
#18. CALL ME Ghostface Painted Pot
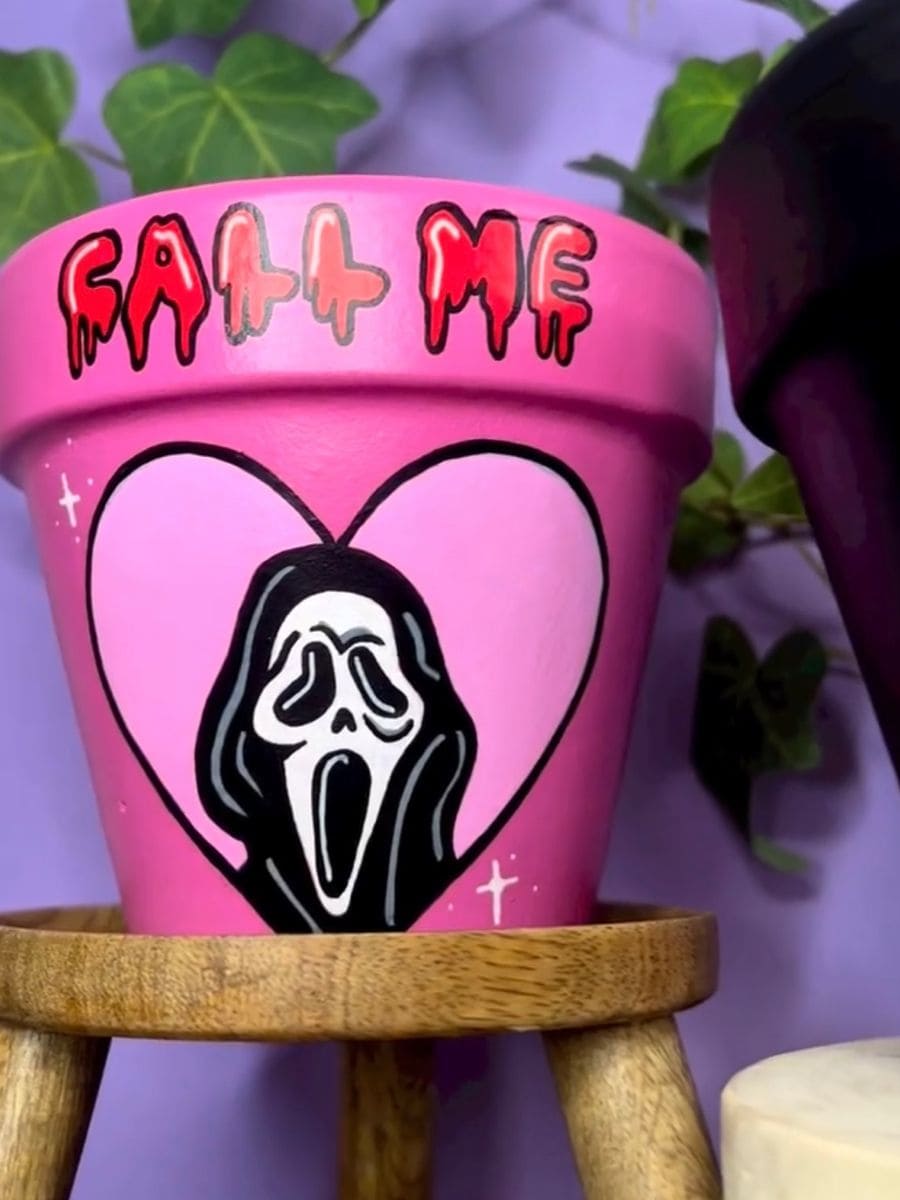
This playful yet chilling Halloween pot brings a flirty twist to spooky décor. The bright pink backdrop, dripping “CALL ME” lettering, and bold Ghostface silhouette inside a heart make it both creepy and cheeky.
You don’t need to be a pro artist to pull this off, just a steady hand, some patience, and the right paints.
The combination of horror and humor makes it a conversation starter that’s perfect for gifting to fellow scary-movie fans or keeping as your own seasonal décor.
Materials Needed
- 1 terracotta pot (6″ diameter)
- Acrylic paint in pink, black, white, and red (1-2 oz each)
- Fine detail paintbrush (size 0-1)
- Medium flat paintbrush (1″)
- Pencil for sketching
- Clear acrylic sealer spray (1 can)
Step-by-step Guide
Step 1: Paint the entire pot in pink using the medium brush. Let it dry completely before moving on.
Step 2: Lightly sketch the heart outline and Ghostface shape on the front of the pot with a pencil.
Step 3: Fill in the heart outline in pink (same as the base) if needed, then paint the Ghostface figure in black, leaving space for the white facial areas.
Step 4: Add the white details to Ghostface’s face using the fine brush. Let dry.
Step 5: Paint the dripping “CALL ME” text in red, then outline in black for definition. Next, add tiny white sparkle accents around the design for a playful pop.
Step 6: Once fully dry, spray with clear acrylic sealer to protect your design.
#19. Halloween Blue Monster Face Planter
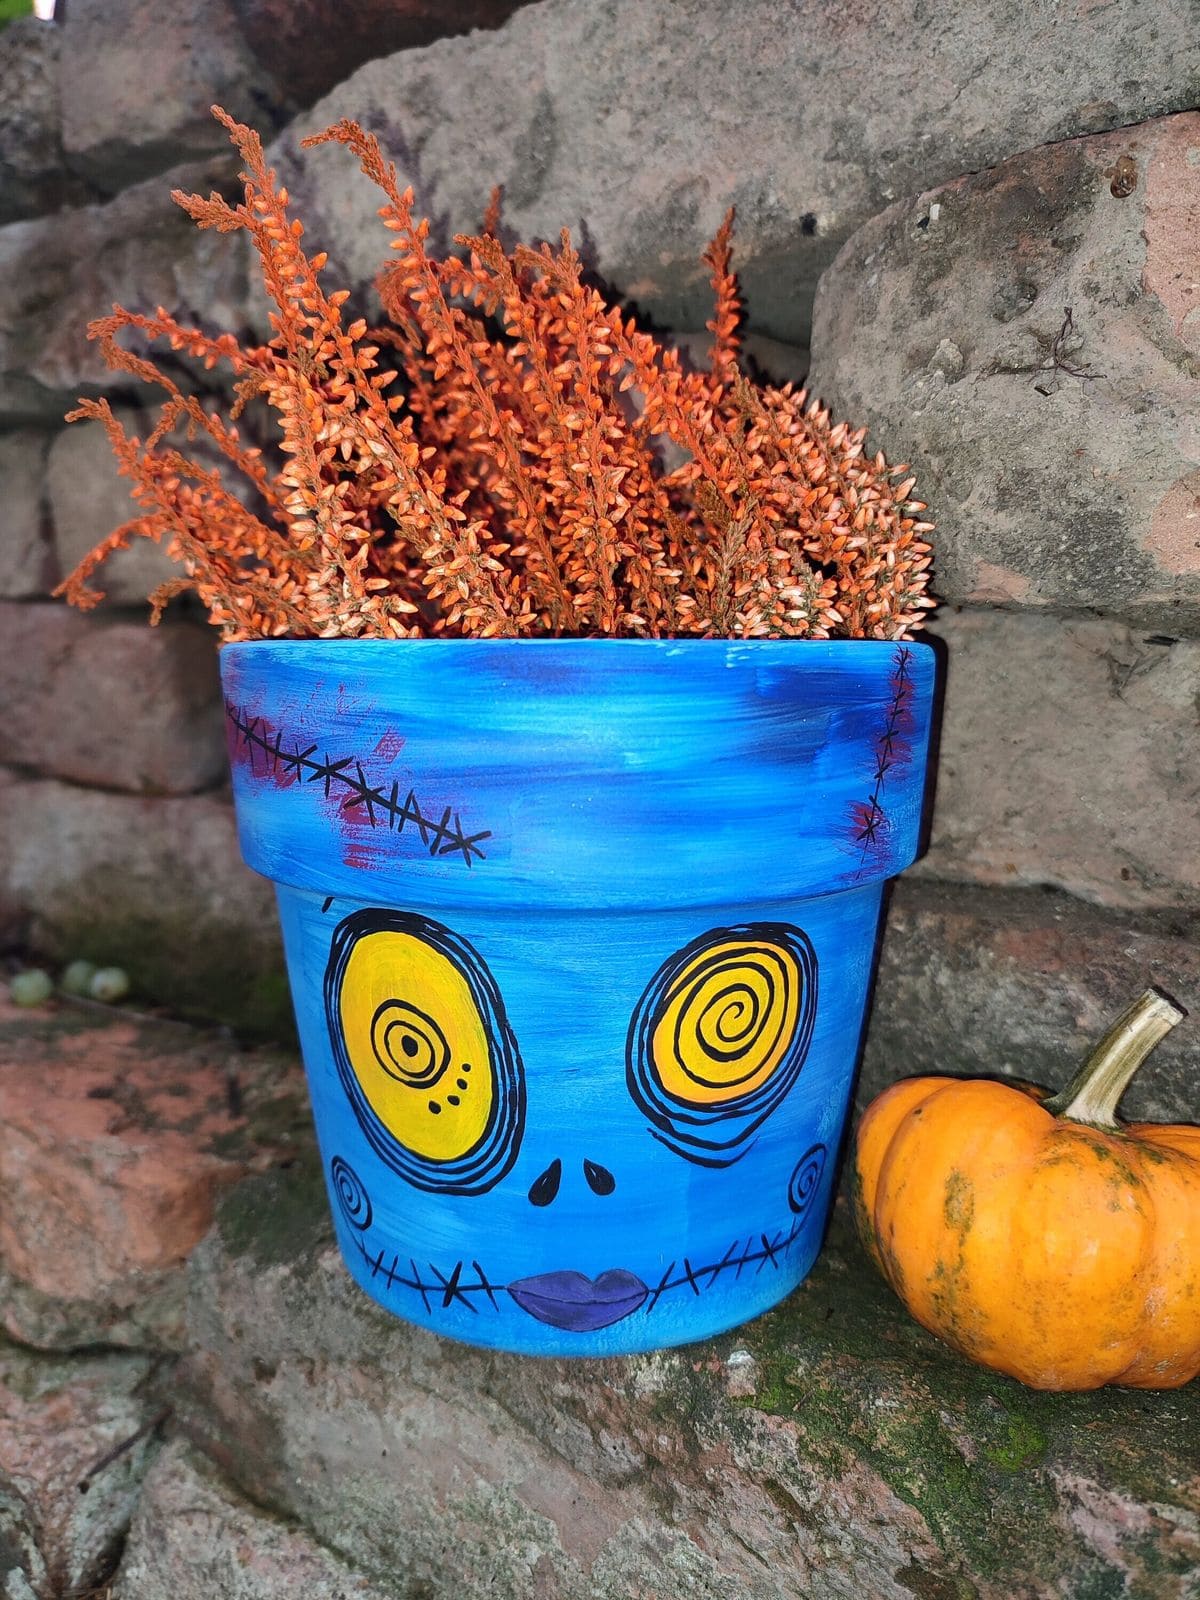
Painted in vibrant blue with swirly yellow eyes, stitched smile, and a playful purple pout, this quirky blue monster face planter brings a whimsical, slightly spooky vibe to your porch or garden.
The orange plant inside pops beautifully against the blue, creating a perfect seasonal contrast, especially when paired with a mini pumpkin.
Its hand-painted details give it personality, almost like it’s watching over your Halloween setup.
Materials Needed
- 1 terracotta pot (6-8 inches)
- Blue acrylic paint (1 small bottle)
- Yellow, black, and purple acrylic paints (small amounts)
- Paintbrushes (medium and fine tip)
- Clear acrylic sealer spray (1 can)
- 1 small artificial or dried orange plant
Step-by-step Guide
Step 1: Clean the terracotta pot to remove dust, then let it dry completely.
Step 2: Paint the pot blue using a medium brush. Then apply 2-3 coats for an even finish.
Step 3: Once dry, use a fine brush to paint swirly yellow eyes, black outlines, stitches, and a purple mouth.
Step 4: Let the design dry, then seal with clear acrylic spray for weather protection.
Step 5: Fill the pot with an orange-toned plant for the perfect Halloween pop of color.
#20. Romantic Skeleton Couple Plant Pot
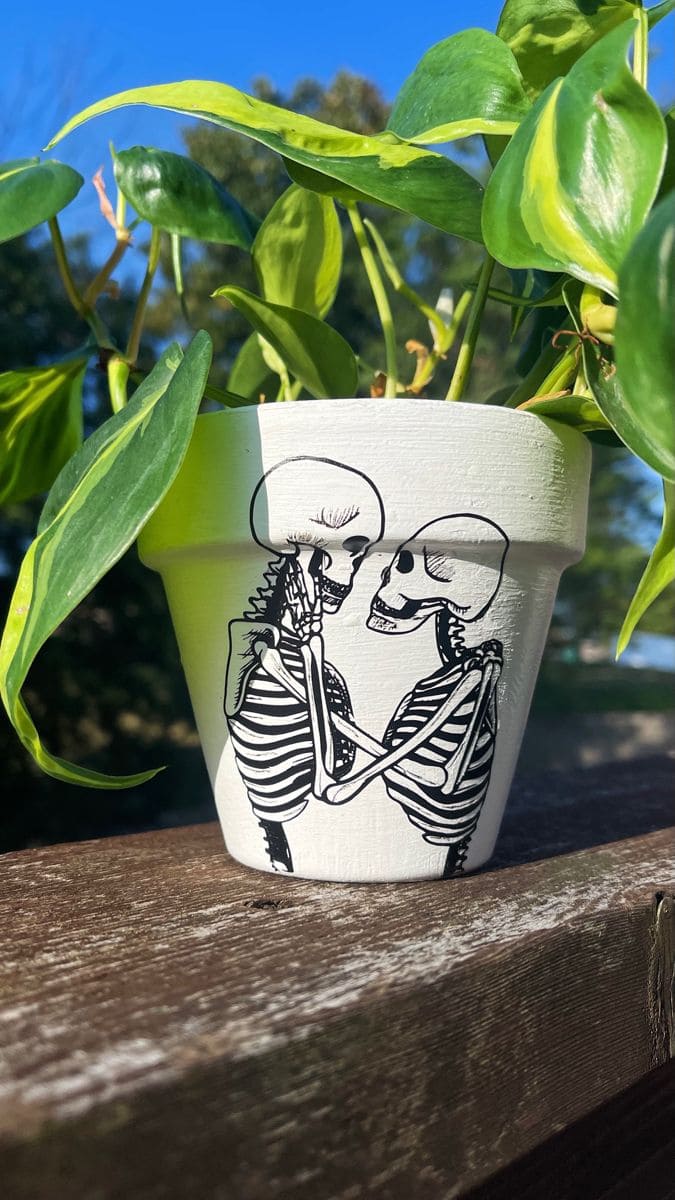
You can see the skeleton couple, hand-painted in black on a crisp white background, makes it feel like a love story that lasts beyond the grave.
Paired with a trailing green plant, the contrast is striking and full of character. It’s the perfect mix of eerie and charming, making it a standout piece for a porch, balcony, or windowsill display.
Materials Needed
- 1 terracotta pot (6″ diameter)
- 1 small can of white acrylic paint (120 ml)
- 1 set of fine-tip black acrylic paint markers
- 1 paintbrush (1″ flat)
- Clear acrylic sealer spray (150 ml)
- Pencil for sketching
Step-by-step Guide
Step 1: Clean your terracotta pot to remove dust and dirt. Let it dry completely.
Step 2: Apply two coats of white acrylic paint with the flat brush, letting each layer dry for 20-30 minutes.
Step 3: Lightly sketch the skeleton couple using a pencil, adjusting their pose until it feels balanced on the pot.
Step 4: Trace and fill in the design using black paint markers, working slowly for crisp lines.
Step 5: Let the artwork dry fully, then spray the pot with clear acrylic sealer to protect it from moisture and fading.
#21. Bloody Halloween Cactus Pots
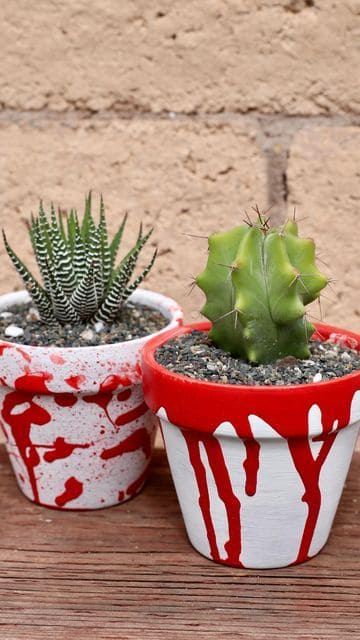
These terracotta cactus pots take a creepy twist with bold blood drip paint effects, instantly giving your plants a horror-movie vibe.
The white base makes the red splatters and drips stand out, creating an eerie but playful look for your Halloween display. Perfect for showcasing spiky succulents or cacti, they add just the right amount of scare without overwhelming your space.
You can keep them indoors on a shelf or line them up on your porch for a spooky greeting.
Materials Needed
- 2 terracotta pots (6-8 inches diameter)
- White acrylic paint (1 bottle)
- Red acrylic paint (1 bottle)
- Small and medium paintbrushes (2-3 pcs)
- Clear sealant spray (1 can)
Step-by-step Guide
Step 1: Paint the pots white and let them dry completely.
Step 2: Dip a small brush in red paint and tap or flick it onto one pot for a splatter effect.
Step 3: For the drip design, load a brush with red paint and let it flow down from the rim naturally.
Step 4: Allow the designs to dry fully before sealing with a clear spray. Now plant your favorite cactus or succulent for a spiky, spooky finish.
See also: 21 Unique DIY Halloween Wreath Ideas That Will Wow Every Trick-or-Treater