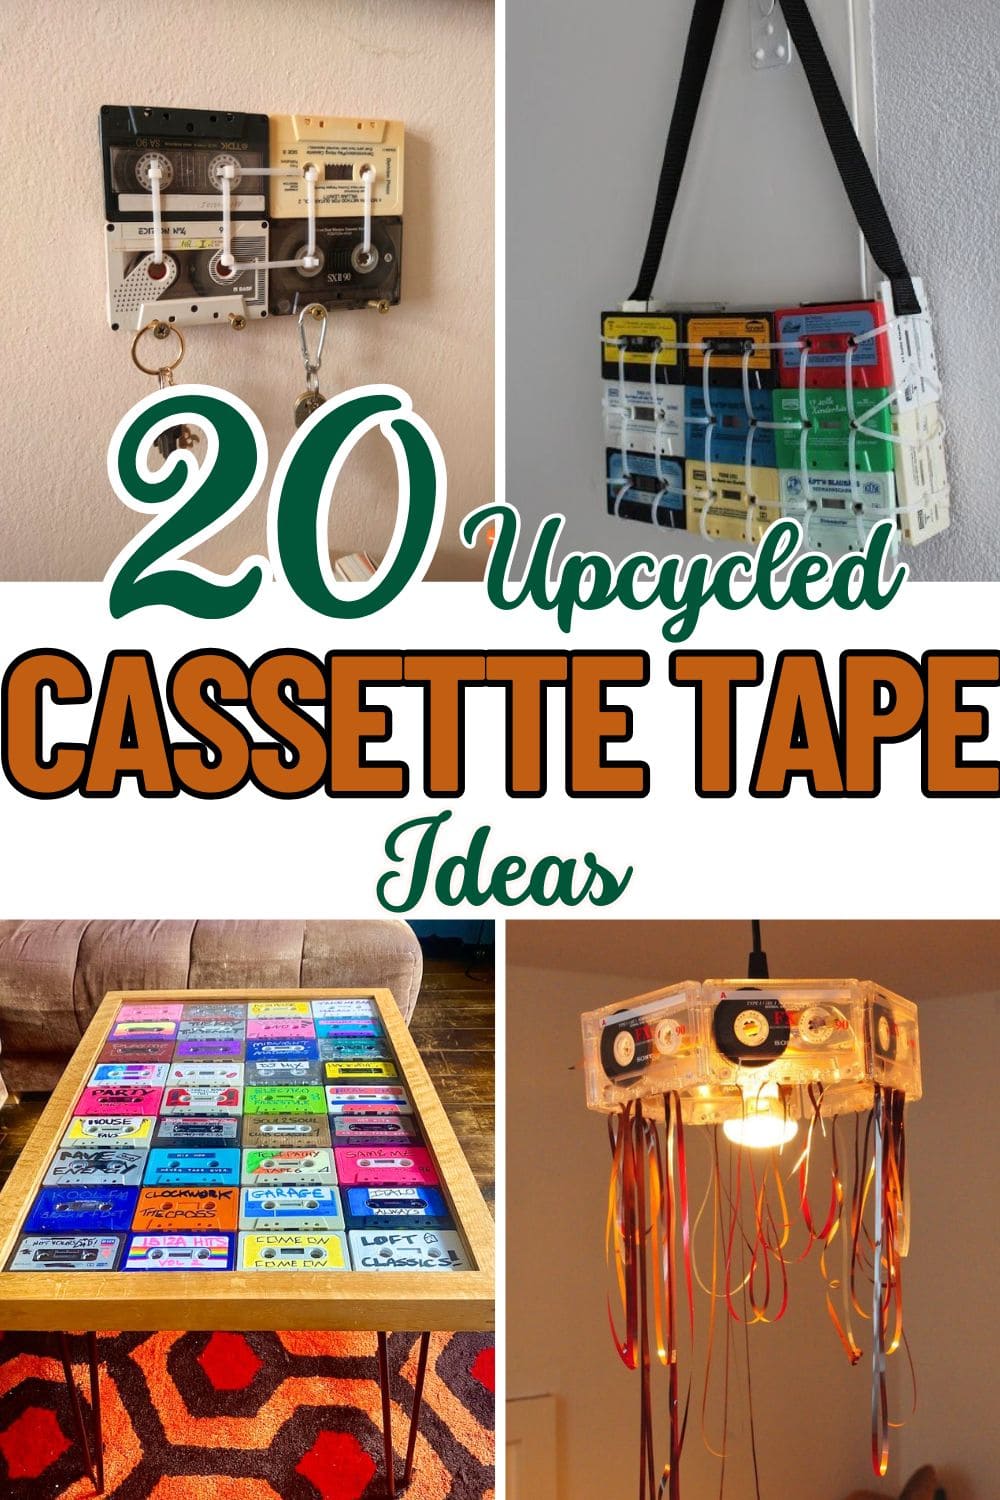
20 Awesome Ways To Upcycle Old Cassette Tapes Into Something Totally Cool
Remember those clunky old cassette tapes collecting dust in a drawer somewhere? What if you could turn them into something stylish, practical, or just downright fun?
Instead of tossing them out, why not give them a second life with a little creativity? Cassette tapes may be outdated for music, but their vintage charm and sturdy structure make them perfect for upcycling.
Whether you’re a nostalgic collector or just love a good upcycle project, this list will surprise you with how cool and functional these tiny retro relics can become.
#1. Cassette Tape Corner Wall Art
This installation turns nostalgia into bold wall art. You’re not just filling empty space, you’re telling a story through vintage color, shape, and texture.
Each cassette adds a pop of personality, and when arranged across a corner like this, they create a dramatic 3D effect that pulls the eye and makes people pause. It’s a perfect way to dress up a studio, gaming nook, or music lover’s den.
Materials Needed
- 50-70 cassette tapes (varied colors for visual interest)
- Double-sided heavy-duty mounting tape or removable wall adhesive
- Level or ruler
- Painter’s tape
Step-by-step Guide
Step 1: Begin by planning your design. You can sketch it out or use painter’s tape to outline the shape directly on the wall.
Step 2: Choose a focal point where your pattern will begin. Start from there and build outward, switching up colors and positions to avoid repetition.
Step 3: Apply strong double-sided tape to the back of each cassette and press firmly onto the wall. Then use a level to keep lines straight, especially near corners.
Step 4: Continue layering up and around the corner until the pattern is complete. Now you can stand back often to adjust and make sure the visual flow works.
#2. Retro Cassette Tape Tower Lamp
By stacking clear cassette tapes vertically around a core light source, you’ll create a sleek column of glowing memories. It’s perfect for music lovers, vintage collectors, or anyone craving a one-of-a-kind lighting statement.
Moreover, the transparent shells of the tapes allow the light to scatter beautifully, creating an ambient effect that feels both modern and sentimental.
Materials Needed
- 24 clear cassette tapes (approx. 4″ × 2.5″ each)
- 1 LED pillar light or LED strip (12″-14″ long)
- Hot glue gun and glue sticks
- Ruler and pencil
- Optional: transparent acrylic sheet (4″ × 4″)
Step-by-step Guide
Step 1: Start by laying out your cassette tapes in rows to visualize the lamp’s height. You’ll need roughly 8 tapes per side, stacked 3 tapes high.
Step 2: Using a hot glue gun, attach the tapes side by side to form square walls. You need to do this for all four sides, creating a hollow cube tower.
Step 3: Carefully glue each wall together at the corners to form a vertical tower. Then use a ruler to keep the edges aligned and sturdy.
Step 4: Insert the LED light inside the tower. Make sure it’s centered and not touching the sides to avoid melting the plastic.
Step 5: Secure a flat acrylic sheet to the bottom if you want added stability, especially if your tower is over 12″ tall.
#3. Colorful Cassette Tape Handbag
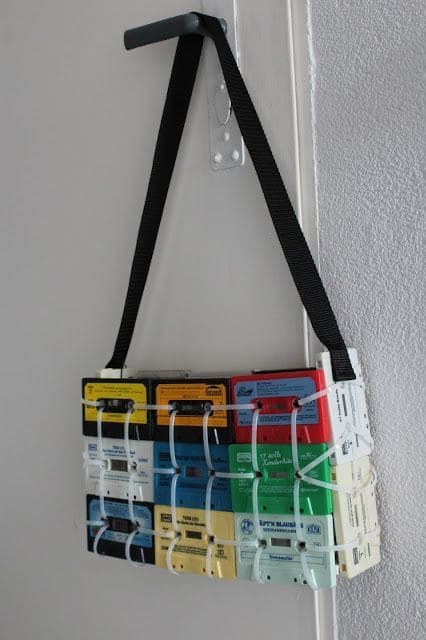
Wow, this one’s for the bold souls who love to carry art on their shoulders. This colorful cassette tape handbag isn’t just functional—it’s a retro masterpiece.
Using a rainbow mix of vintage tapes, the bag is structured, quirky, and undeniably eye-catching. It’s the ultimate throwback accessory that sparks nostalgia and style in one swoop.
Materials Needed
- 12 cassette tapes (variety of colors)
- 20+ zip ties (white or matching tones)
- Strong black strap or belt (30″-40″)
- Small canvas or fabric pouch
- Hot glue or E6000
Step-by-step Guide
Step 1: Arrange your cassette tapes into a rectangular grid (3 rows of 4) and connect them using zip ties through the reel holes and corners.
Step 2: Secure the sides and bottom with more zip ties until the form feels stable and tight.
Step 3: Cut your strap to the desired length and glue or screw it securely to the top inside corners.
Step 4: Optional: insert a fabric pouch inside and glue it down for a neat lining to protect small items.
#4. Cassette Tape Coffee Table
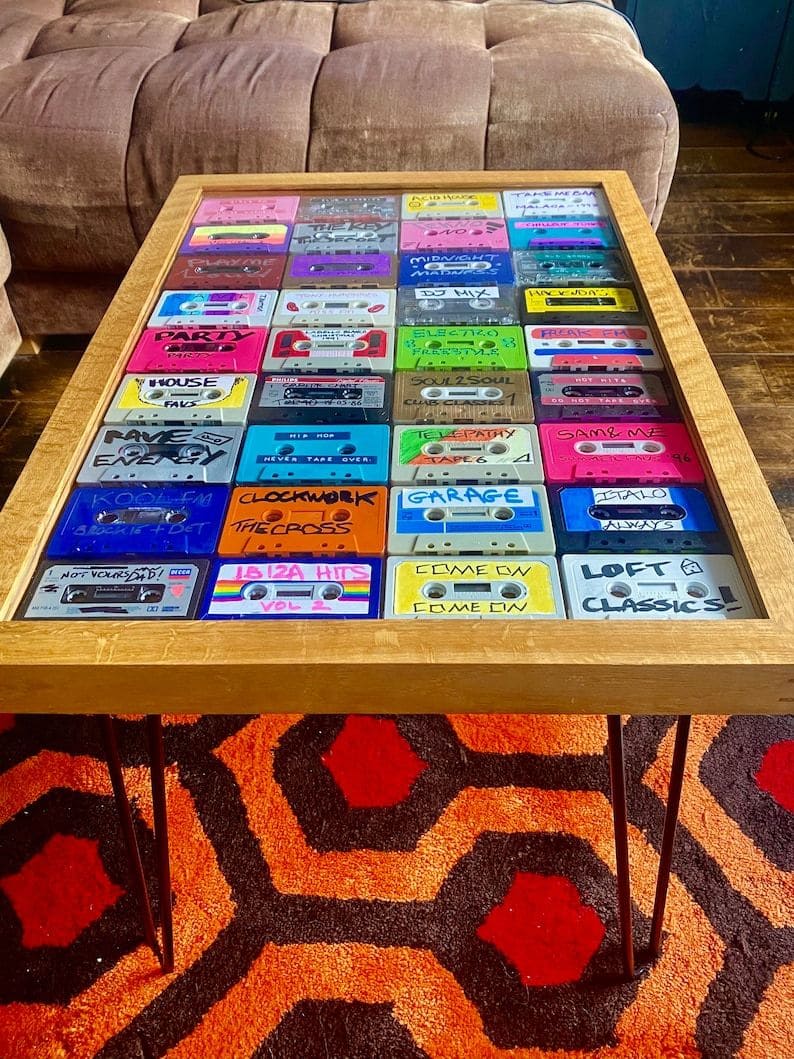
Look at this vibrant cassette coffee table! It is a tribute to retro beats and colorful creativity. Each tape tells its own story, laid out under glass like a mini museum of musical memories.
Specially, the tapes are neatly arranged in rows inside a wooden frame with a clear glass or acrylic top, offering both visual appeal and functional use.
Materials Needed
- 30-40 colorful cassette tapes (approx. 4″ x 2.5″)
- Wooden frame (pre-built or DIY) sized to your table dimensions
- Clear acrylic/glass sheet
- Plywood or MDF baseboard
- Table legs (e.g., hairpin legs) with screws
- Strong glue or double-sided adhesive
- Drill and screwdriver
Step-by-step Guide
Step 1: Arrange your cassette tapes on the baseboard to determine layout. You can mix colors and labels for variety.
Step 2: Once satisfied, glue each tape in place securely and allow to dry fully.
Step 3: Attach the table legs to the baseboard using screws and a drill.
Step 4: Position the wooden frame over the tapes and place the glass/acrylic sheet on top. Then secure the top in place or leave it removable for easy cassette swapping.
#5. Cassette Tape Key Holder Wall Rack
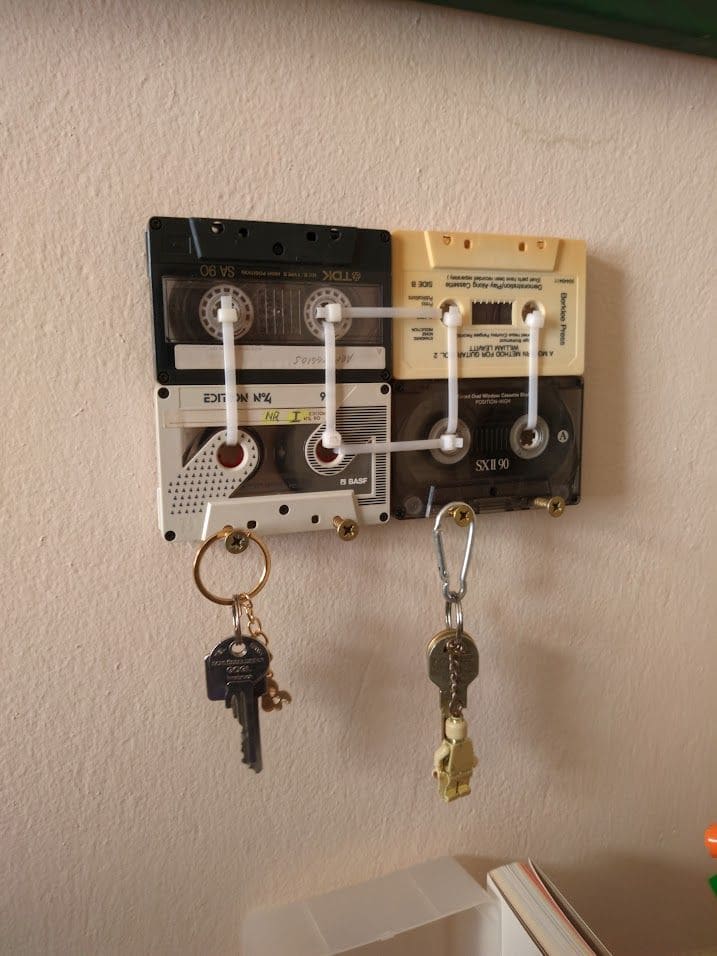
This quirky key holder gives your old tapes a whole new rhythm. Instead of misplacing your keys or digging through cluttered drawers, you’ll have them displayed on a functional piece of music history.
Plus, the cassette tapes form a vintage grid, while hooks and zip ties provide the utility. It’s a fun way to turn nostalgia into everyday usefulness.
Perfect for entryways or home studios, this little organizer hits the sweet spot between retro charm and practical design. Plus, every visitor will ask you where you got it and you can proudly say, “I made it.”
Materials Needed
- 4 cassette tapes (standard size: 4″ × 2.5″)
- 4 small screw hooks (1″ length)
- 4 zip ties (4″ length, white or clear)
- Strong wall adhesive strips or small mounting screws
- Optional: small wood board (6″ × 6″)
Step-by-step Guide
Step 1: Clean each cassette tape and decide the layout, usually two rows of two tapes looks balanced and compact.
Step 2: Use hot glue or a backing board to secure the tapes together and give the whole piece strength.
Step 3: Screw small hooks into the bottom edge of each cassette. You should go slowly to avoid cracking the plastic.
Step 4: Attach zip ties across the tape reels in a pattern to add extra storage space or a touch of industrial design.
#6. Retro Cassette Tape Pen Holder
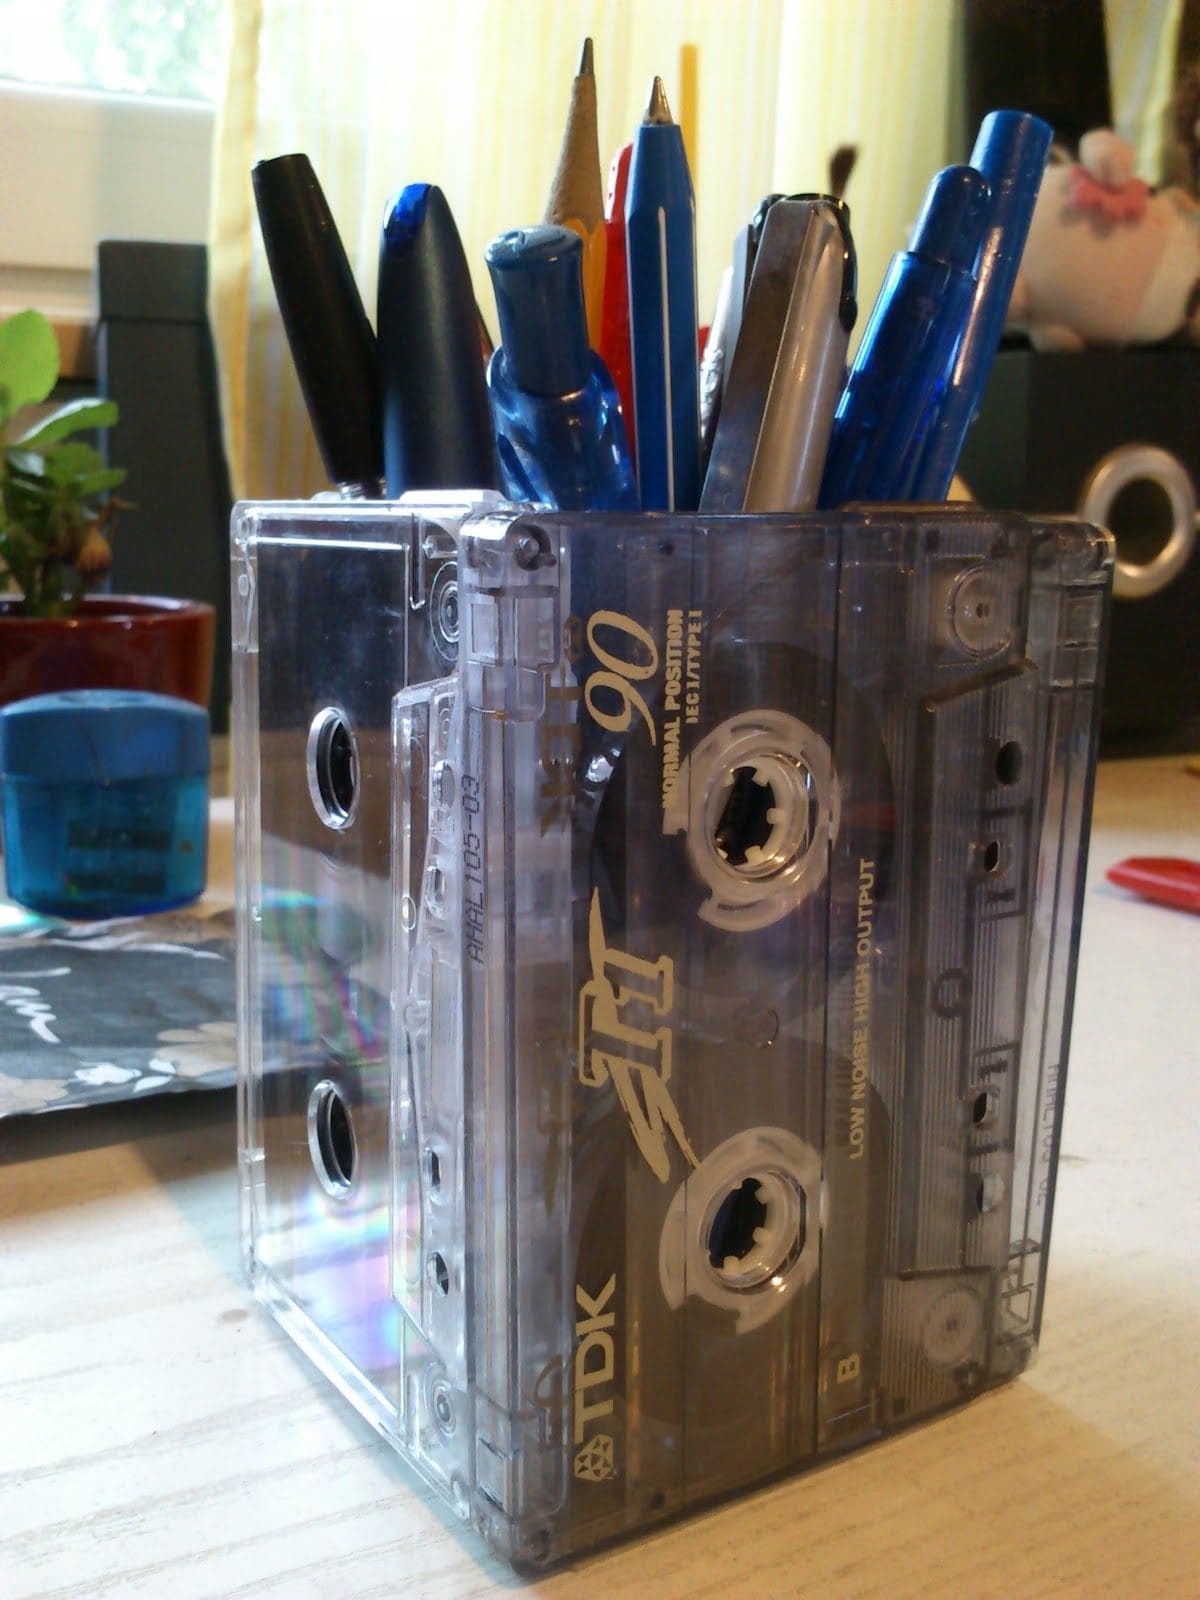
How about turning your cluttered desk into a retro haven with this funky pen holder made entirely from vintage cassette tapes?
Perfect for lovers of analog vibes, this DIY project gives you a practical way to store pens, pencils, or even paintbrushes while doubling as a nostalgic statement piece. It’s an eye-catching blend of function and flair that sparks conversation in any workspace.
Materials Needed
- 5 cassette tapes (matching or mixed)
- Strong glue (like E6000 or hot glue)
- Small square base (wood or thick cardboard, approx. 4″x4″)
- Optional: clear sealer
Step-by-step Guide
Step 1: Arrange four cassette tapes upright to form a square box shape. Then use glue along the sides where the tapes touch and press together.
Step 2: Attach the fifth cassette or a base material to the bottom for support.
Step 3: Once the structure is secure, test it with pens or utensils to ensure stability.
Step 4: Finally, place it on your desk and fill with writing essentials.
#7. Cassette Tape Art Shadow Box
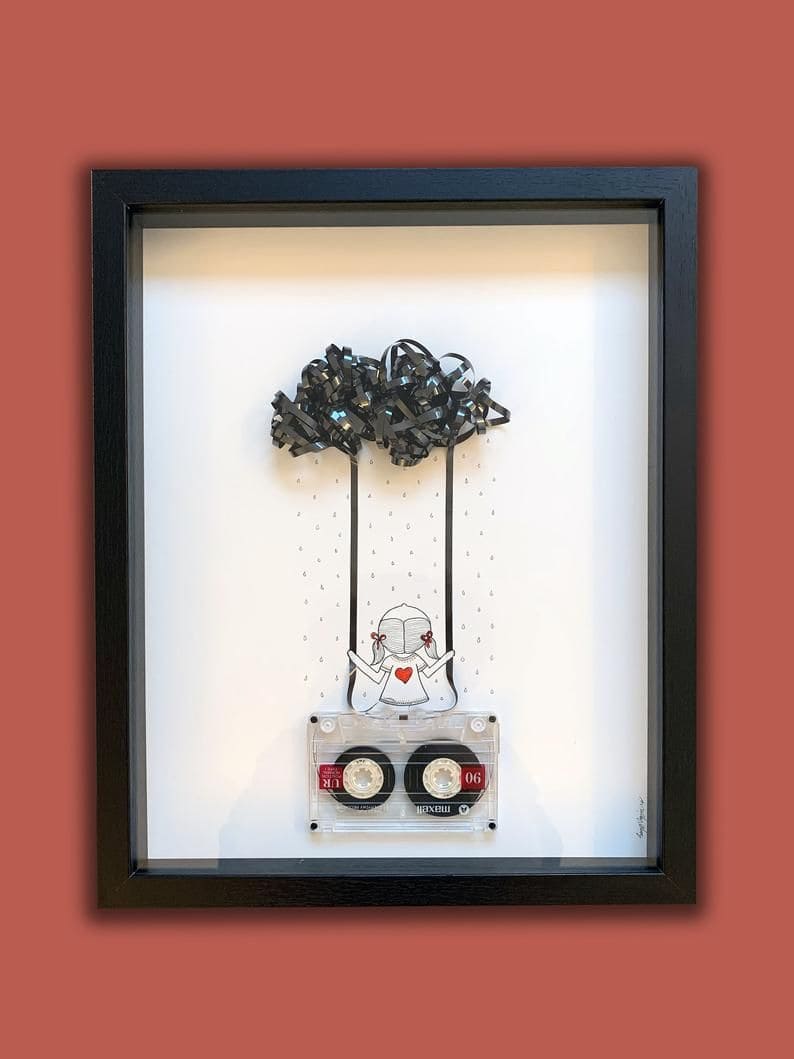
You can see this whimsical shadow box transforms a single cassette into a touching piece of wall art. The tape ribbon blooms into a textured raincloud, with drawn-on raindrops and a sweet sketch of a child swinging below.
Plus, the cassette forms the swing’s base, grounding the artwork with both charm and nostalgia. It’s a poetic blend of analog materials and personal storytelling, perfect for adding depth and personality to a gallery wall or gifting.
Materials Needed
- 1 clear cassette tape (standard size 4″ x 2.5″)
- Shadow box frame (at least 8″ x 10″)
- White cardstock or canvas backing
- Black cassette ribbon (from the tape itself)
- Glue gun or craft glue
- Fine-tip black marker
- Scissors, optional tweezers
Step-by-step Guide
Step 1: Remove the tape ribbon from the cassette and gently bunch it into a loose cloud shape.
Step 2: Sketch a figure (like a child or character) on the cardstock and draw the swing ropes extending upward.
Step 3: Glue the cassette in place where the swing seat should be, lining it up with your drawing. Continue to glue the ribbon cloud above the swing, shaping it with tweezers or your fingers for volume.
Step 4: Add final touches like falling rain, hearts, or a message before placing it in the shadow box.
Tip: You can personalize the sketch with a loved one’s hairstyle or initials to turn it into a meaningful gift.
#8. Glowing Cassette Cube Lamp
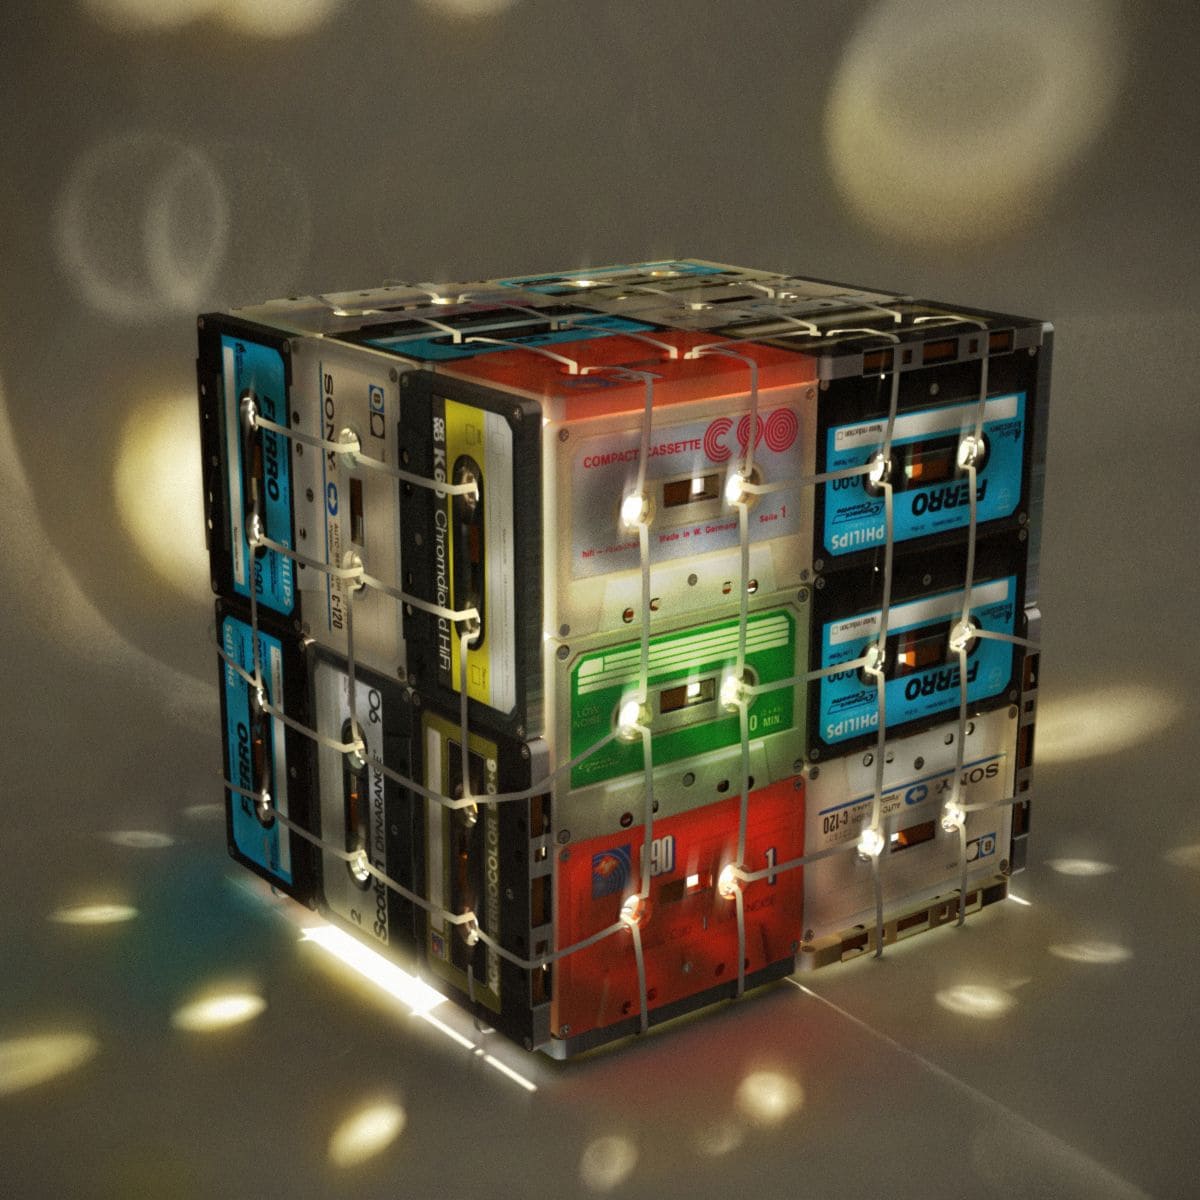
Crafted from vintage cassettes arranged into a cube, this retro-inspired cassette lamp becomes a glowing art piece with a nostalgic soul.
When lit, the transparent and colored cases scatter light in all directions, casting warm, dotted reflections onto the walls, just like a disco ball, but more analog and personal.
Materials Needed
- 24-36 cassette tapes (standard size)
- LED fairy lights or USB LED string lights
- Hot glue gun or clear zip ties
- Clear acrylic sheet (optional)
- Craft wire or plastic frame
- Drill (optional)
Step-by-step Guide
Step 1: Arrange the cassette tapes into six square panels (four sides, a top, and bottom), securing them with hot glue or zip ties.
Step 2: Assemble the panels into a cube, reinforcing the corners and edges with extra ties or glue.
Step 3: Weave LED string lights through the inside of the cube, distributing them evenly behind the tape windows.
Step 4: Create a small opening for the wire to exit, or power via battery if you want it cordless.
Tip: You should choose cassettes with bold labels and different shell colors to maximize the light effects and visual impact.
#9. Cassette Tape Ribbon Chandelier
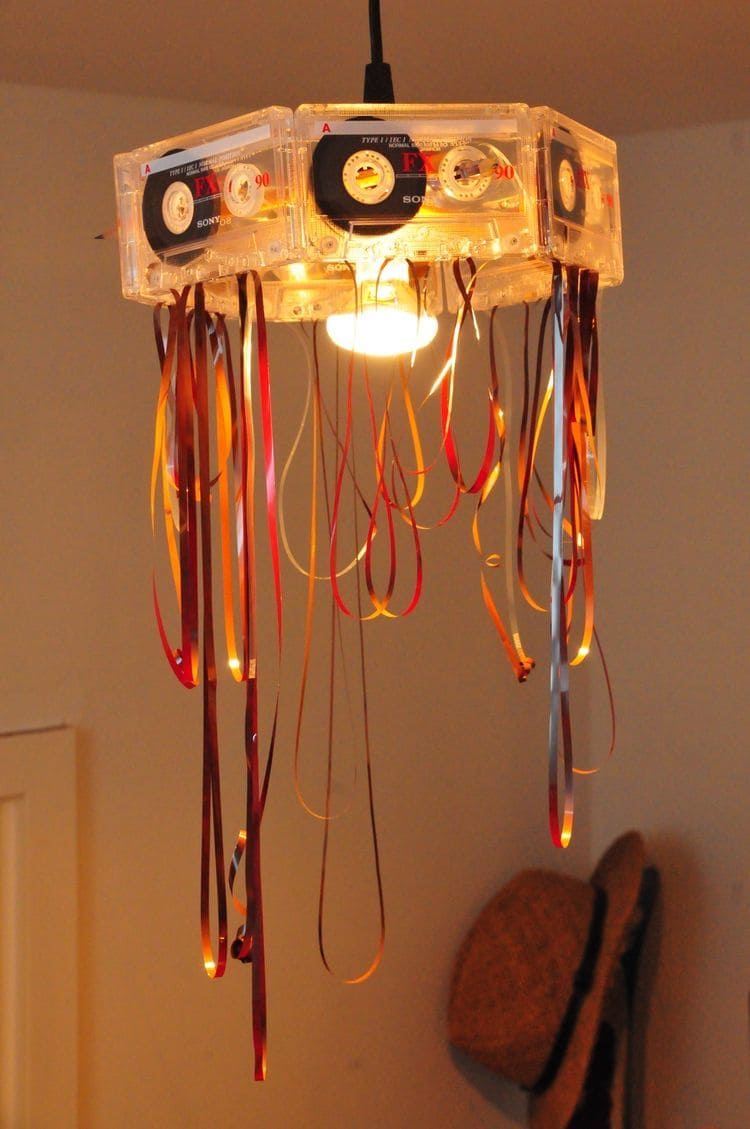
When the bulb lights up, it plays with the shiny magnetic ribbon, casting soft, surreal shadows that shimmer like a 90s dream.
You’ll love how it adds personality to your space, think retro music room, quirky hallway, or that artsy corner you’ve been meaning to revive. It’s playful, dramatic, and strangely soothing to watch as the ribbons flutter gently in the breeze.
Materials Needed
- 6 cassette tapes (standard 4.25″ x 2.75″)
- 1 small pendant light fixture with bulb
- Hot glue gun and glue sticks
- Salvaged tape ribbon from cassettes (10-20 strands, 18″-24″ long)
- Craft wire or zip ties (optional)
Step-by-step Guide
Step 1: Begin by removing the tape ribbon from inside your cassettes. Then loosen it gently so it comes out in long, intact loops for the best draping effect.
Step 2: Glue the cassette tapes together to form a hexagon or square that fits snugly around your pendant light. You need to leave an opening for the bulb socket to slip through the center.
Step 3: Attach strands of ribbon to the bottom edge of each cassette using hot glue. Then space them out so they hang at different lengths for visual movement.
Step 4: Carefully slide your cassette structure over the pendant bulb and secure it if needed.
#10. Retro Cassette Tape Coin Purse
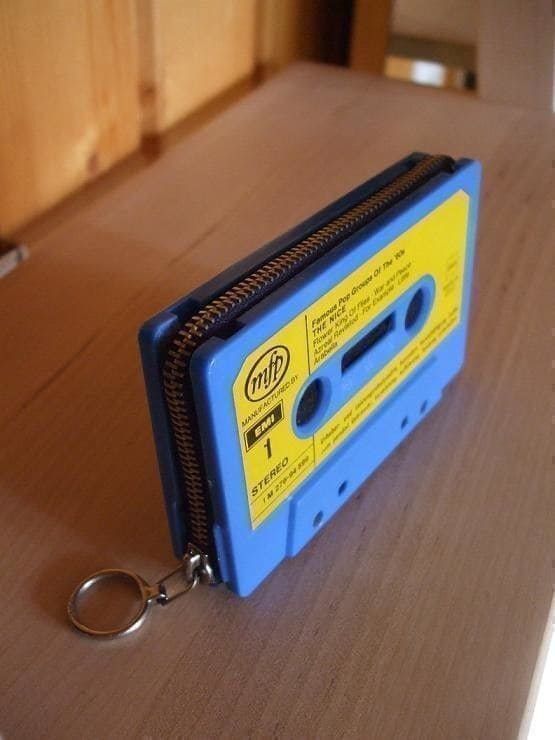
Old-school charm meets everyday utility with this quirky cassette tape coin purse. It’s compact, edgy, and guaranteed to start conversations when you pull it out.
Perfect for holding change, earbuds, or tiny essentials, it gives new life to your nostalgic music collection. The zip closure adds a sleek finish while keeping everything secure inside.
Moreover, this mini purse is equal parts retro fashion and functional upcycling, ideal for anyone who loves a bold and playful statement accessory.
Materials Needed
- 1 cassette tape (2 halves)
- Small zipper (6″-7″ length)
- Felt or fabric liner (cut to fit interior)
- Hot glue or super glue
- Optional: keyring or wrist strap
Step-by-step Guide
Step 1: Carefully split the cassette tape into two halves, removing any inner parts that get in the way.
Step 2: Cut felt to match the shape of each inner half. Glue the felt to line the inside, creating a soft interior.
Step 3: Glue the zipper around the inside edges of one cassette half, then attach the other half to complete the pouch.
Step 4: Let it dry fully before using. you can also attach a keyring or small strap to one end for easy carrying.
#11. Retro Cassette Light Switch Plate
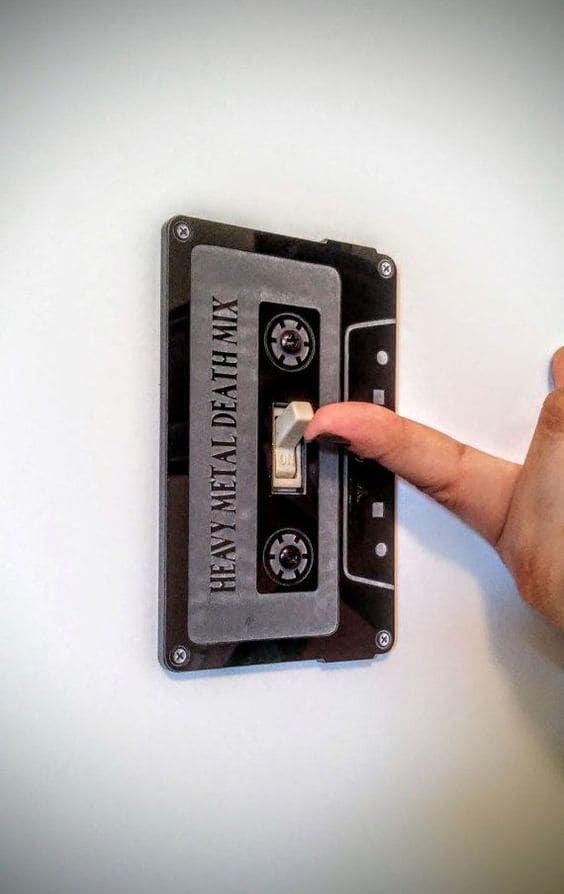
Why not give your walls a jolt of personality with this electrifying cassette switch plate?
Instead of a boring plastic cover, you’ll flip the lights on and off through a music relic that screams personality. This idea is especially perfect for game rooms, man caves, or any space where your love for retro vibes shines.
Plus, every flick of the switch becomes a playful nod to the days of making mixtapes. It’s easy, budget-friendly, and turns a small everyday detail into a conversation starter.
Materials Needed
- 1 cassette tape (standard size 4″ × 2.5″)
- 1 plastic or metal switch plate cover
- Craft knife
- Hot glue gun or strong epoxy
- Small screws (optional)
- Drill (optional)
Step-by-step Guide
Step 1: First, remove the old switch plate from your wall and use it as a guide to measure the cutout you’ll need on the cassette.
Step 2: Carefully cut a rectangular hole in the center of the cassette, just large enough to fit around the switch toggle.
Step 3: Glue the cassette securely to a plain switch plate, aligning the opening with the toggle.
Step 4: Reattach the whole unit to the wall with screws. If you want a super flush fit, drill small pilot holes through the cassette’s corners.
#12. Cassette Tape Succulent Planter
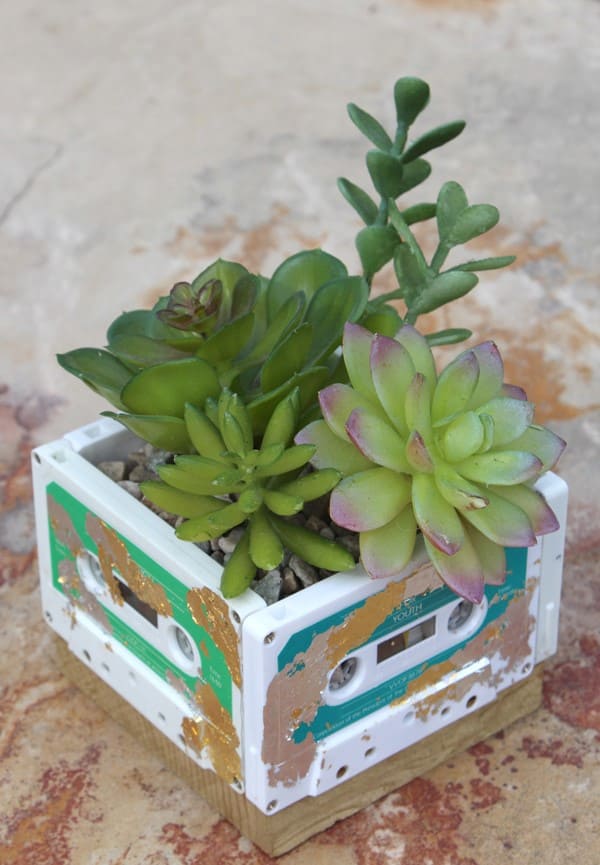
This charming little succulent planter proves that even outdated music relics can breathe life into your space.
Using four old cassette tapes, you can craft a funky, square pot that’s perfect for mini plants like echeveria, jade, or hens and chicks. The contrast between the hard plastic and the vibrant greens makes it a statement piece full of retro vibes and fresh energy.
Materials Needed
- 4 cassette tapes (same size)
- 1 small wood block for the base (approx. 3.5″x3.5″)
- Hot glue or E6000 adhesive
- Small plastic container or liner
- Potting mix and succulents of your choice
Step-by-step Guide
Step 1: Clean and prep the cassette tapes by removing any loose labels or dust. Then glue the tapes together to form a square, open-top container.
Step 2: Secure the cassette cube onto the wood base using glue.
Step 3: Insert a liner or small plastic container inside to protect the cassette interiors from moisture.
Step 4: Add soil, gently press in your succulents, and sprinkle some gravel on top for a polished look.
#13. Cassette Case Trinket Organizer
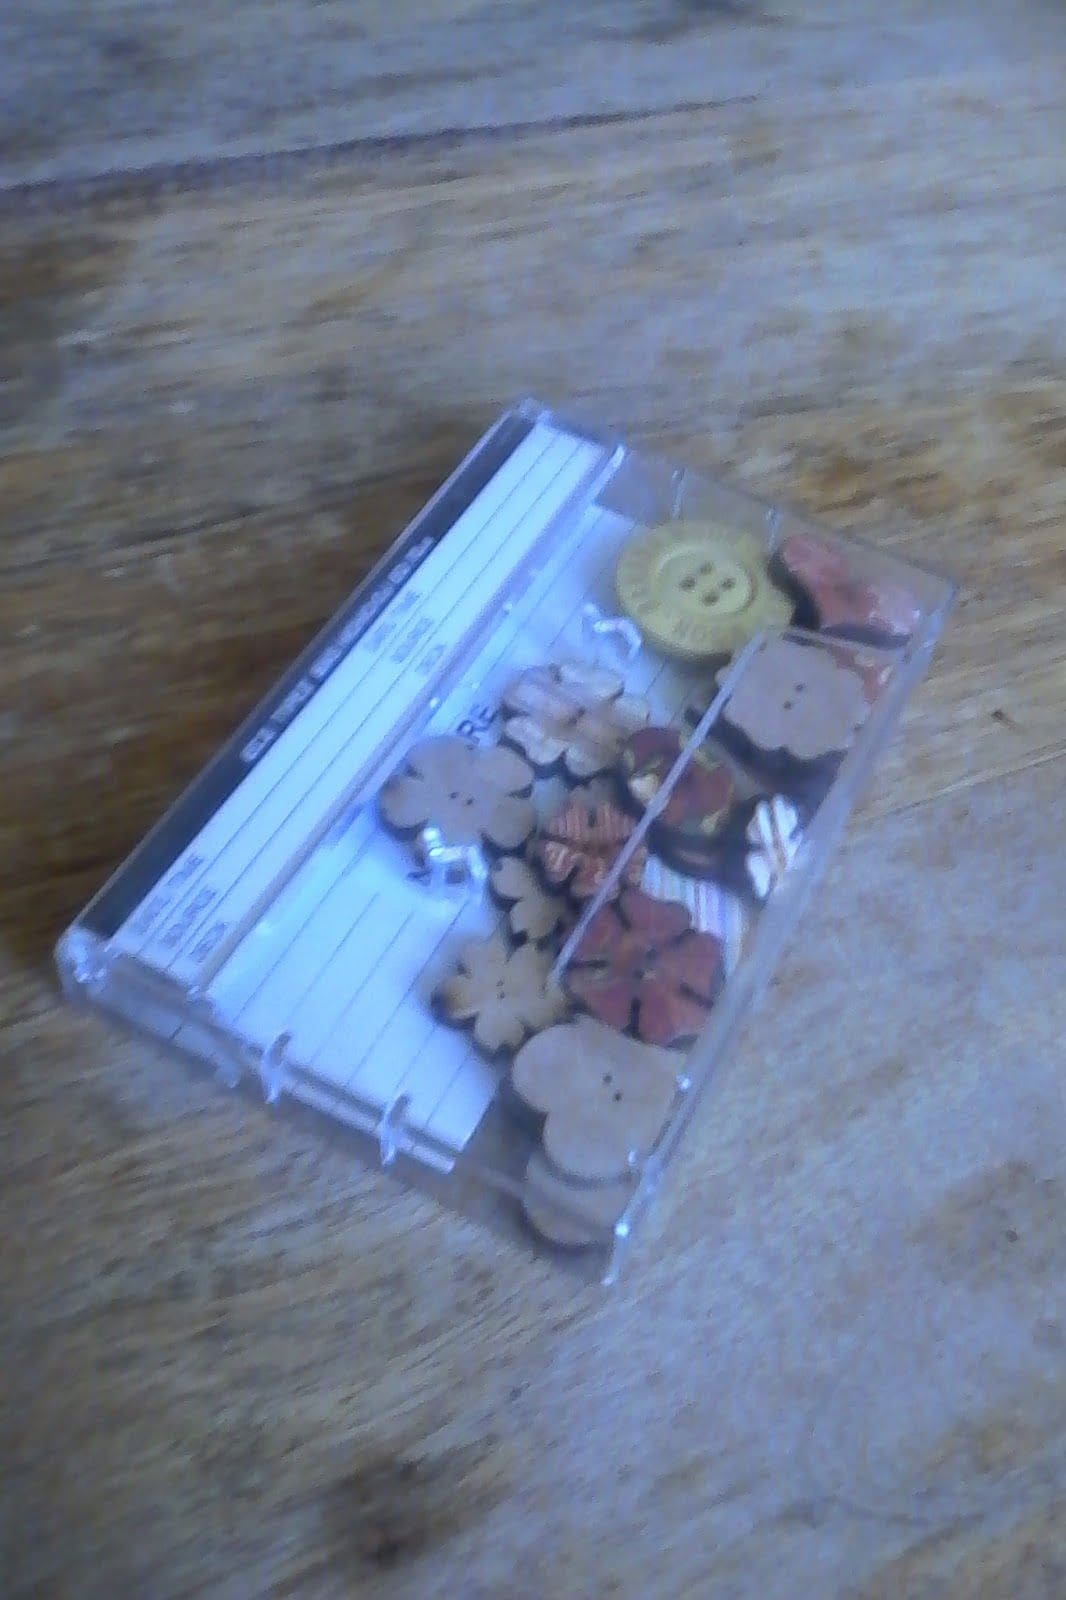
Sometimes the simplest ideas turn out to be the most useful. This cassette case trinket box proves that
. Instead of tossing out that empty shell, give it a new role as a petite storage compartment for buttons, beads, or tiny treasures. It fits easily in drawers, sewing kits, or craft bags, keeping those small essentials sorted and close at hand.
Materials Needed
- 1 empty cassette case (standard size)
- Decorative buttons, beads, or mini craft supplies
- Optional: small dividers (thin cardboard, felt, or plastic strips)
- Label sticker or washi tape
Step-by-step Guide
Step 1: Open the cassette case and remove any insert or paper labels if needed.
Step 2: If desired, create dividers by cutting cardboard or felt to fit and glue them in to make small sections.
Step 3: Fill the sections with buttons, pins, or whatever little odds and ends you want organized.
Step 4: Decorate the outside with a label, sticker, or washi tape so you can easily identify the contents.
Step 5: Now you just close it up and slide it into your drawer or craft bin, everything stays in place and visible.
#14. Steampunk Cassette Tape Necklace
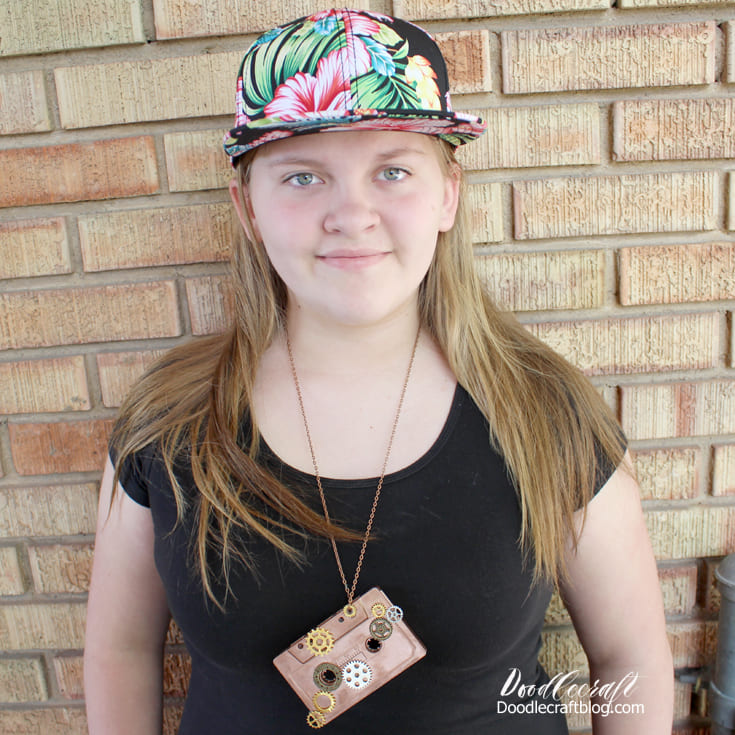
This funky accessory fuses retro and industrial in the coolest way. A simple cassette tape gets an edgy makeover with metallic paint and an array of gears, creating a bold steampunk statement necklace.
I bet it’s wearable art that brings music nostalgia and mechanical flair together, perfect for teens, cosplay fans, or anyone who loves one-of-a-kind jewelry that sparks conversation.
Materials Needed
- 1 cassette tape (standard size, approx. 4 x 2.5 inches)
- Bronze or metallic spray paint (1 small can)
- 10-12 assorted metal gears and steampunk embellishments
- Strong glue (E6000 or hot glue gun)
- Jewelry chain or leather cord (approx. 30 inches)
- Small drill or hole punch
- Jump rings and pliers (optional)
Step-by-step Guide
Step 1: Clean the cassette and give it a coat of metallic spray paint. Let it dry thoroughly before decorating.
Step 2: Arrange gears and embellishments in a layout that feels balanced, then glue each piece in place firmly.
Step 3: Drill or punch a small hole in the top corner of the cassette, and insert a jump ring.
Step 4: Attach your chain or cord through the ring, adjusting the length to fit as desired.
Step 5: Let all elements dry and cure fully before wearing your bold new creation out in the world.
Tip: Add a drop of aged patina paint or rub some black wax over the gears for a more vintage, timeworn effect.
#15. Cassette Tape Portrait Art
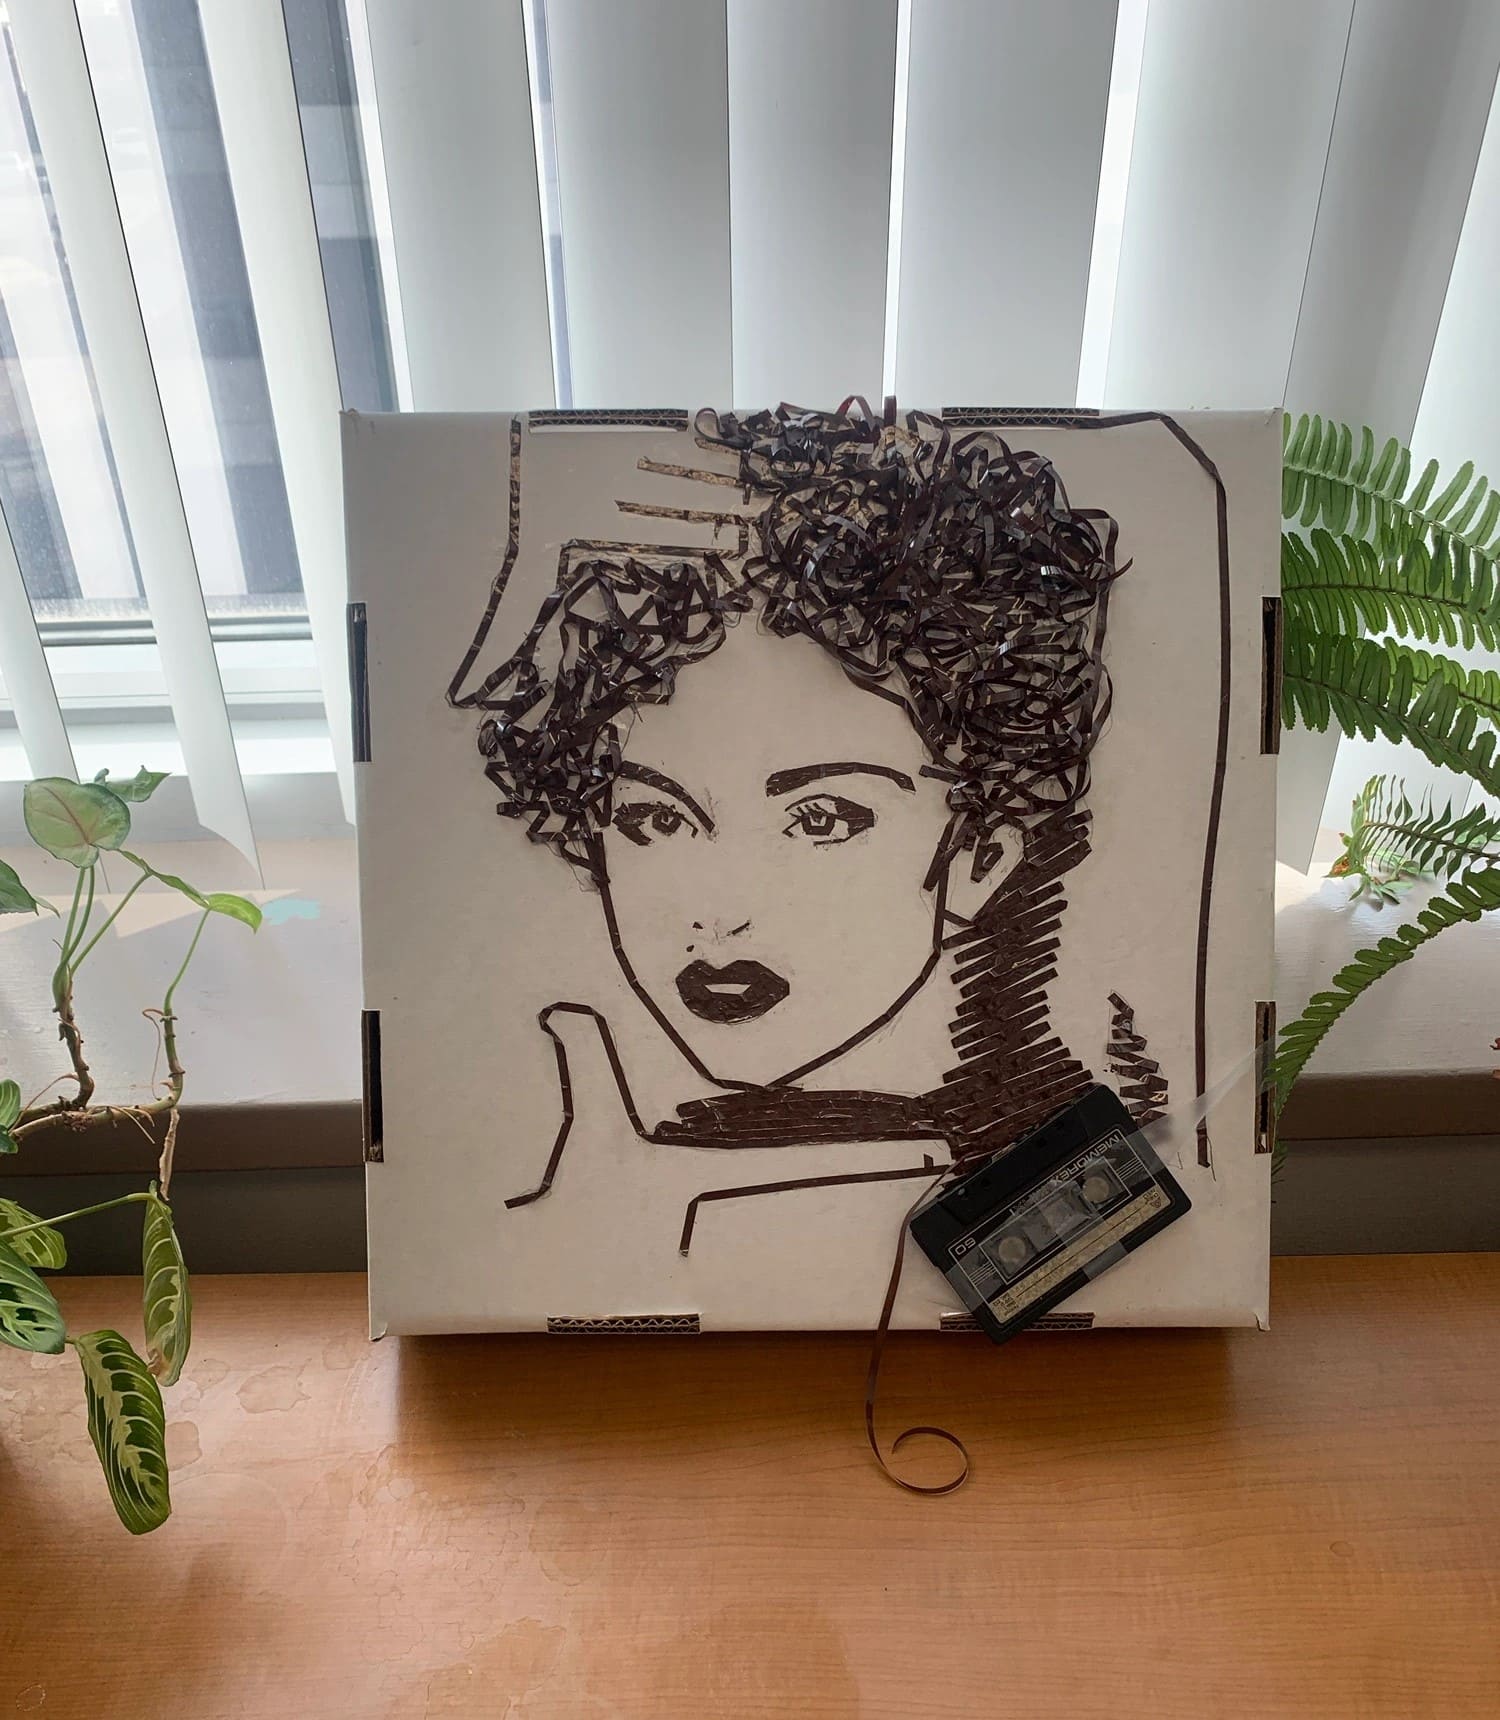
This captivating artwork takes the nostalgia of cassette tapes and transforms it into fine art. The artist has cleverly used magnetic tape strands to craft textured, curly hair, creating a dynamic contrast against the clean line drawing of the face.
I believe it’s dramatic, bold, and completely unique, perfect for adding personality to any modern or creative workspace.
Materials Needed
- 1 cassette tape (any color)
- 1 piece of white foam board or canvas (12 x 12 inches recommended)
- Fine tip black marker
- Glue gun or tacky glue
- Scissors
- Optional: Frame or backing
Step-by-step Guide
Step 1: Lightly sketch your portrait on the canvas using pencil, then trace over it with a black marker for definition.
Step 2: Carefully open a cassette and pull out the tape. You can use it to create the hair texture by curling and gluing sections as you go.
Step 3: Arrange the cassette near the bottom corner and secure it with glue to add dimension and context.
Step 4: Finally, add finishing touches with the marker for more depth or detail.
#16. Retro VHS Tape Tower Shelf
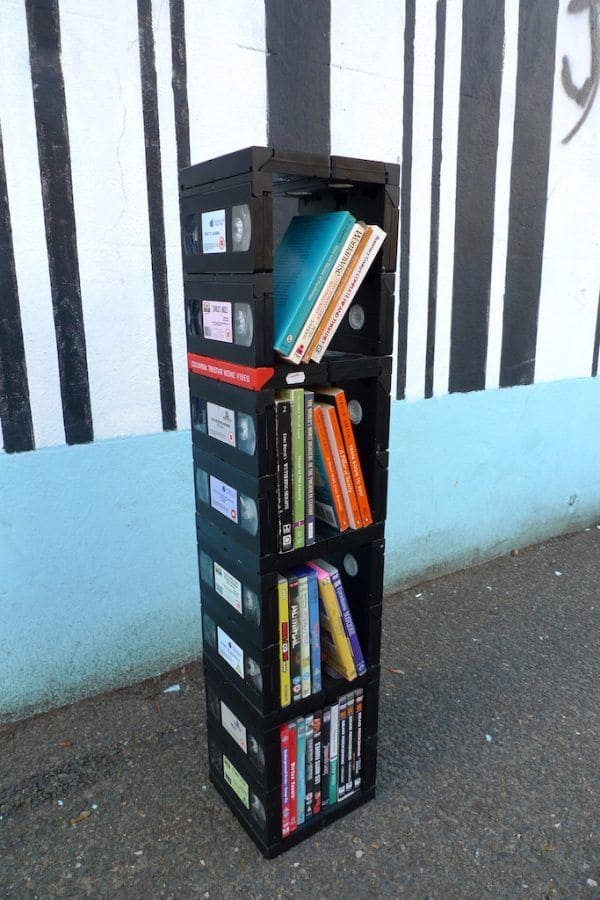
This vertical bookshelf is a nostalgic nod to the analog era, built entirely from empty VHS cases. It’s not just a statement piece, it’s functional, lightweight, and adds a funky retro vibe to any reading nook, office, or bedroom.
Also, the tapes are arranged into cube-like modules, giving the structure a clean, stackable form. Each tier fits paperbacks or DVDs perfectly, and the side labels keep the VHS illusion alive while offering some playful texture.
Materials Needed
- 20-24 empty VHS tape cases (approx. 7.5″ x 4.2″ x 1″)
- Hot glue gun + glue sticks or strong epoxy adhesive
- Cardboard sheets or thin plywood (cut to shelf size, optional)
- Spray paint (optional)
- Ruler and pencil
- Clamp set
Step-by-step Guide
Step 1: Clean the VHS cases and remove any remaining tape or stickers if desired.
Step 2: Arrange four cases into a square, spines facing outward. Then glue each corner securely and hold in place with clamps until set.
Step 3: Repeat this process to create multiple square layers. You can add a thin shelf inside each layer using cardboard or wood for extra support.
Step 4: Stack the layers vertically, securing each level with glue. Now, allow to dry completely before placing any books inside.
Step 5: Optional: Spray paint the whole structure for a cohesive look or keep it raw for vintage charm.
#17. Cassette Tape Coin Purse
Old-school charm meets everyday utility with this quirky cassette tape coin purse. It’s compact, edgy, and guaranteed to start conversations when you pull it out.
Perfect for holding change, earbuds, or tiny essentials, it gives new life to your nostalgic music collection. The zip closure adds a sleek finish while keeping everything secure inside.
Furthermore, this mini purse is equal parts retro fashion and functional upcycling, ideal for anyone who loves a bold and playful statement accessory.
Materials Needed
- 1 cassette tape (2 halves)
- Small zipper (6″-7″ length)
- Felt or fabric liner (cut to fit interior)
- Hot glue or super glue
- Optional: keyring
Step-by-step Guide
Step 1: Carefully split the cassette tape into two halves, removing any inner parts that get in the way.
Step 2: Cut felt to match the shape of each inner half. Then glue the felt to line the inside, creating a soft interior.
Step 3: Glue the zipper around the inside edges of one cassette half, then attach the other half to complete the pouch.
Step 4: Let it dry fully before using. You can also attach a keyring or small strap to one end for easy carrying.
#18. Cassette Owl Wall Hanging
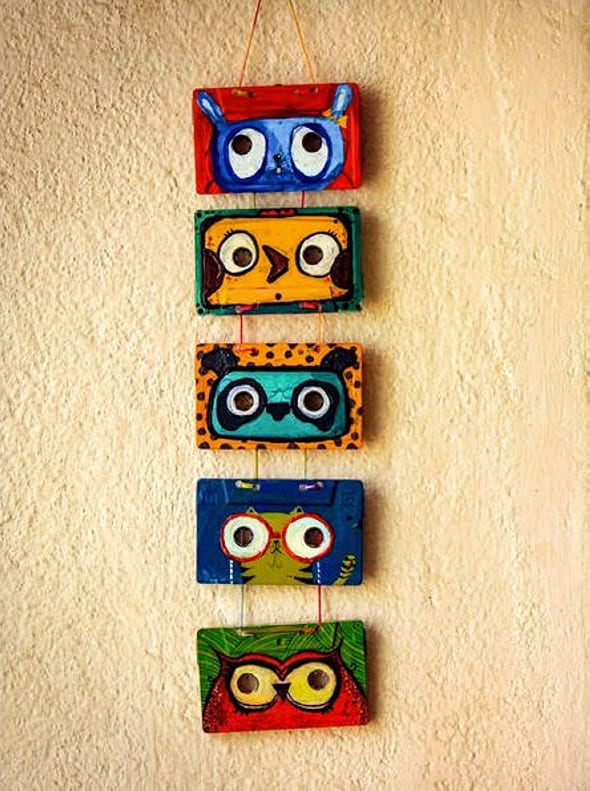
Old cassettes never looked so playful! This colorful wall hanging transforms retro tapes into a row of hand-painted owls, each bursting with personality.
Their eyes pop from the tape reel holes, and the bright, quirky designs make this piece ideal for a kid’s room, reading nook, or eclectic studio. It’s lighthearted, nostalgic, and full of creative spark.
Materials Needed
- 5 cassette tapes
- Acrylic paints + brushes
- Permanent markers or paint pens
- Twine or string
- Hot glue or strong craft glue
- Small screw hook or loop
Step-by-step Guide
Step 1: Paint each cassette with a base color, letting it dry completely.
Step 2: Add owl faces using paint or markers, you can make use of the reels as big expressive eyes.
Step 3: Once dry, glue the tapes vertically using twine or string between them.
Step 4: Attach a loop at the top for easy wall hanging. Optional, you seal with a clear coat to preserve your designs.
#19. Cassette Tape Mini Journal
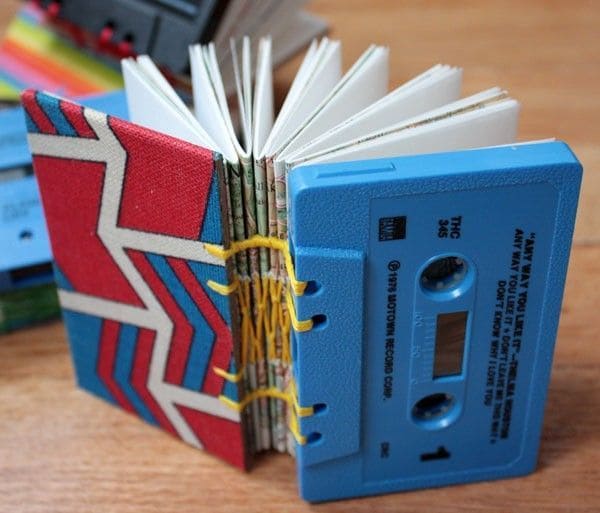
By using two cassette halves as covers, this quirky little journal transforms into a funky, pocket-sized notebook with major retro flair.
Whether you’re jotting down thoughts, sketching doodles, or compiling song lyrics, this DIY journal turns heads and sparks conversations.
Bonus, the stitched binding adds a touch of handmade charm, and the contrast between the colorful tape and the patterned spine makes it a true one-of-a-kind piece.
Materials Needed
- 2 cassette tape halves (front and back)
- 25-40 sheets of blank or recycled paper (cut to size)
- Decorative paper or fabric (optional)
- Heavy-duty needle and waxed thread or embroidery floss
- Drill or rotary tool with a small bit
- Glue (optional)
Step-by-step Guide
Step 1: Split your cassette tape and keep only the flat halves. Then drill 3-5 small holes along the edge of each side to match your bookbinding style.
Step 2: Fold paper sheets into small signatures (mini booklets), then align them between the covers.
Step 3: Sew the signatures to the cassette tape covers using a Coptic stitch or other binding technique.
Step 4: Optionally, glue a fabric or paper piece over the spine for extra style and support.
#20. Cassette Tape Wall Art Panel
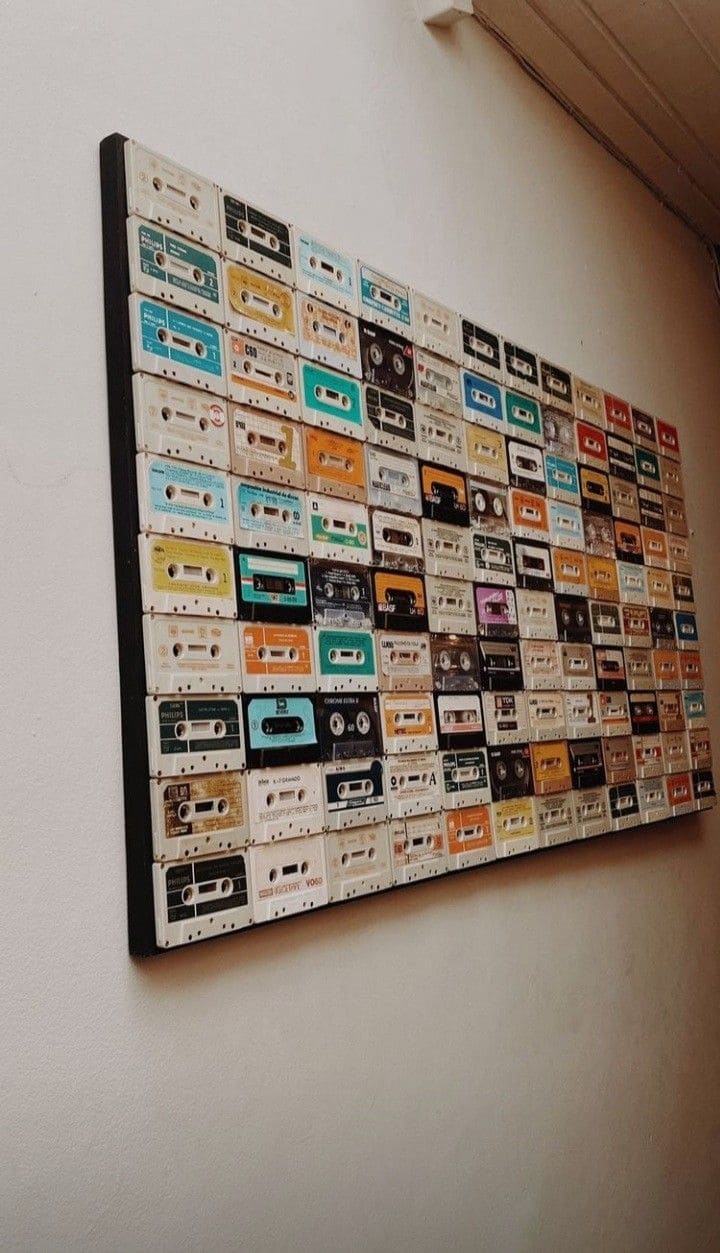
You can also give your wall a blast of analog charm with this striking cassette tape wall art panel.
Dozens of colorful vintage tapes are arranged in a tight grid, each one showcasing its retro label and unique aesthetic. Mounted on a black background, this piece acts like a nostalgic mosaic, ideal for a music studio, hallway, or funky café space.
Materials Needed
- 80-100 cassette tapes (varied colors and styles)
- Wooden board or plywood panel (dimensions based on cassette layout)
- Black paint or fabric
- Strong adhesive
- Measuring tape and pencil
- Wall mounting hardware
Step-by-step Guide
Step 1: Paint or cover the board with black paint or fabric to create a contrasting background.
Step 2: Plan your layout by placing the tapes on the board in neat rows. You should mix colors and styles for variety.
Step 3: Glue each cassette firmly in place, working row by row.
Step 4: Allow the glue to dry completely, then attach hanging hardware to the back of the panel.