22 Charming DIY Wreath Ideas to Dress Up Your Front Door This Fall
When the first crisp breeze of fall rolled through my neighborhood, I knew it was time. Not for sweaters or pumpkin spice but for the wreath.
Every year, I craft a new one, something warm, welcoming, and a little whimsical to hang on the front door. It sets the tone before guests even step inside.
There’s something deeply satisfying about creating seasonal decor with your own hands, it adds heart to the home. Whether you’re drawn to rustic textures, vibrant autumn hues, or playful takes on tradition, these 22 DIY wreath ideas will inspire you to turn your front door into a celebration of fall.
#1. Rustic Corn Husk Sunflower Wreath
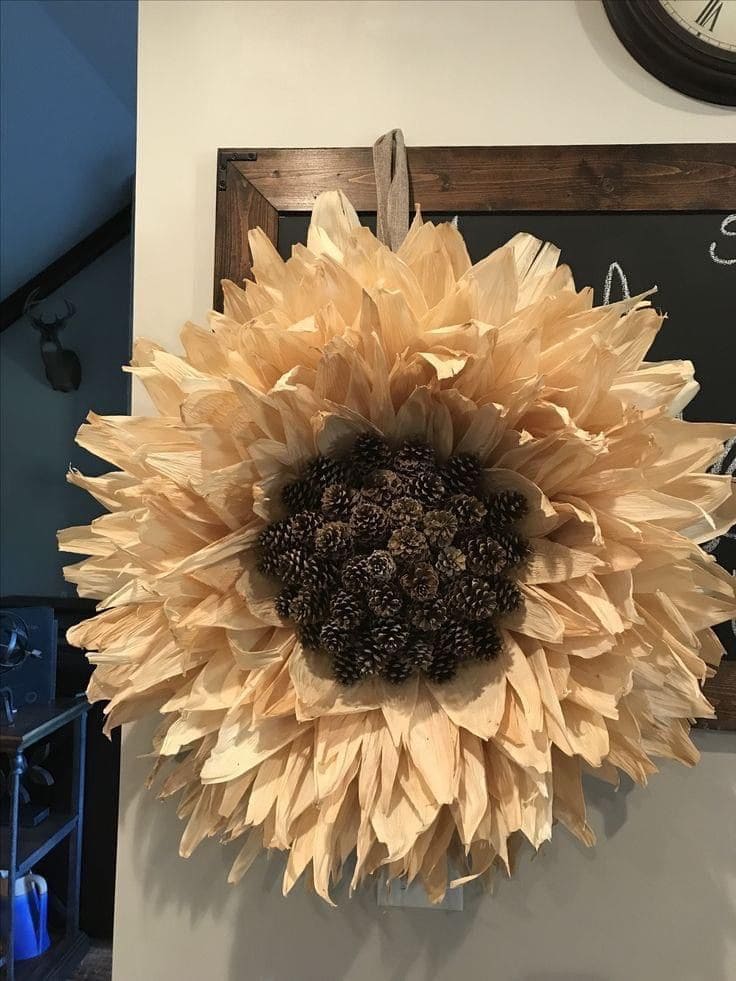
This oversized sunflower wreath brings a warm, natural elegance to any fall entryway. Crafted from real corn husks and clustered pinecones, it mimics the bold beauty of a sunflower while celebrating the textures of harvest season.
Moreover, the feathery husk petals radiate outward in layered waves, while the center feels richly earthy and grounded. Hung on a wooden door or neutral siding, it becomes a quiet showstopper.
Materials Needed
- 40-50 dried corn husks
- Wire wreath frame (14–18″ wide)
- Mini pinecones (about 30-50, depending on size)
- Hot glue gun and plenty of glue sticks
- Floral wire, jute string, or ribbon for hanging
- Scissors, water for soaking, and optional clear spray sealant
Step-by-step Guide
Step 1: Soak the dried corn husks in warm water for 10-15 minutes to soften. Then gently pat them dry and press flat under a book or heavy board for a couple of hours.
Step 2: Starting from the outer edge of your base, glue husks in overlapping layers, working toward the center and slightly angling them for a realistic petal flow.
Step 3: Cluster the pinecones tightly in the center, forming a bold, textured contrast to the soft petals. You should fill gaps as needed to make it full and dimensional.
Step 4: Attach floral wire or jute to the back for hanging. For outdoor use, finish with a coat of clear sealant to protect from moisture.
Tip: Lightly tint some husks with brewed tea or watercolor to add a sun-warmed gradient!
#2. Harvest Garden Bloom Wreath

This show-stopping wreath is a tribute to fall’s vibrant abundance. Overflowing with fluffy chrysanthemums, clusters of hypericum berries, and delicate sprigs of mossy green textures, it feels like an autumn garden gathered in full bloom.
Specially, lush greenery brings balance and movement, while bursts of burnt orange, goldenrod, and deep burgundy give this wreath depth and warmth. It’s wild, a little romantic, and completely stunning on a neutral door.
Materials Needed
- 18” grapevine wreath base
- 10-12 faux or fresh mums in assorted fall colors
- Green moss, berry picks, and seed pods
- Mixed faux foliage (eucalyptus, boxwood, or seasonal greens)
- Floral wire and wire cutters
- Optional: hot glue gun
Step-by-step Guide
Step 1: Begin by weaving foliage into the grapevine base, letting leaves spill over for a natural look.
Step 2: Nestle your largest flowers into the wreath, spacing them evenly or clustering them for more drama.
Step 3: Tuck in smaller filler blooms, berries, and moss to create texture and fill in gaps.
Step 4: Use floral wire to secure heavier stems and hot glue to reinforce delicate sections if needed.
#3. Rustic Rake Head Harvest Wall Decor
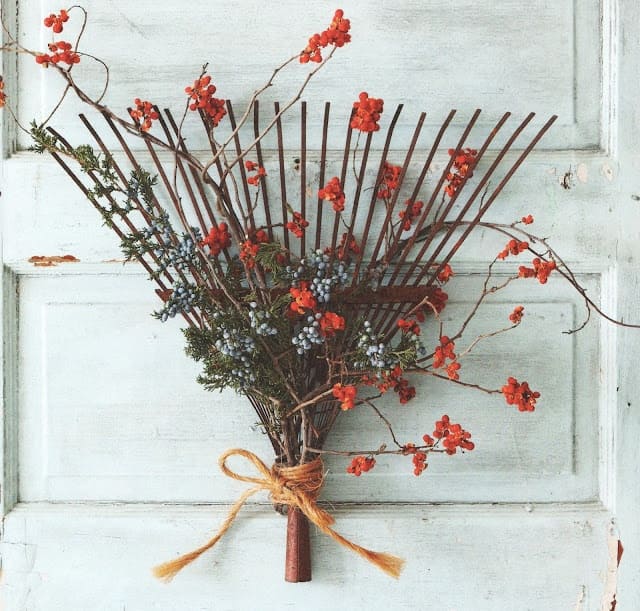
Wow, this charming piece turns an old rake into a bundle of countryside nostalgia. Red berries, evergreen sprigs, and powdery blue juniper berries spill out in a loose, organic bouquet, tied up with twine.
Materials Needed
- Old metal rake head
- Faux red berry stems
- Juniper or blueberry-style faux picks
- Evergreen twigs
- Natural jute twine
- Wire cutters and floral wire (optional)
Step-by-step Guide
Step 1: Clean the rake head and position it with the tines upward to form a fan shape.
Step 2: Layer in berry branches and greenery, fanning them to mimic a floral spray. Then tuck them between the tines and secure with wire or twine.
Step 3: Tie a generous jute bow at the base to gather everything together and soften the look.
Step 4: Hang the piece on a nail or hook by the back of the rake head, letting the florals spread outward like a burst of fall color.
#4. Glittered Acorn Cap Wreath
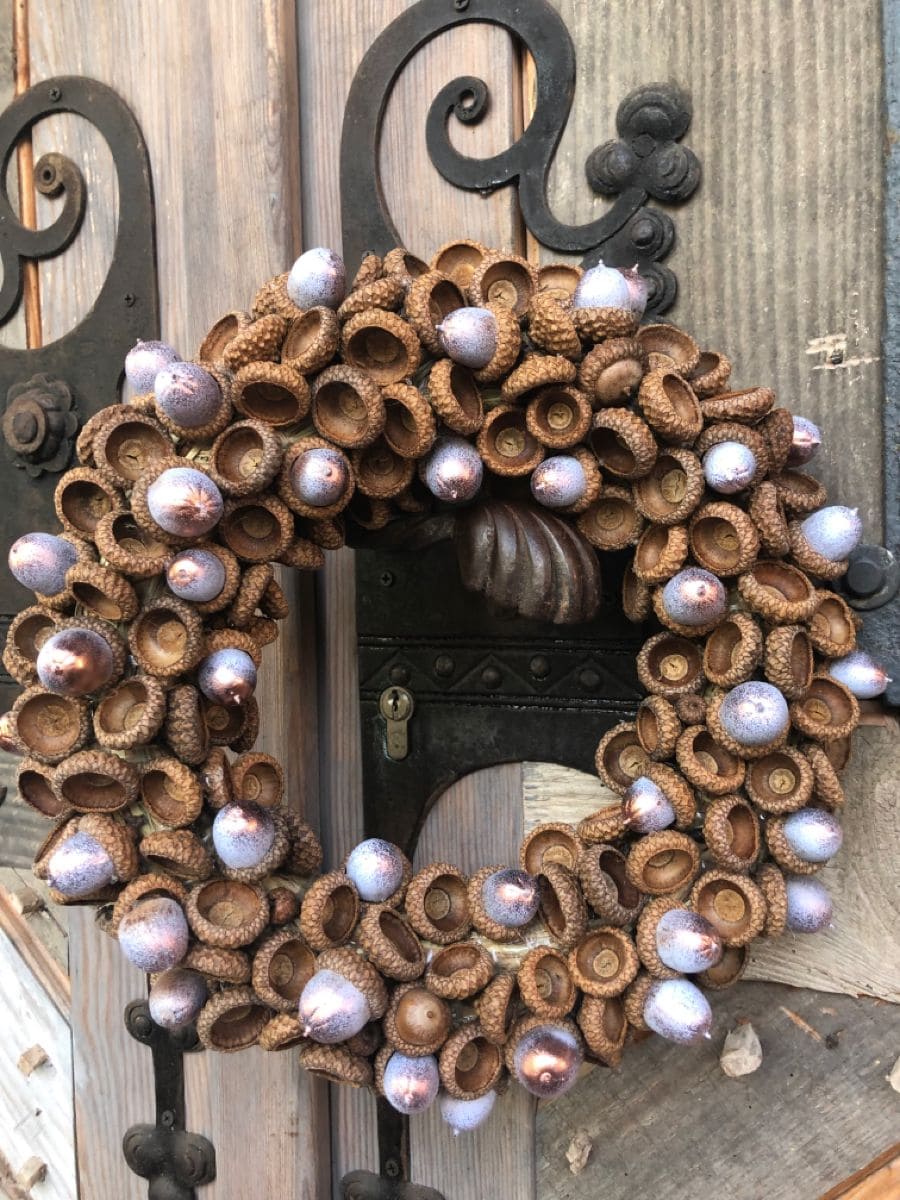
There’s something irresistibly nostalgic about acorns, and this wreath elevates them with just a touch of magic. Natural caps and painted acorns come together in a full-circle design that feels both woodland and whimsical.
Plus, perfect for a rustic fall door or cozy cabin porch, this piece brings in texture, light, and natural charm without being overly busy.
Materials Needed
- 80-100 acorn caps (washed and dried)
- 50-60 faux acorns or real ones with tops glued on
- Silver or copper glitter spray paint
- Grapevine (12″-14″)
- Hot glue gun with extra glue sticks
- Protective gloves and workspace covering
- Optional: Clear sealer spray
Step-by-step Guide
Step 1: Spray your acorns (or faux versions) with glitter paint in a well-ventilated space. Let them dry fully, then apply a clear sealant if you want a weather-safe finish.
Step 2: Arrange and hot glue the acorn caps closely together on the wreath form, covering it fully or leaving gaps for a more organic look.
Step 3: Fill in gaps by tucking the glittered acorns between the caps. You can vary directions slightly to keep it natural-looking.
Step 4: Once your wreath is fully assembled and dry, attach a ribbon or twine to the back for easy hanging.
Optional: You can add cinnamon sticks, star anise, or dried orange slices for extra fragrance and flair.
#5. Hydrangea Harvest Wreath
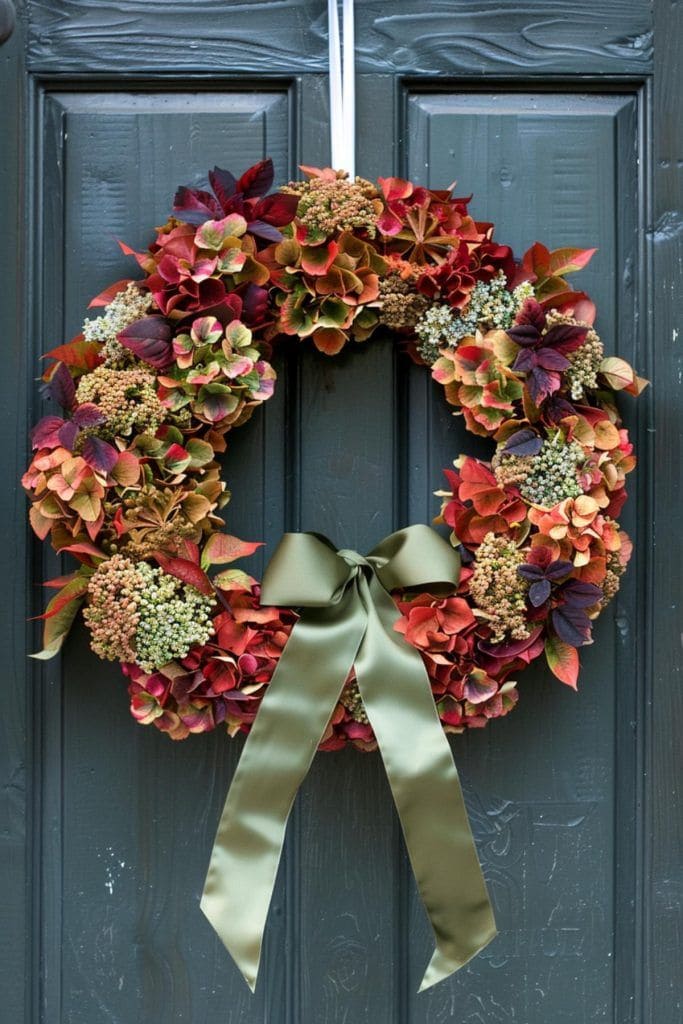
You can see rich jewel-toned hydrangeas steal the spotlight in this bold, botanical fall wreath. Clusters of dried blooms in burgundy, moss, and dusty rose give it a painterly texture, while seeded accents provide a touch of natural intricacy.
Bonus, a sleek sage green satin bow anchors the piece, tying in that subtle elegance that works for both rustic and refined entryways. It feels fresh, but still deeply rooted in the warm palette of the season.
Materials Needed
- 14-16” straw or foam wreath base
- 8-10 stems of dried or preserved hydrangeas in various fall shades
- Assorted dried seed heads
- Floral pins
- 1-inch wide sage green satin ribbon
Step-by-step Guide
Step 1: Trim hydrangea heads into medium clusters and begin pinning them closely around the wreath base for full coverage.
Step 2: Nestle smaller textures like dried seed pods or clusters of faux berries into the gaps between blooms.
Step 3: Use floral pins or glue to secure everything tightly, especially the outer edge of petals that may curl over time.
Step 4: Tie a wide satin bow and attach it to the bottom center or slightly to one side, letting the tails drape freely.
Step 5: Finally, add a matching ribbon loop at the top for hanging, then display on a dark or neutral door to make the colors pop beautifully.
#6. Whimsical Fall Gnome Wreath
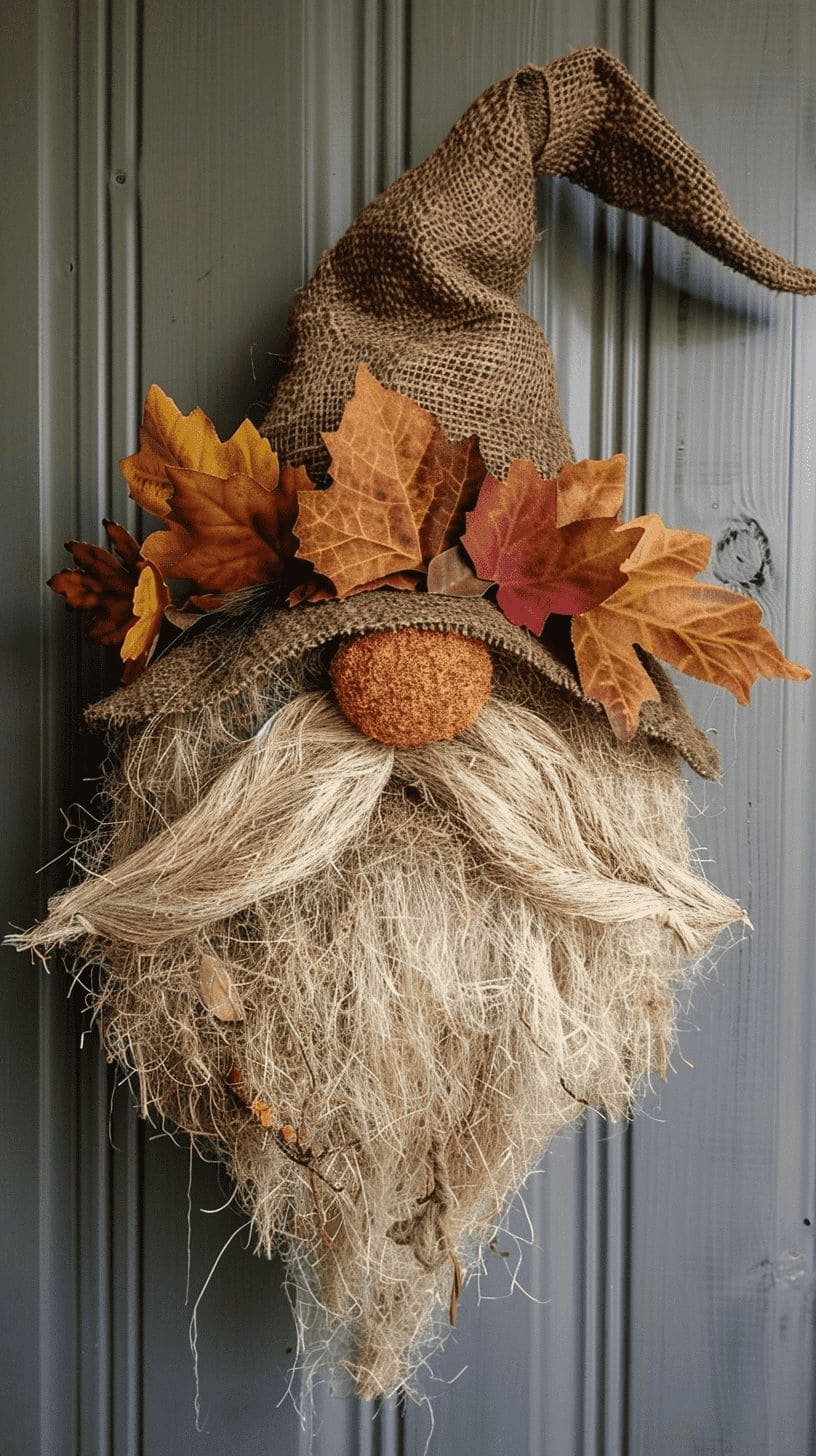
Who could resist this fuzzy-bearded woodland gnome peeking out from a bed of autumn leaves? His burlap hat tips just the right amount of crooked, and that plush pumpkin-colored nose is pure charm.
Materials Needed
- 1 sheet of burlap (18″ x 18″)
- 2 bunches of Spanish moss
- 1 faux orange pom-pom
- Silk autumn leaves (15-20 in mixed tones)
- Hot glue gun and glue sticks
- Floral wire
- Brown felt (optional)
Step-by-step Guide
Step 1: Roll burlap into a cone and shape it into a floppy pointed gnome hat. Then secure the edge with hot glue and trim the brim.
Step 2: Glue moss generously under the hat brim to form the beard, layering until full. You need to separate and braid a few strands for a cute mustache detail.
Step 3: Tuck in and glue the felt ball or pom-pom nose right under the hat edge, resting above the beard.
Step 4: Decorate the hat brim with fall leaves, tucking and gluing them into place in a half-crown shape.
Step 5: Attach a loop of twine or wire to the back of the hat for hanging. Then you adjust any loose moss and give the beard a fluff before display.
#7. Clothespin Pumpkin Wreath
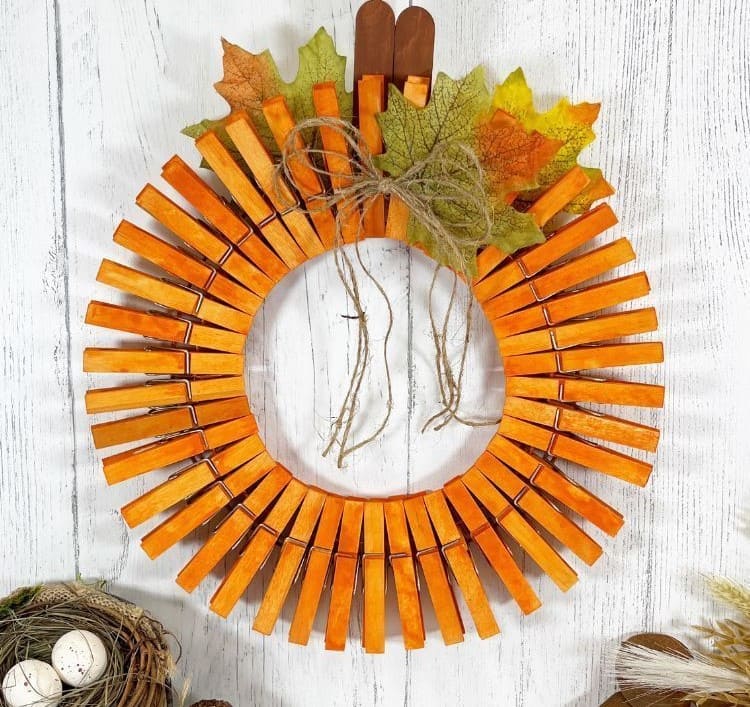
Who knew a bundle of clothespins could turn into such festive fall magic? This charming wreath mimics the plump shape of a pumpkin with its warm orange tones and rustic, circular form.
Additionally, finished with faux leaves, twine bows, and painted stems, it brings just the right touch of homemade whimsy to your front door.
Materials Needed
- 50-60 wooden clothespins
- Wire wreath frame (10″-12″ diameter)
- Orange acrylic paint
- 2 small craft sticks
- Artificial fall leaves
- Twine
- Hot glue gun and glue sticks
Step-by-step Guide
Step 1: Paint all clothespins in a vibrant orange. Let them dry completely before assembling.
Step 2: Clip the painted clothespins evenly around the wreath frame, aligning them tightly to create the pumpkin’s shape.
Step 3: Hot glue two brown craft sticks at the top center as the pumpkin stem, angling slightly if desired for a playful look.
Step 4: Tuck faux leaves behind the top clothespins and glue in place. Now you can add a twine bow for a cozy, homespun finish.
#8. Rustic Ruffled Burlap Wreath
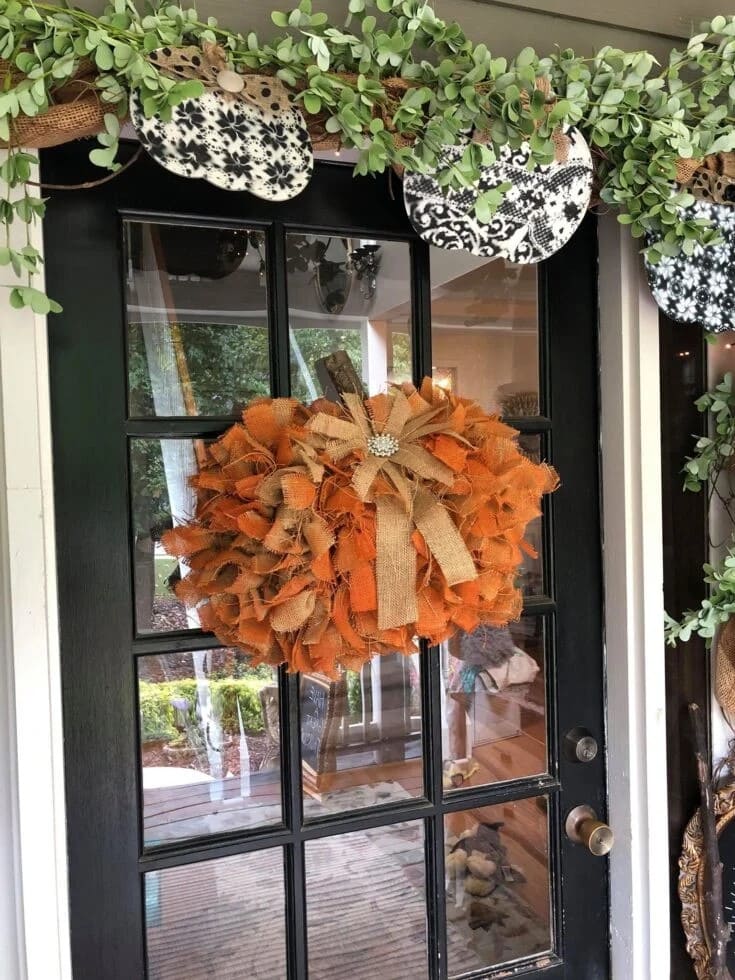
Full of texture and handmade charm, this rustic wreath is a celebration of fall’s warm tones and cozy vibes. Layers of frayed burlap strips in earthy orange and tan tones form a plush, ruffled effect that feels both festive and farmhouse-inspired.
Materials Needed
- 14” wire wreath frame
- 1 yard orange burlap fabric (cut into 1″ x 6″ strips)
- 1 yard natural burlap fabric (also in 1″ x 6″ strips)
- Hot glue gun + glue sticks
- Decorative button
- Twine or ribbon
Step-by-step Guide
Step 1: Cut your burlap into strips, fraying the edges slightly for that rustic touch.
Step 2: Tie the strips around the wire frame in alternating colors, double-knotting each to create a full, fluffy base.
Step 3: Attach your button, brooch, or small ornament to the center with hot glue.
Step 4: Add a loop of jute or twine to the back and hang it on your door to welcome guests with soft, seasonal flair.
#9. Rustic Farmhouse Fabric Strip Wreath
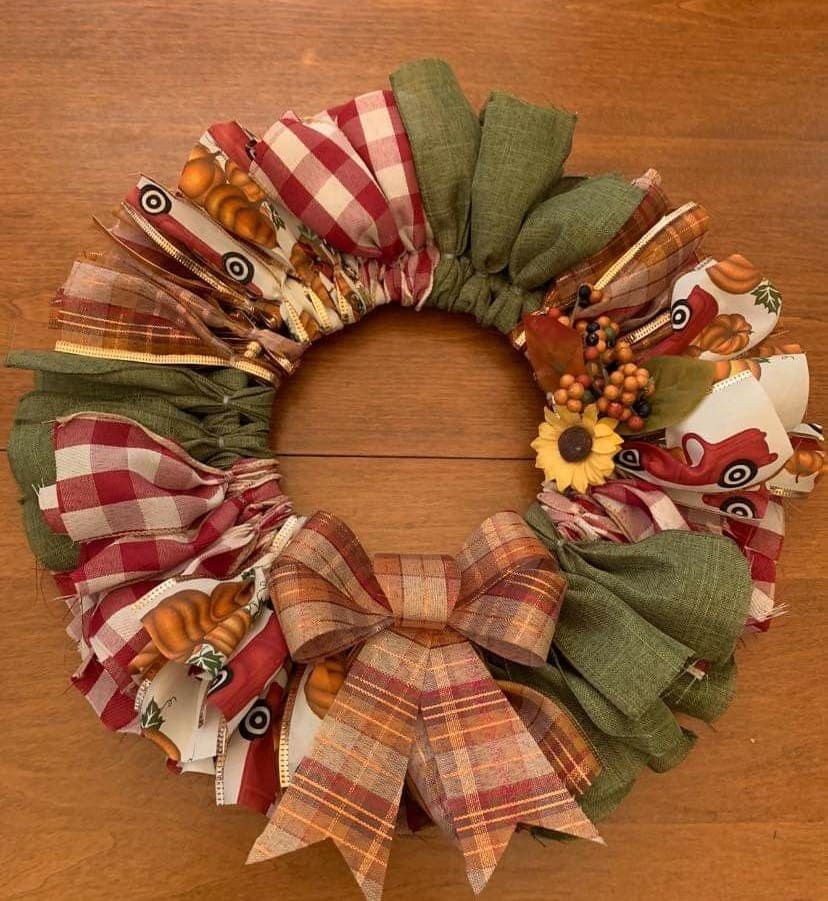
Interestingly, this cozy wreath is a joyful celebration of fall in all its country charm. It combines warm plaid, checkered cotton, pumpkin prints, and olive green fabric into a soft, gathered ring of color and texture.
Also, finished with a big bow and a touch of faux berries and sunflowers, it brings farmhouse flair straight to your front door. It’s budget-friendly, beginner-friendly, and bursting with personality.
Materials Needed
- 1 wire wreath frame (12″–14″)
- 40-50 fabric strips (2″-3″ wide, 18″-20″ long) in fall colors and prints
- 1 large plaid bow (optional)
- Faux fall floral picks (mini pumpkins, berries, or sunflowers)
- Hot glue gun and glue sticks
- Scissors
Step-by-step Guide
Step 1: Cut strips of fabric in varied fall tones and patterns. Gingham, flannel, pumpkin prints, and earthy solids work beautifully.
Step 2: Tie each strip tightly around the metal wreath form, pushing them close together to form a fluffy, full wreath. You should mix and alternate your fabrics for visual interest.
Step 3: Once the base is full, hot glue a few faux leaves or florals to one side for a focal point.
Step 4: Add a wide bow at the bottom or top, choose a bold plaid to tie the whole design together.
Optional:
You’d better spray the finished wreath lightly with cinnamon or pumpkin spice spray for a hint of autumn scent every time you open the door.
#10. Rustic Harvest Pumpkin Wreath

Nothing captures the mood of fall quite like mini pumpkins tucked into a swirl of burnt orange leaves, pinecones, and berry clusters. This wreath blends bold color and woodland texture with deep navy accents for an unexpected contrast that feels both classic and fresh.
Plus, it’s warm, rich, and invites that cozy autumn vibe right to your doorstep. The layered elements make it a striking centerpiece for any dark-colored front door.
Materials Needed
- 18” grapevine wreath base
- 6-8 faux mini pumpkins (orange and golden yellow)
- Artificial maple leaves in red, rust, and green
- Faux berries in navy and burgundy
- Pinecones and small acorns
- Floral wire and hot glue
Step-by-step Guide
Step 1: Begin with the largest elements, place pumpkins evenly around the wreath, securing with floral wire or hot glue.
Step 2: Layer maple leaves behind the pumpkins, allowing them to peek out and create a lush, full shape.
Step 3: Tuck berries and pinecones in between for pops of contrast and texture. You should vary colors to avoid visual monotony.
Step 4: Now you can attach a loop of wire at the back for hanging, or thread a velvet ribbon for a softer touch.
#11. Rustic Pumpkin Basket Wreath
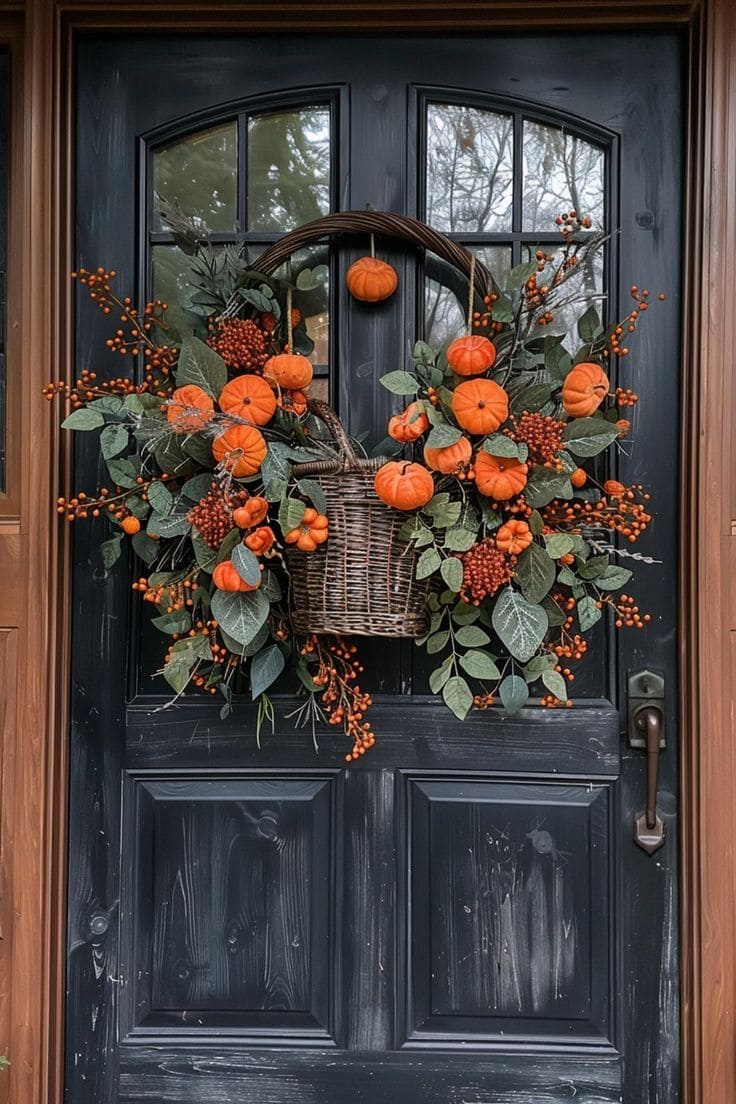
Oh my God, this fall wreath bursts with farmhouse charm, overflowing from a woven basket like a freshly gathered harvest. Miniature pumpkins, faux berries, and lush greenery spill outward with abundant texture, while the rich orange tones pop beautifully against a dark door.
Materials Needed
- 1 medium-sized flat-back wicker basket (12″-14″)
- 8-10 small faux pumpkins (varied sizes)
- 2-3 bunches of artificial eucalyptus, lamb’s ear, or fall greenery
- 1-2 stems of orange berry sprays
- Hot glue gun and floral wire
- Twine
- Optional: a hanging hook
Step-by-step Guide
Step 1: Fill the bottom of the basket with crumpled paper or floral foam to give height. You can secure with glue if needed.
Step 2: Start with greenery, placing it symmetrically on each side. Let some branches extend outward for a wild, natural shape.
Step 3: Add pumpkins, tucking them into the greenery and anchoring with floral wire or hot glue.
Step 4: Insert berry sprays throughout the arrangement for color contrast and fullness.
Step 5: Hang the basket using twine or ribbon. For extra flair, you can attach a single pumpkin above with a hidden string to create a floating effect.
#12. Swirling Pinecone and Burlap Ribbon Wreath
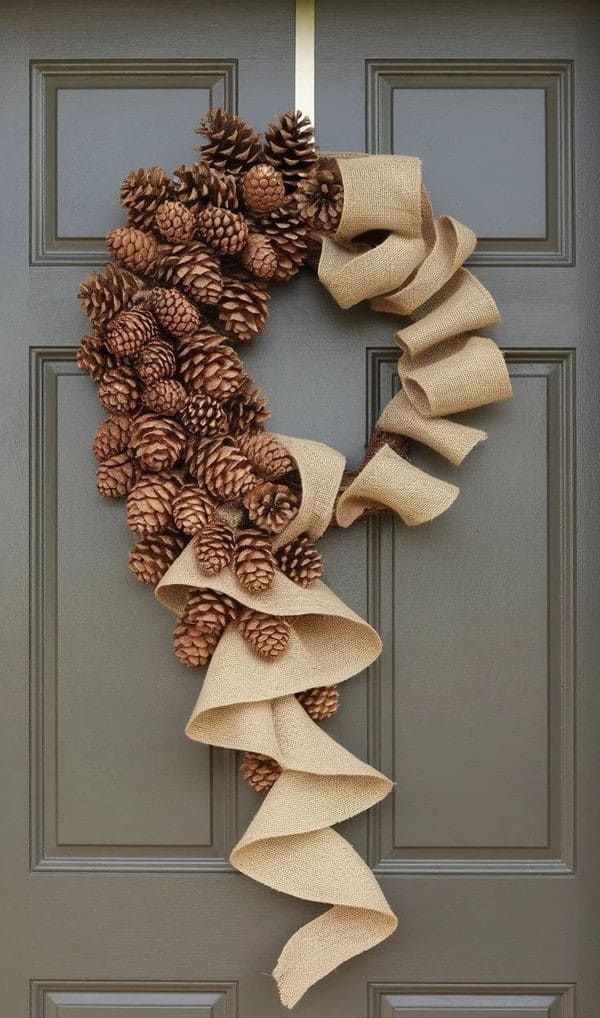
This dramatic asymmetrical wreath takes a rustic material and turns it into a true statement piece. Dozens of pinecones form a full crescent shape, while a long sweep of wired burlap ribbon cascades downward like a woodland waterfall.
Furthermore, it’s earthy, elegant, and subtly festive, perfect for a neutral fall palette or a farmhouse-style entryway. The organic textures create a cozy and natural feel without going over the top.
Materials Needed
- 18″ wire wreath form
- 40-50 pinecones in various sizes
- 2.5″ wide wired burlap ribbon (about 3 yards)
- Hot glue gun and glue sticks
- Floral wire
- Brown or green felt (optional)
Step-by-step Guide
Step 1: If desired, wrap and glue felt around the wreath form to help the pinecones adhere better and cover gaps.
Step 2: Begin hot gluing pinecones tightly together along one side of the wreath, layering smaller ones near the top and bottom for shape variation.
Step 3: Once the pinecones are secured, attach one end of the wired burlap ribbon behind the top of the wreath form using wire or glue.
Step 4: Drape the ribbon down in soft waves or loops, letting it twist naturally. Now you should secure with hot glue at a few points along the way to hold the shape.
#13. Cozy Felt Leaf Fall Wreath
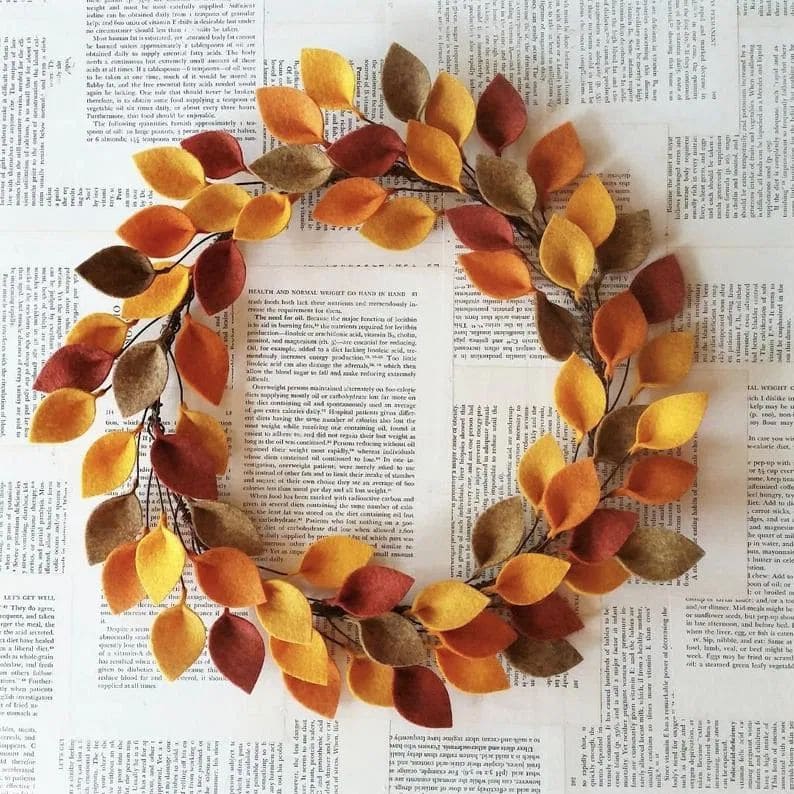
Warm, soft, and earthy, this felt leaf wreath feels like autumn wrapped in a hug. Its graceful branches are covered in muted tones of burnt orange, marigold, russet, and oak brown, bringing that forest-floor richness to your entryway.
Also, lightweight and charmingly handmade, it brings a calm, nature-inspired elegance to your fall décor without needing any floral fuss.
Materials Needed
- Felt sheets in mustard, rust, burnt orange, and olive (about 2 sheets per color)
- 14″ wire wreath frame
- Brown floral wire
- Hot glue gun and glue sticks
- Sharp fabric scissors
- Pencil or leaf-shaped template (optional)
Step-by-step Guide
Step 1: Cut out 40-60 leaf shapes from felt, roughly 2″-3″ long. You should vary the angles and curves slightly for a natural effect.
Step 2: Attach each leaf to a 5″-7″ piece of brown floral wire using a dot of hot glue at the base. Let them dry.
Step 3: Bundle 3-5 leaves together by twisting their stems and shaping them to form small sprays.
Step 4: Attach the leaf bundles onto your wreath base, overlapping slightly as you go to hide gaps and wire.
#14. Dried Grass Crescent Wreath
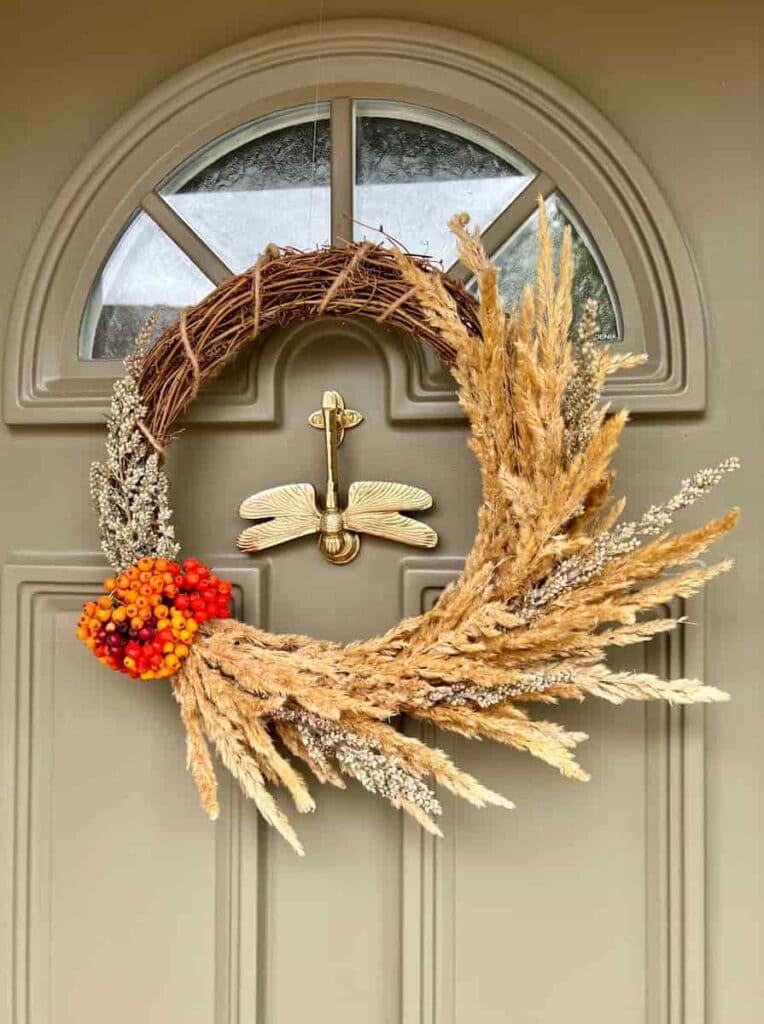
Look at this! This crescent-shaped wreath radiates autumn elegance with a natural twist. Built on a grapevine base, it flows with layers of dried grasses and a pop of clustered berries for color contrast.
Materials Needed
- 1 grapevine wreath form (12″-16″)
- 6-8 stems of dried pampas grass
- 3-4 dried millet
- Small bundle of dried orange and red berries
- Floral wire and wire cutters
- Hot glue gun (optional)
- Neutral twine
Step-by-step Guide
Step 1: Choose one side of the grapevine wreath to build your crescent. Start layering dried grasses, working outward in one sweeping direction.
Step 2: Attach each bundle using floral wire, tucking ends securely between the grapevine twists. Then alternate grass types for added depth and movement.
Step 3: Add dried berries in a tight bunch near the base of the crescent curve for a bold, eye-catching accent.
Step 4: Fluff and trim any uneven stems. Finally, hang with rustic twine for that countryside-chic finish.
#15. Cheerful Pom-Pom Fall Wreath
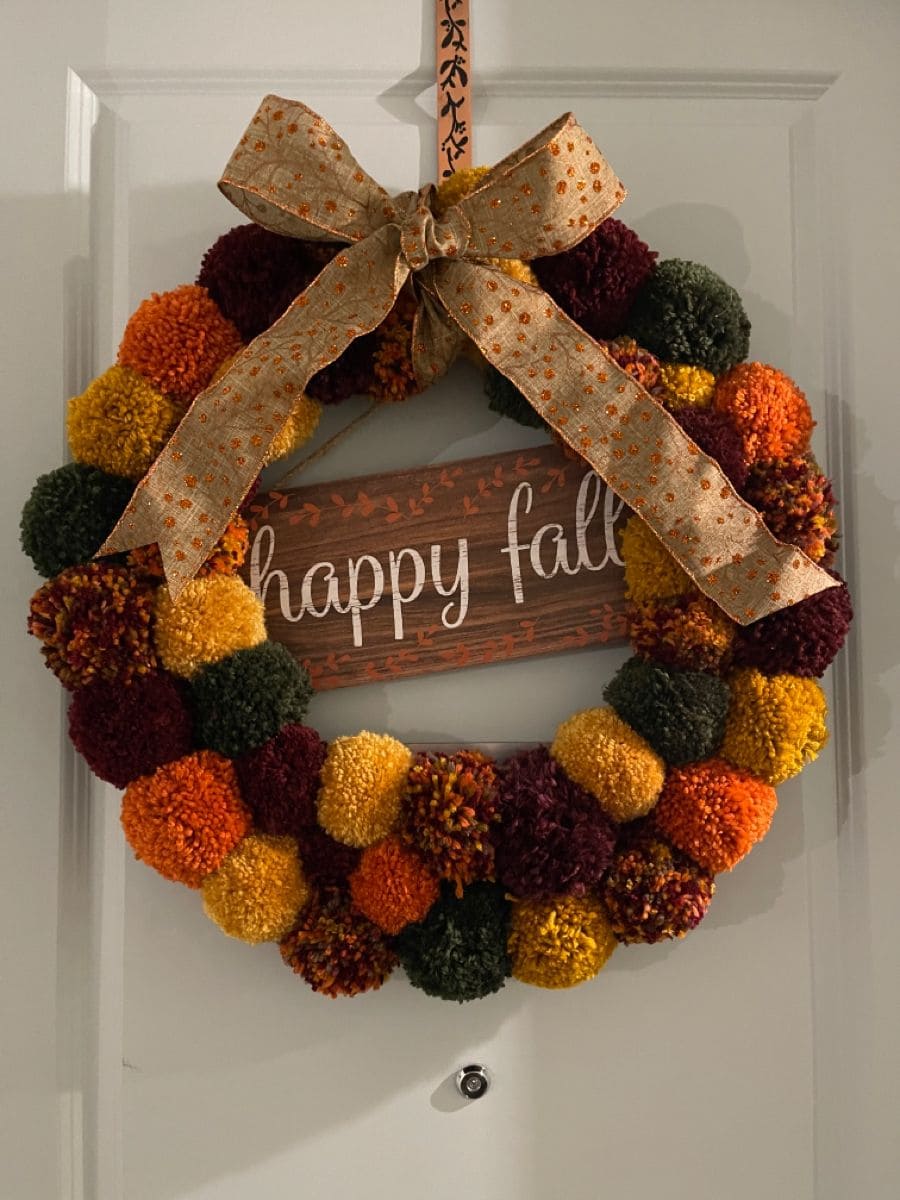
The mix of rich burgundy, deep green, mustard yellow, and pumpkin orange makes it feel like wrapping yourself in your favorite knit blanket. Specially, a rustic wood “Happy Fall” sign adds a welcoming touch, while the polka-dot bow completes the look with a hint of homespun whimsy.
Materials Needed
- 12″ foam or wire wreath form
- About 35-40 pom-poms in fall colors (2-3 inches each)
- Wooden plaque or sign
- Decorative fall ribbon
- Hot glue gun
Step-by-step Guide
Step 1: Start by arranging your pom-poms around the wreath form to balance the colors and texture before gluing them down.
Step 2: Glue each pom-pom in place, ensuring they’re snug and cover the base fully.
Step 3: Attach the wooden “Happy Fall” sign to the center using wire or glue, making sure it sits evenly.
Step 4: Tie a large decorative bow and secure it at the top of the wreath, letting the tails drape freely.
Step 5: Finally, add a ribbon loop at the back for hanging, or use a fall-themed hook to match the cozy vibe.
#16. Whimsical Straw Hat Scarecrow Wreath
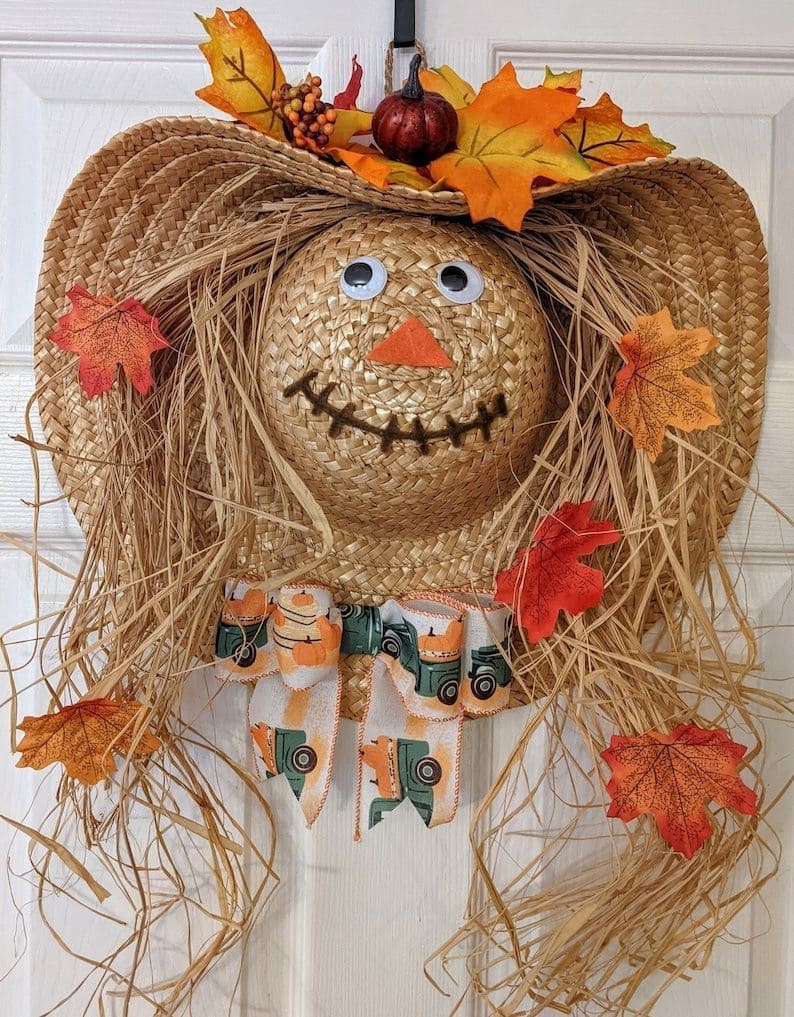
Playful and packed with charm, this scarecrow hat wreath brings instant smiles to everyone who steps up to your door. Made from a wide-brimmed straw hat turned face-forward, the wreath features googly eyes, a stitched-on grin, and a raffia wig that gives it tons of personality.
Plus, autumn leaves, a ribbon bow, and a mini pumpkin add pops of seasonal color. It feels warm and homemade, like something straight from a cozy country porch.
Materials Needed
- Wide-brimmed straw hat
- Raffia
- Googly eyes and orange felt
- Black yarn
- Faux autumn leaves and mini pumpkins
- Ribbon with fall motifs
- Hot glue gun and scissors
Step-by-step Guide
Step 1: Start with the straw hat and glue raffia along the inner edge to create fun hair strands.
Step 2: Attach googly eyes, a triangle nose cut from orange felt, and use black yarn to form a stitched smile.
Step 3: Glue faux leaves and berries along the brim, topping with a mini pumpkin for a playful crown.
Step 4: Now you can add a fall-themed bow under the face to give the scarecrow a festive collar or scarf.
#17. Pastel Pumpkin and Floral Fall Wreath
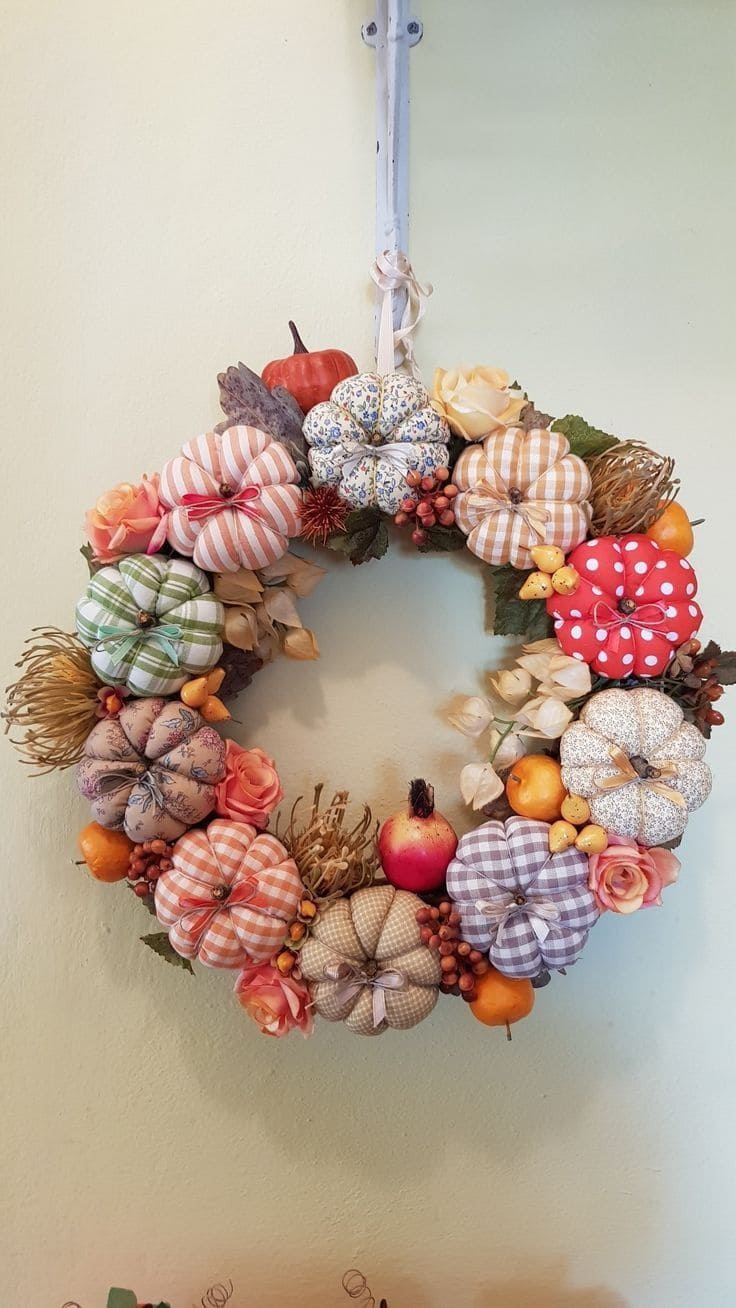
This soft, charming wreath brings a vintage quilt-like feel to your door, featuring plush fabric pumpkins in gingham, florals, and polka dots.
Besides, tucked among delicate faux roses, berries, and dried botanicals, the gentle pastels create a warm, inviting display without the usual bold autumn tones. It’s cozy, whimsical, and ideal for anyone who loves handmade touches and soft color palettes.
Materials Needed
- 12-14 mini fabric pumpkins (in assorted prints: plaid, floral, polka dot)
- 1 foam or wire wreath base (14″)
- Artificial roses, small gourds, pomegranates, and berry sprays
- Hot glue gun and glue sticks
- Raffia, ribbon bows, or twine for accents
- Scissors
Step-by-step Guide
Step 1: Begin by evenly spacing your fabric pumpkins around the wreath form and hot gluing them securely in place.
Step 2: Fill the spaces between pumpkins with clusters of faux roses, berry sprigs, and dried elements like pods or mini leaves.
Step 3: Tuck in ribbons or raffia between pumpkins for texture and charm. Then, add tiny bows to each pumpkin top for an extra crafted detail.
Step 4: Use floral picks or wire to help secure any heavier decorations or awkward pieces.
Optional:
You can lightly mist the wreath with a cinnamon-scented spray for a sweet seasonal aroma every time guests come by.
#18. Vibrant Red Leaf Fall Wreath
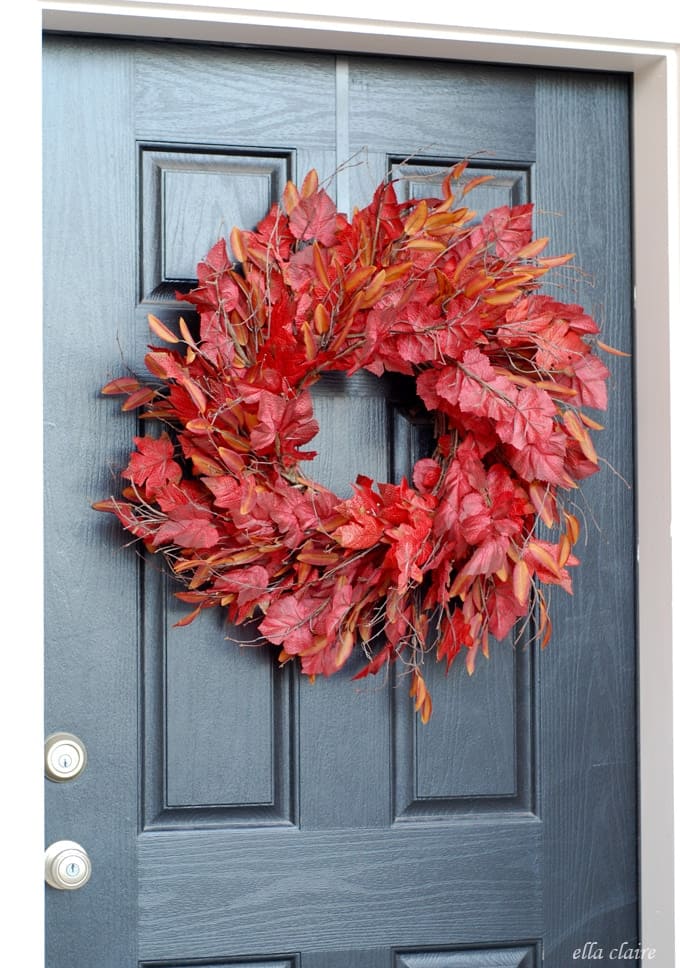
This fiery red wreath brings an instant burst of warmth and drama to your front door. Made with layered red faux leaves and accents of rust-toned foliage, it mimics the rich shades of a crisp autumn day.
Materials Needed
- 1 grapevine or foam wreath form (14″-18″)
- 40-50 artificial red leaf stems
- 15-20 small brown and burnt orange leaf sprays
- Floral wire and wire cutters
- Hot glue gun with extra glue sticks
- Ribbon or door hanger
Step-by-step Guide
Step 1: Begin by attaching your red leaf stems to the wreath form using hot glue or floral wire, covering the front and outer edges first.
Step 2: Layer in the burnt orange and brown leaf accents in between the red foliage to add texture and natural color variation.
Step 3: Fluff and bend leaves outward to create a full, lively shape. Then, you need to trim any pieces that stick out too far.
Step 4: Attach a ribbon loop or use a metal wreath hanger to hang it securely on your door.
#19. Golden Gourd and Seed Pod Wreath
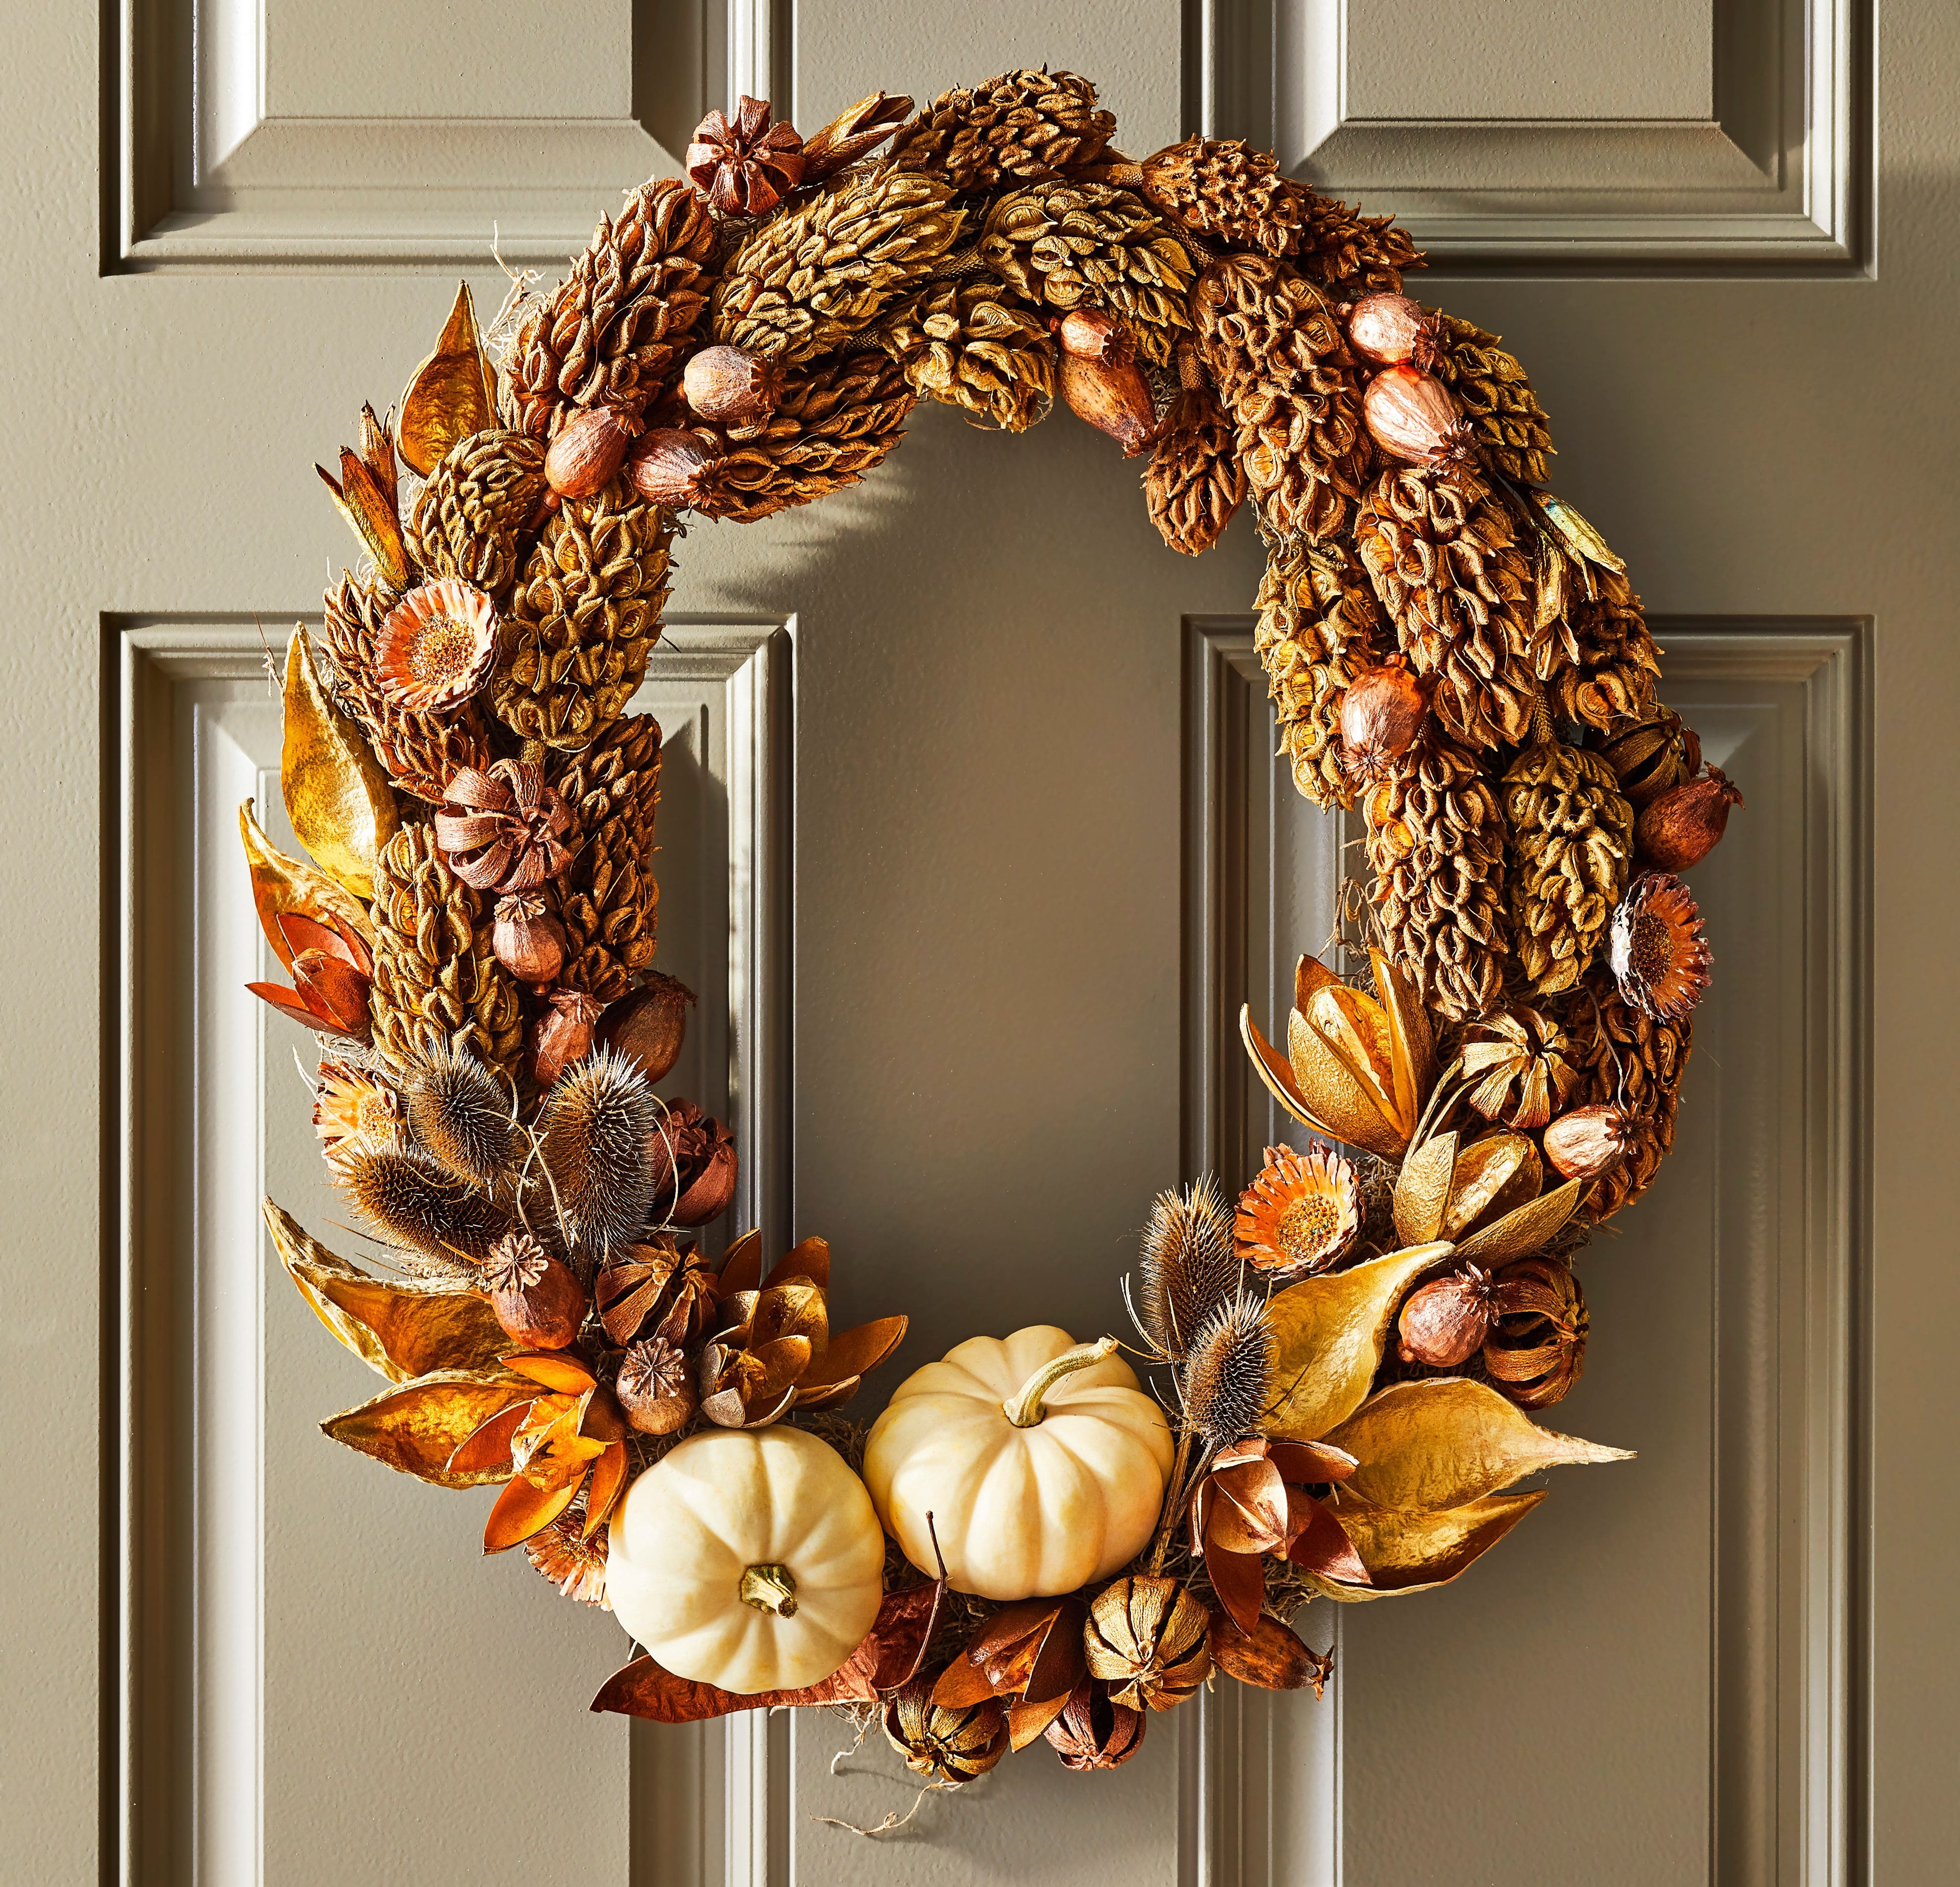
This sculptural beauty captures fall’s rugged textures and earthy warmth in one elegant statement. Richly packed with dried seed pods, golden leaves, and ornamental thistles, it forms a naturally layered base that glows in the afternoon light.
Moreover, two pale mini pumpkins anchor the bottom with a soft contrast, drawing your eye and balancing the composition. Every detail feels organic, yet intentionally placed like nature arranged it herself.
Materials Needed
- 14-16” sturdy grapevine or wire wreath form
- 20-25 assorted dried seed pods and cones (lotus, pine, milkweed, etc.)
- Rust-colored faux leaves
- 2-3 mini white pumpkins
- Hot glue gun and heavy-duty glue sticks
- Optional: floral picks
Step-by-step Guide
Step 1: Attach seed pods in clusters around the wreath form, alternating shapes and spacing for a natural look.
Step 2: Fill in gaps with metallic leaves and dried floral elements to soften the structure and add shimmer.
Step 3: Secure two small pumpkins toward the bottom off-center, using strong adhesive or floral wire.
Step 4: Rotate the wreath as you work to ensure balance and rhythm in texture.
#20. Cozy Chenille Loop Yarn Wreath
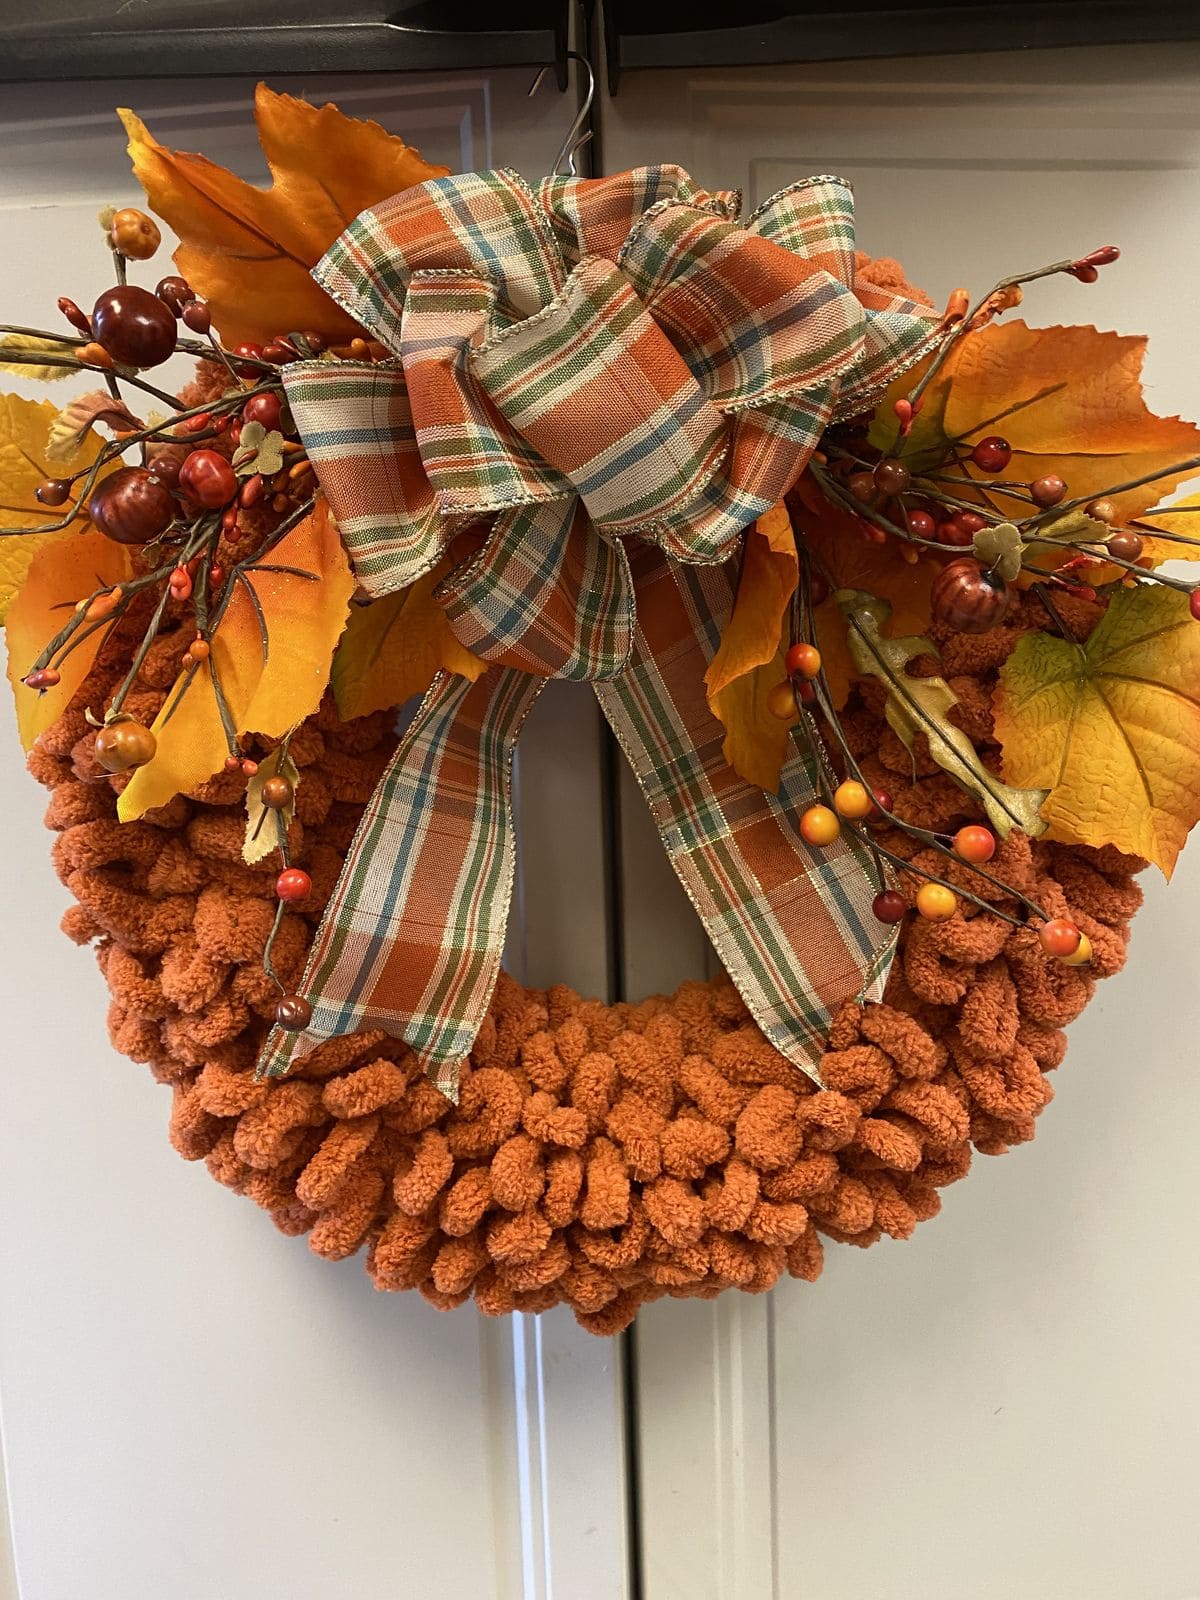
This wreath wraps your door in soft, fuzzy warmth with its plush loop yarn base and cheerful plaid bow. Bright faux maple leaves and sprigs of berries give it that unmistakable fall flair, but the real charm is the squishy texture that feels just like a favorite throw blanket.
It’s the kind of piece that makes guests smile before they even ring the bell. This one’s all about cozy comfort and easy crafting joy.
Materials Needed
- 12″ foam wreath form
- 1 skein (6-7 oz) orange loop chenille yarn
- 2-3 faux maple leaf picks with berries
- 1 wide plaid wired ribbon (about 2.5″ x 3 yards)
- Hot glue gun
Step-by-step Guide
Step 1: Wrap the chenille yarn snugly around the foam base, overlapping slightly so no white peeks through. Then secure ends with hot glue or pins.
Step 2: Tuck your leaf and berry sprays into one side of the wreath. Now, you ruff them for a natural shape, and glue in place.
Step 3: Create a large plaid bow and attach it over the picks, letting the ribbon tails cascade gently.
Step 4: Fluff the yarn loops and leaves for a full, cozy look, and hang it using a loop of ribbon or a clear door hook.
#21. Polka Dot Sunflower Wreath
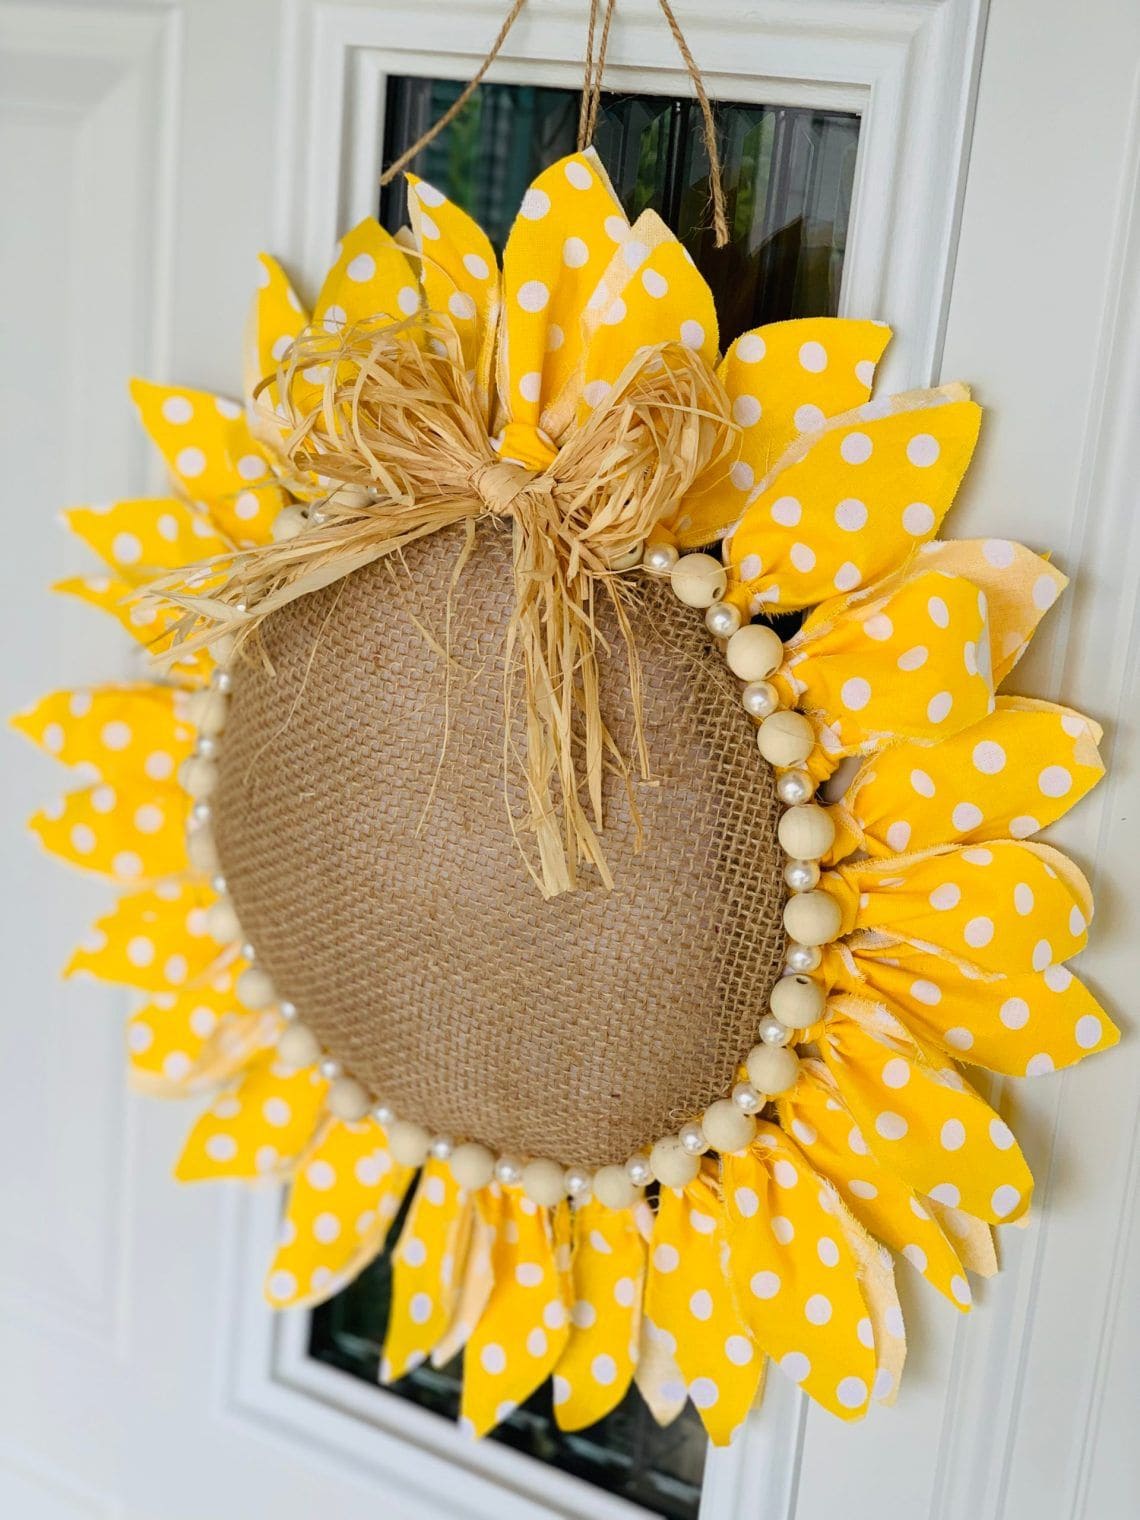
This playful wreath radiates joy with its sunny yellow petals and sweet polka dot pattern. A burlap center gives it just enough rustic charm, while the beaded trim adds a hint of polish.
Bonus, the raffia bow at the top ties everything together like a little nod to handmade tradition. It’s cheerful, warm, and full of personality like a sunflower smiling on your front porch.
Materials Needed
- Round wire wreath form
- Yellow polka dot fabric
- White wooden beads
- Natural burlap fabric
- Raffia
- Hot glue gun and scissors
Step-by-step Guide
Step 1: Cut yellow fabric into leaf-shaped petals and fold/tie each at the base. Then attach the petals around the wire form using hot glue, layering for fullness.
Step 2: Cut and glue a circle of burlap to the center, covering the form completely.
Step 3: Glue beads around the inner edge where petals meet burlap for added texture.
Step 4: Finish with a raffia bow on top and a loop for hanging.
#22. Asymmetrical Willow and Twig Pumpkin Wreath
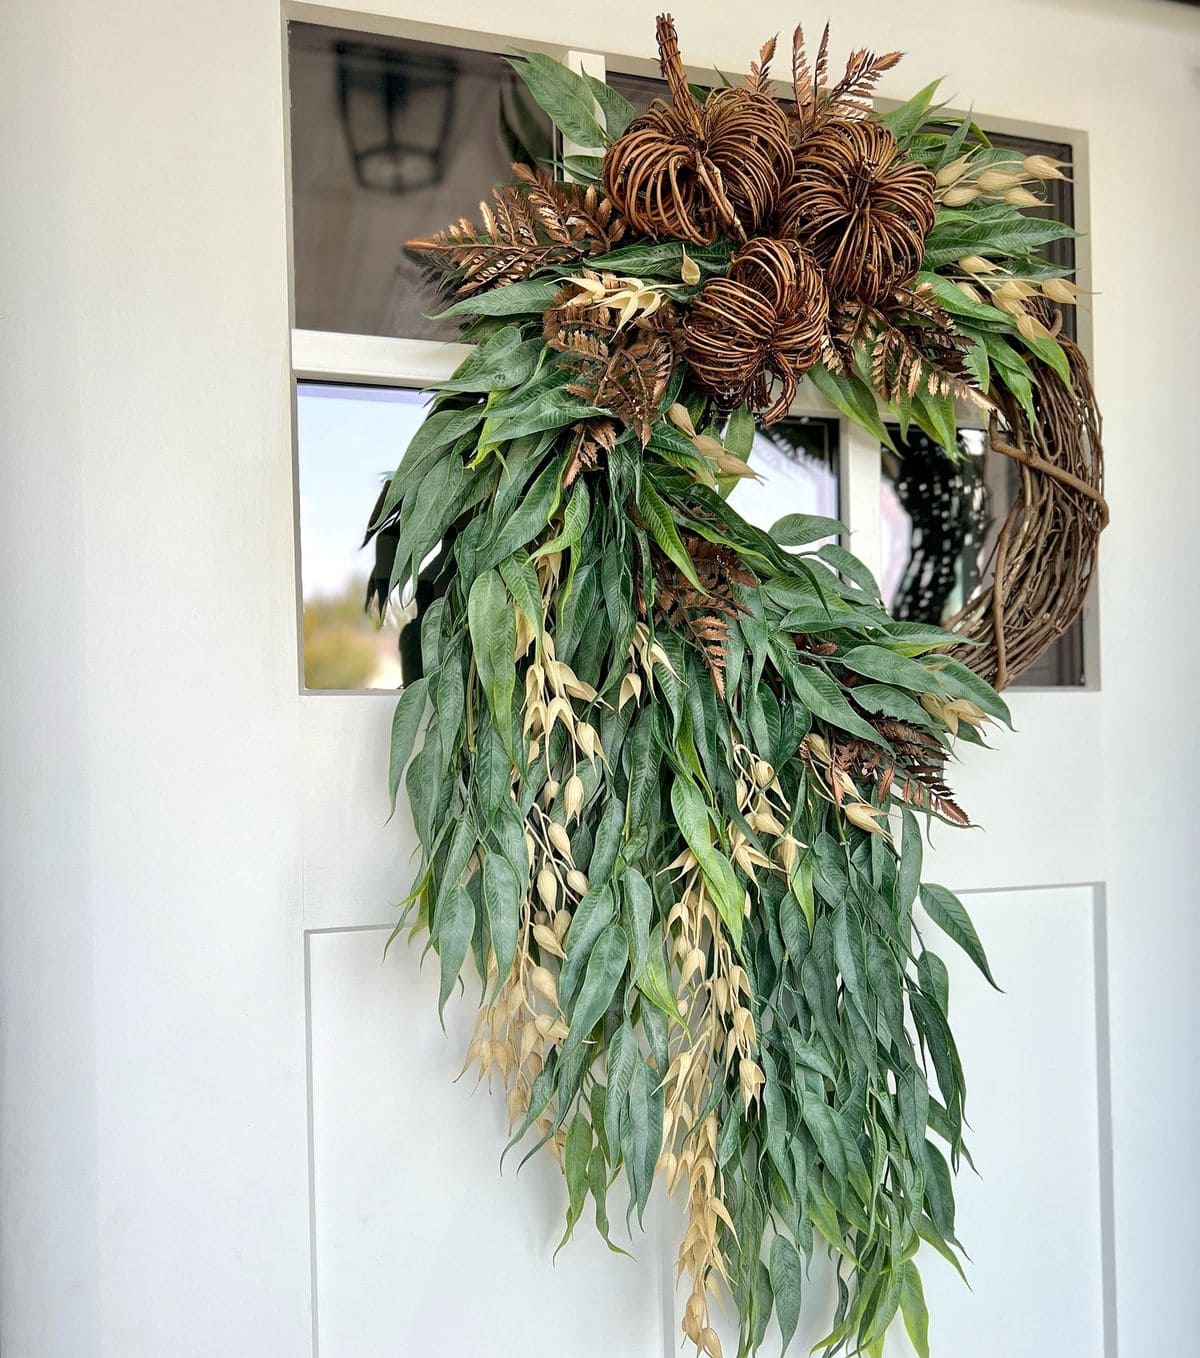
This wreath leans into natural elegance with cascading greenery and a playful cluster of twig pumpkins nestled to one side. The asymmetrical design brings movement and contrast, with long willow-like leaves draping in soft waves.
The best part is that earthy tones and rustic textures give it a grounded, organic feel that’s both stylish and seasonal. It’s bold in its simplicity, making it a standout piece for any front door or covered porch.
Materials Needed
- 18-20″ grapevine wreath base
- Faux eucalyptus
- Decorative twig pumpkins
- Preserved ferns
- Floral wire and hot glue
- Wire cutters
Step-by-step Guide
Step 1: Start with your grapevine wreath, positioning it slightly tilted to give that elegant side sweep.
Step 2: Secure long greenery stems with wire, allowing the ends to fall naturally downward in layers.
Step 3: Tuck in dried ferns and lighter accent leaves to break up the deep green and add visual texture.
Step 4: Attach 3-4 small twig pumpkins tightly together on the top curve using floral wire or hot glue.
Step 5: Now you fluff and adjust the greens for fullness and balance, then hang using a sturdy hook or ribbon.